Technical details cover both the backend architecture and client-side technology, ensuring secure and efficient access to content. The documentation includes
guidelines for installation, user management, API access, and troubleshooting, along with updates on new features and maintenance.
Flutter
3.35.0
Dart
3.4.0
Java / OpenJDK
17.0.11
Android SDK
34.0.0
Xcode
26.0.1
VSCode
1.91.1+
Laravel
10.23.1
PHP
8.2
MySQL
8.0.39
Apache
2.4.52
phpMyAdmin
5.2.1
OS : Ubuntu Linux
22.04.1
Using the specified versions of the various technologies ensures that our project remains compatible, stable, and performant. Each version listed has been carefully
chosen to leverage the latest features, security updates, and optimizations specific to that version.
Setup Admin Panel
This section will guide you through setting up the admin panel for your Backand application.
Pre Required Tool & Environment
Before setting up the Admin Panel, make sure you have the following tools and environment ready:
Server
VPS (Virtual Private Server)
Shared Hosting
I recommend using a VPS for better performance and control over your environment.
Linux OS (Recommended)
50 GB Storage (Minimum)
4 GB RAM (Minimum)
100 GB SSD (Preferred)
Web Server
Apache
Make sure you have Apache web server Installed. If not, run the following Command in your terminal:
Begin by updating the local package index to reflect the latest upstream changes:
sudo apt update
Then, install the apache2 package:
sudo apt install apache2
After confirming the installation, apt will install Apache and all required dependencies.
At the end of the installation process, Ubuntu starts Apache. The web server will already be up and running.
Make sure the service is active by running the command for the systemd init system:
sudo systemctl status apache2
Expected output:
                                                    ● apache2.service - The Apache HTTP Server
                                                    Loaded: loaded (/lib/systemd/system/apache2.service; enabled; vendor prese)
                                                    Active: active (running) since Tue 2022-04-26 15:33:21 UTC; 43s ago
                                                        Docs: https://httpd.apache.org/docs/2.4/
                                                    Main PID: 5089 (apache2)
                                                        Tasks: 55 (limit: 1119)
                                                        Memory: 4.8M
                                                        CPU: 33ms
                                                    CGroup: /system.slice/apache2.service
                                                        ├─5089 /usr/sbin/apache2 -k start
                                                        ├─5091 /usr/sbin/apache2 -k start
                                                        └─5092 /usr/sbin/apache2 -k start
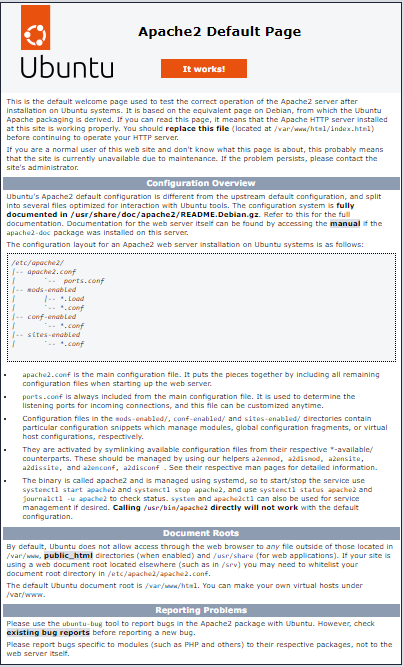
As confirmed by this output, the service has Started Successfully. The best way to test this is to request a page from Apache.
You can access the default Apache landing page to confirm that the software is running properly through your IP address.
When you have your server’s IP address, enter it into your browser’s address bar:
http://your_server_ip
You will see the default Ubuntu Apache web page as shown below:
Database
MySQL
phpMyAdmin
MySQL
MySQL is an open-source relational database management system. It is essential for managing the data for your application.
Make sure you have MySQL installed on your server. You can install it using the following command:
Step 1 - Install MySQL
Install MySQL on your server using the APT package repository:
Update the package index:
sudo apt update
Install the MySQL server package:
sudo apt install mysql-server
Start the MySQL service:
sudo systemctl start mysql.service
Step 2 - Configuring MySQL
Run the MySQL secure installation script:
Open the MySQL prompt:
sudo mysql
Change the root user’s authentication method:
ALTER USER 'root'@'localhost' IDENTIFIED WITH mysql_native_password BY 'password';
Replace 'password' with a strong password of your choice.
Exit the MySQL prompt:
exit
Run the security script:
sudo mysql_secure_installation
Follow the prompts to secure your MySQL installation.
Step 3 - Testing MySQL
Check MySQL status to ensure it is running:
systemctl status mysql.service
Expected output:
                                                    ● mysql.service - MySQL Community Server
                                                      Loaded: loaded (/lib/systemd/system/mysql.service; enabled; vendor preset: enabled)
                                                      Active: active (running) since Mon 2022-04-11 16:04:39 UTC; 2h 36min ago
                                                     Process: 2593 ExecStartPre=/usr/share/mysql/mysql-systemd-start pre (code=exited, status=0/SUCCESS)
                                                    Main PID: 2601 (mysqld)
                                                      Status: "Server is operational"
                                                       Tasks: 38 (limit: 1119)
                                                      Memory: 354.3M
                                                         CPU: 19.944s
                                                      CGroup: /system.slice/mysql.service
                                                              └─2601 /usr/sbin/mysqld
If MySQL isn't running, you can start it with the following command:
sudo systemctl start mysql
This command will initiate the MySQL service on your system.
phpMyAdmin
Learn how to install and configure phpMyAdmin on your server, simplifying the management of your MySQL Databases with a user-friendly web interface.
Now, you need to configure the webserver to serve phpMyAdmin on the network.
First, create an Apache configuration file for phpMyAdmin and edit it in a text editor:
sudo vim /etc/apache2/conf-available/phpmyadmin.conf
Next, add the following content to the file:
                                                            Alias /phpmyadmin /usr/share/phpmyadmin
                                                            Alias /phpMyAdmin /usr/share/phpmyadmin

                                                            <Directory /usr/share/phpmyadmin/>
                                                                AddDefaultCharset UTF-8
                                                                <IfModule mod_authz_core.c>
                                                                    <RequireAny>
                                                                        Require all granted
                                                                    </RequireAny>
                                                                </IfModule>
                                                            </Directory>

                                                            <Directory /usr/share/phpmyadmin/setup/>
                                                                <IfModule mod_authz_core.c>
                                                                    <RequireAny>
                                                                        Require all granted
                                                                    </RequireAny>
                                                                </IfModule>
                                                            </Directory>
Save your File. Press ESC key to switch to command mode. Then type :wq (colon + w + q) and hit Enter button.
After making all the changes, make sure to start the Apache service to reload all settings:
                                                            <Directory /var/www/>
                                                                Options Indexes FollowSymLinks
                                                                AllowOverride All
                                                                Require all granted
                                                            </Directory>
Once done, close the file.
After executing the command, restart Apache:
                                                            sudo apt-get install libapache2-mod-php
                                                            sudo service apache2 restart
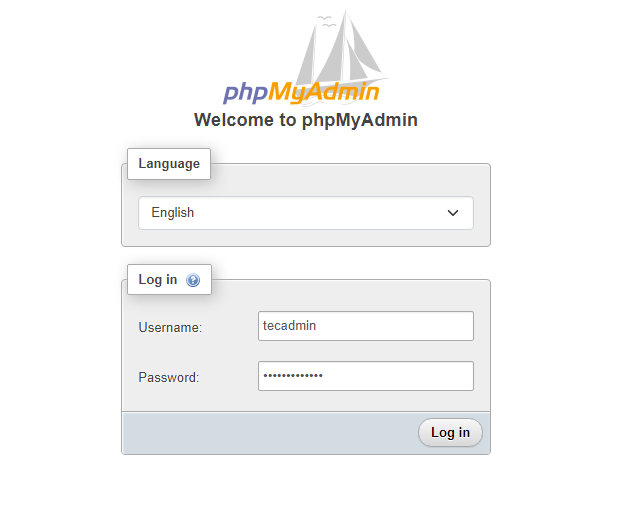
Step 4 - Access phpMyAdmin
Setup Complete! You've Successfully configured phpMyAdmin on your system. Now, to access phpMyAdmin, use the following URL:
http://your-server-ip-domain/phpmyadmin
Replace "your-server-ip-domain" with either "localhost" for local machines or your system's IP address for remote machines.
If you've updated your DNS and pointed it to your server's IP address, you can use the domain name instead.
Sign in using the Username and Password you use to access MySQL via the command line:
Programming Language
PHP (Hypertext Preprocessor)
Laravel (The PHP Framework)
Ensure PHP is Installed on your server. If not, run the following Command in your terminal:
Update the local package index to reflect the latest changes:
Admin panel is built using Laravel Framework 10.0 so you need PHP version upto 8.1.0 or higher version installed on your server.
How to Deploy Admin Panel code on a server :
VPS (Virtual Private Server)
Upload the Zip File to Your Server
■ Connect to your VPS using an FTP client or SSH.
■ Upload the zip file containing your Admin Panel code to the server.
Move the File to the Appropriate Directory
■ Navigate to the directory where you uploaded the file.
■ Move the zip file to the /var/www/html/ directory using the command:
mv your-file.zip /var/www/html/
Unzip the File
■ Unzip the file using the following command:
unzip your-file.zip
Rename the Folder
■ Rename the unzipped folder to admin:
mv your-unzipped-folder admin
Visit Your Domain
■ Navigate to your domain URL. You should see the installation wizard. Follow the instructions to complete the setup.
Shared Hosting
Log in to cPanel
■ Access your hosting account and log in to cPanel.
Open the File Manager
■ Go to the File Manager in cPanel.
Navigate to the public_html Directory
■ Navigate to the public_html directory where your web files are hosted.
Upload the Zip File
■ Upload the zip file containing your Admin Panel code to the public_html directory.
Extract the Zip File
■ Right-click the uploaded zip file and choose "Extract" to unzip the contents.
Rename the Folder
■ Rename the extracted folder to admin.
Visit Your Domain
■ Navigate to your domain URL. You should see the installation screen. Follow the instructions to complete the setup.
How to Build Database on server :
VPS (Virtual Private Server)
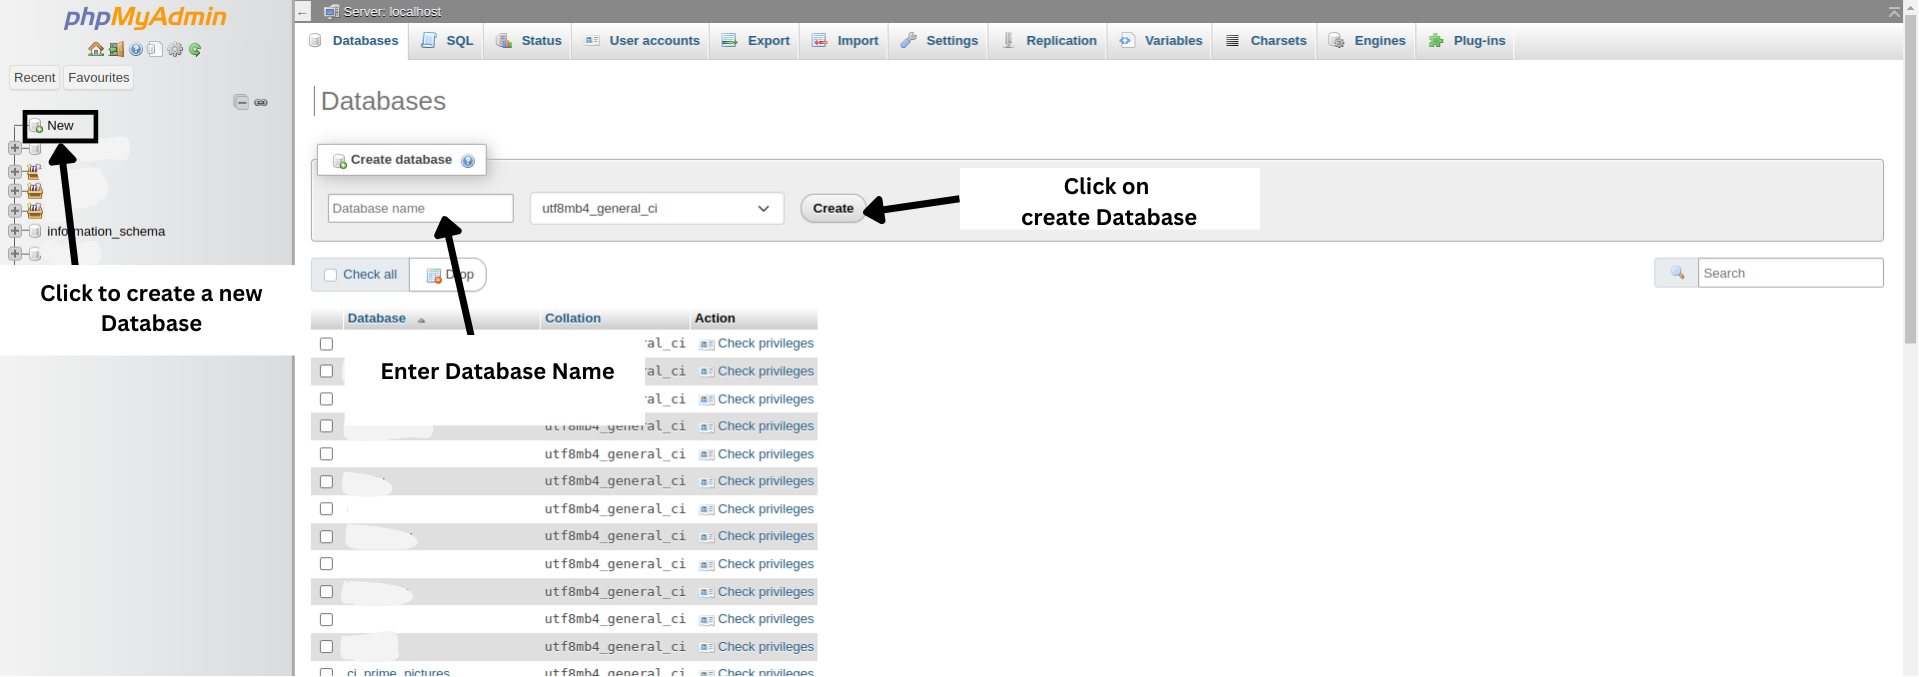
Access phpMyAdmin
■ Once phpMyAdmin is installed and configured, access it by entering its URL in your web browser.
Typically, you can access it using:
http://your_server_ip/phpmyadmin
Login
■ You'll be prompted to log in to phpMyAdmin.
Use the MySQL root Username and Password for authentication.
Create a Database
■ Use the phpMyAdmin dashboard to create a new database.
You can navigate to the "Database" section and click on the "New database" button.
Then, provide a name for your new database and click on the "Create" button.
Database Created
■ Now, Database is created Successfully.
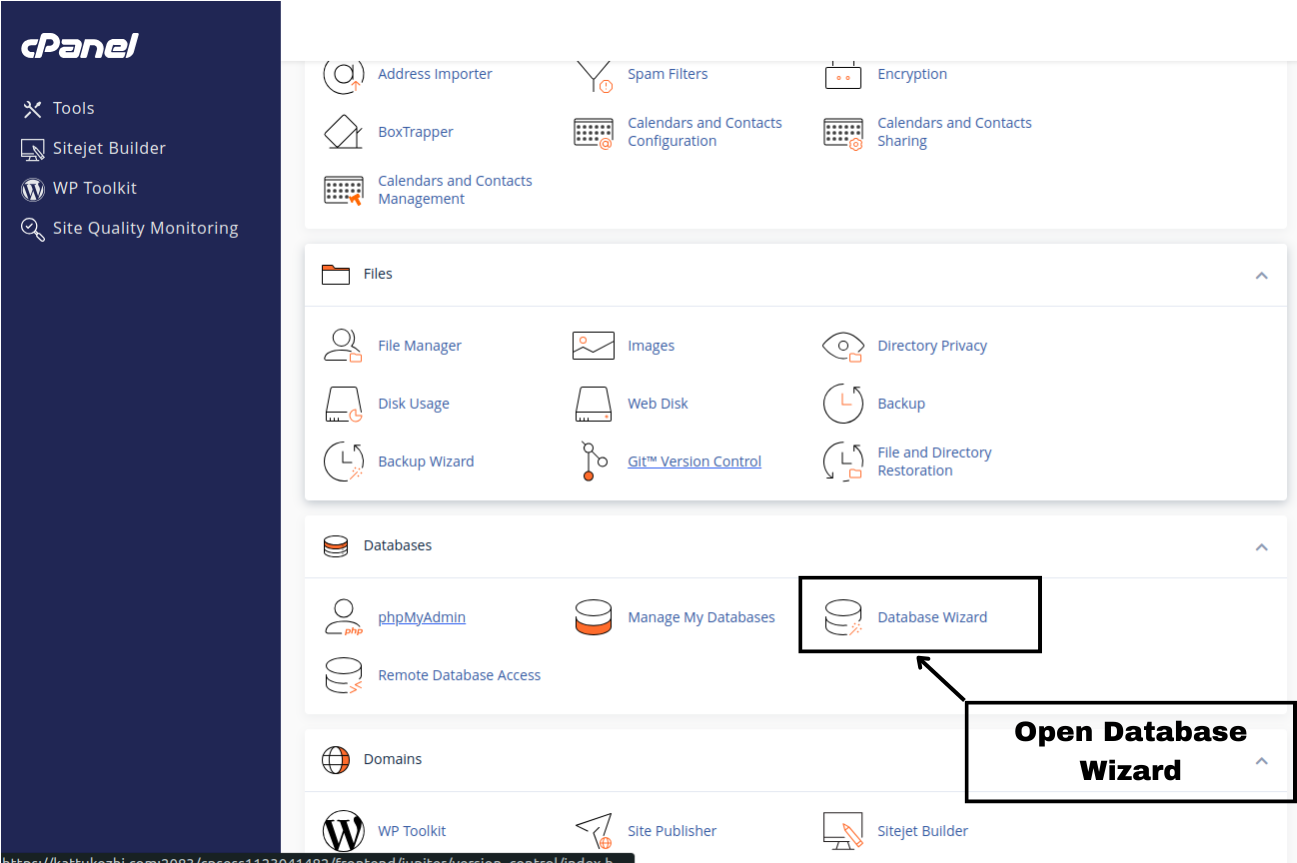
Shared Hosting
Access cPanel
■ Log in to your shared hosting account's cPanel dashboard.
Locate MySQL Databases
■ In the cPanel dashboard, find and click on the "MySQL Databases" icon or link.
Create Database
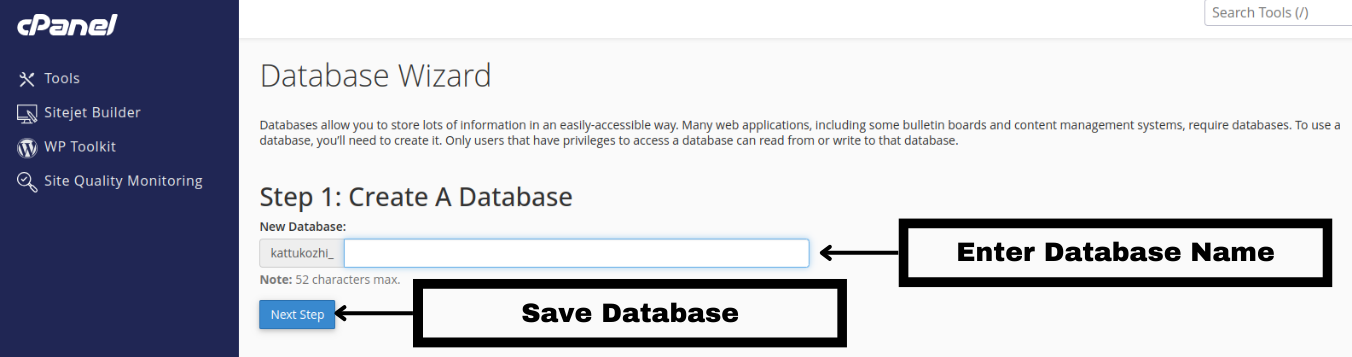
■ Under the "Create New Database" section, enter a name for your new database and click the "Create Database" button.
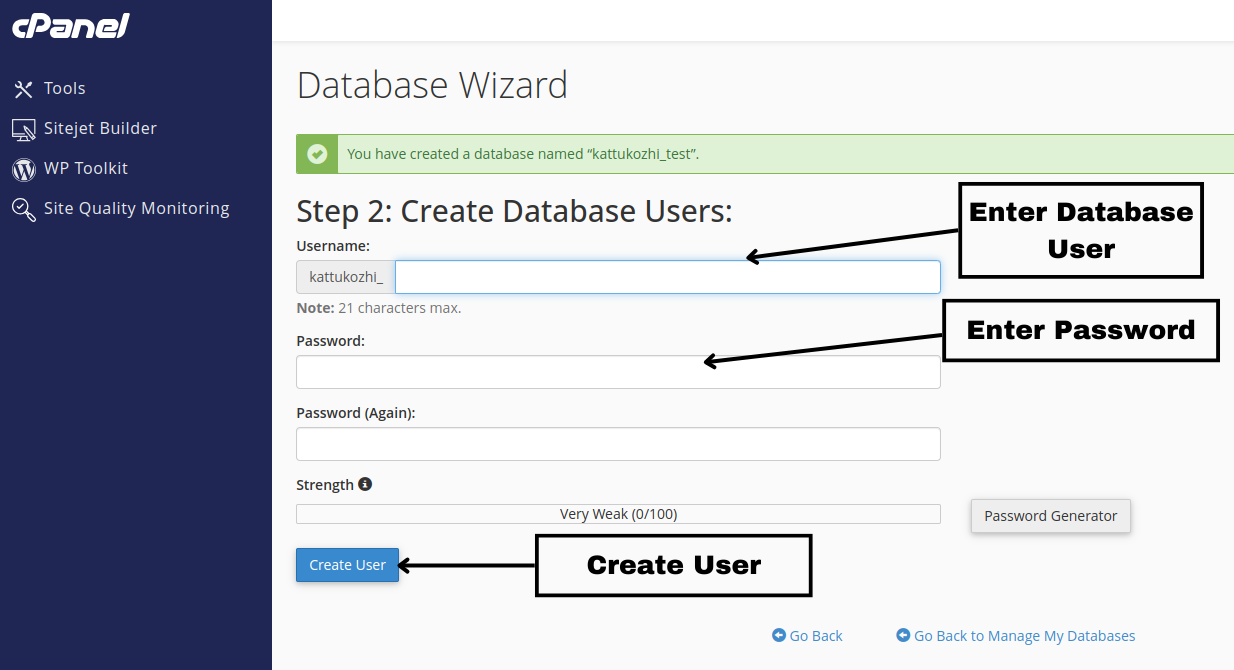
Create Database User
■ Scroll down to the "MySQL Users" section, provide a Username and Password for your
new MySQL user, and click the "Create User" button.
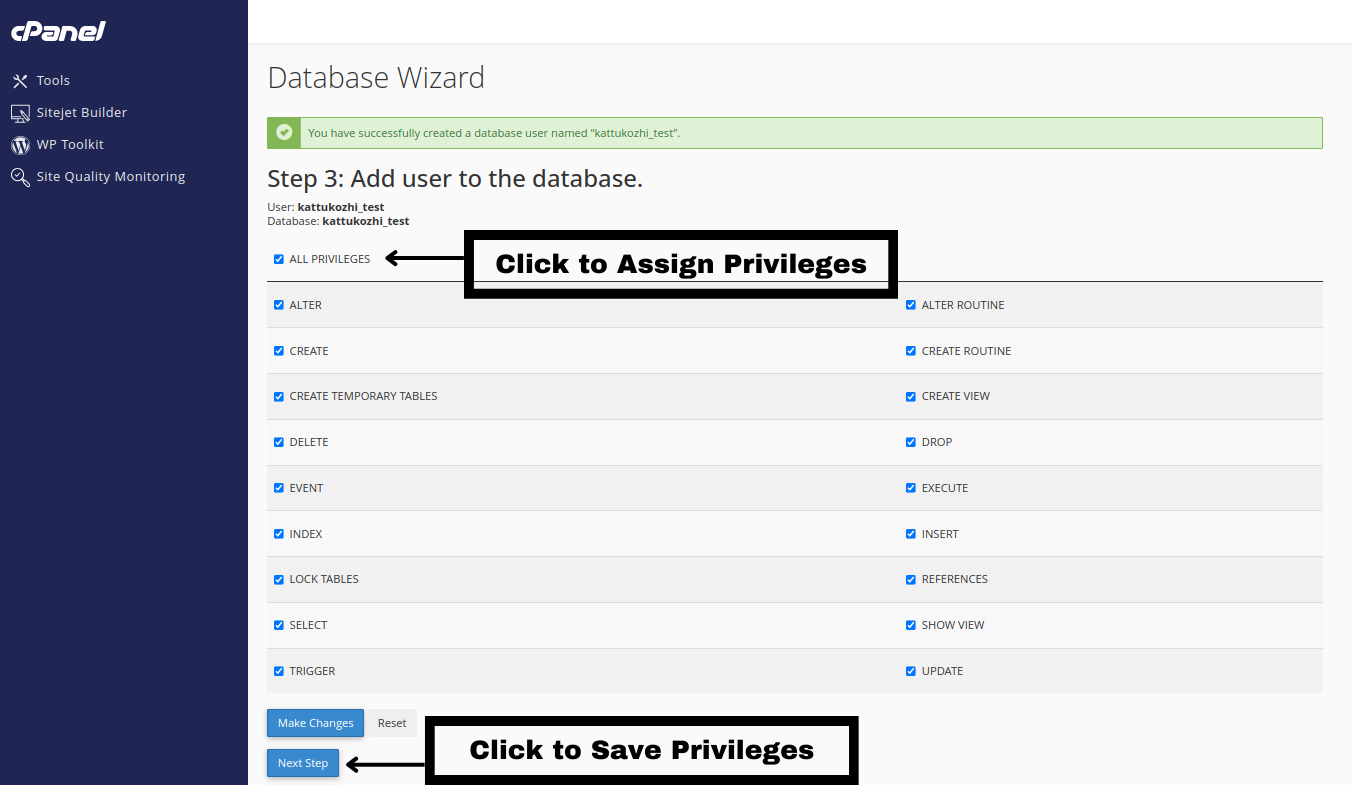
Assign Privileges
■ On the following screen, select "All Privileges" and then click the "Make Changes" button.
Confirmation
■ You should receive a confirmation message indicating that the user has been successfully added to the database with all privileges.
Database Created
■ Now, Database & User are created Successfully.
Installation Steps
Installation Screen
■ Follow the on-screen instructions to begin the installation process.
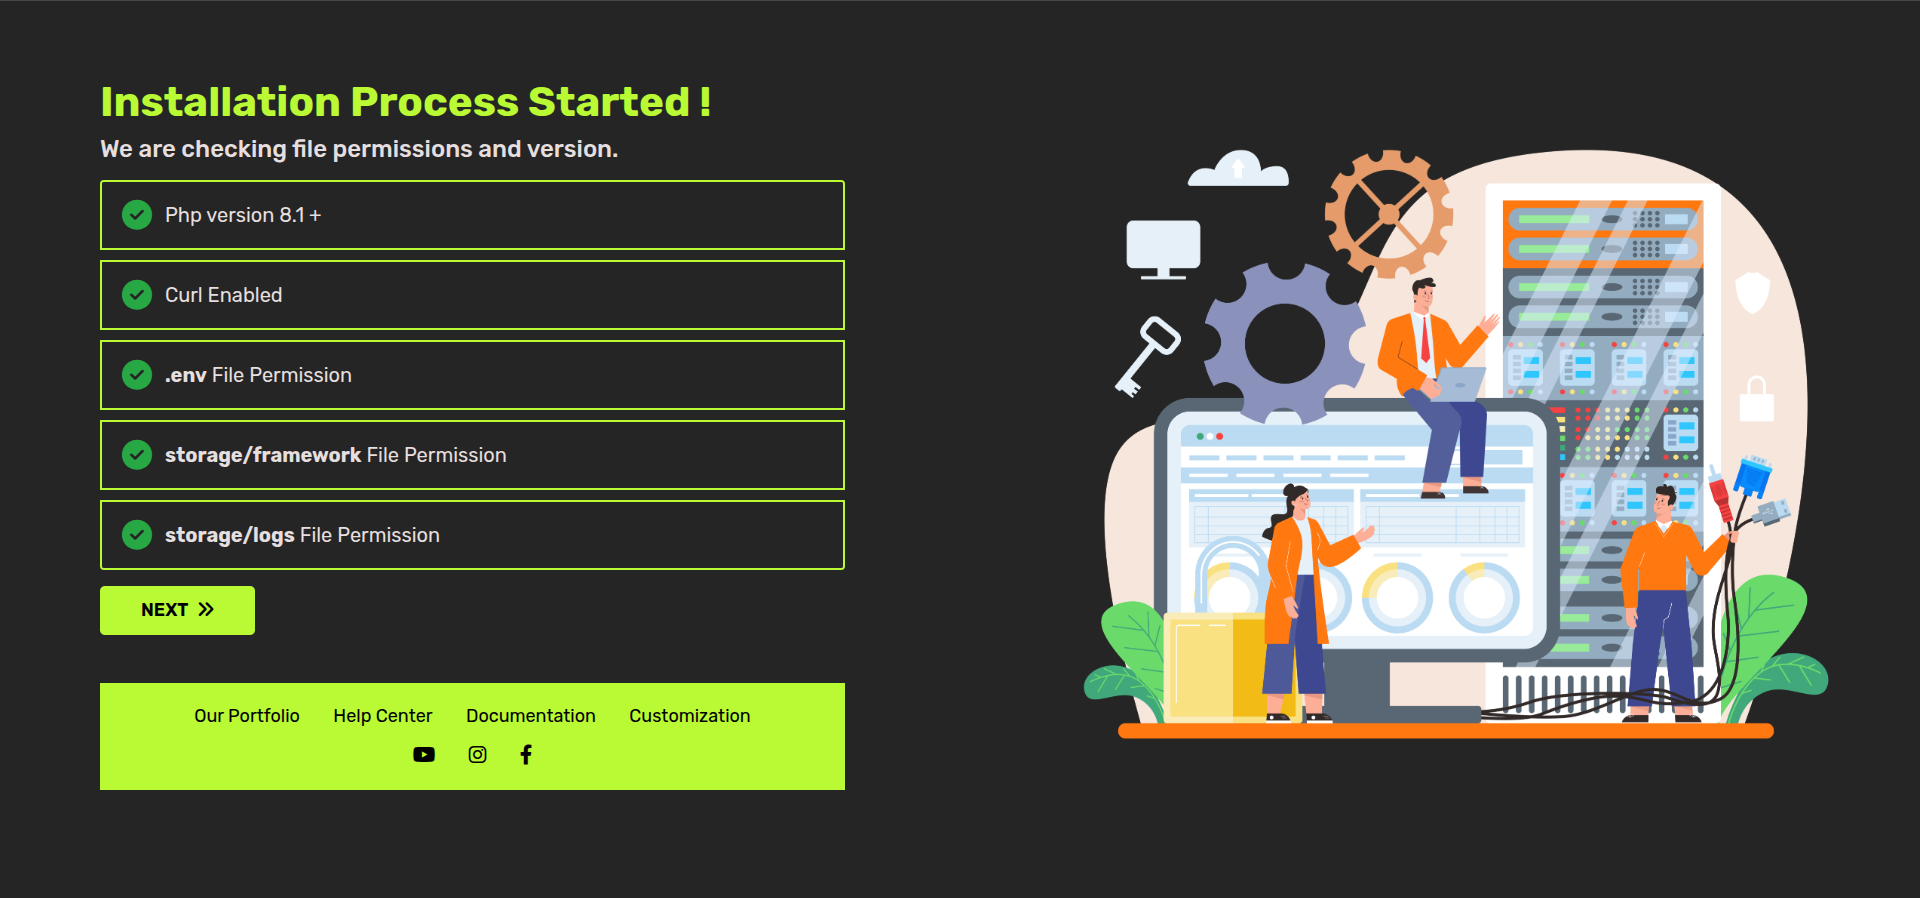
Server Requirements & File Permissions
■ If the PHP version is Lower than 8.1 or any required extension is not installed, it
will be highlighted in Red. Ensure that your server meets all these requirements and that the specified folders have
Read & Write Permissions before proceeding with the installation.
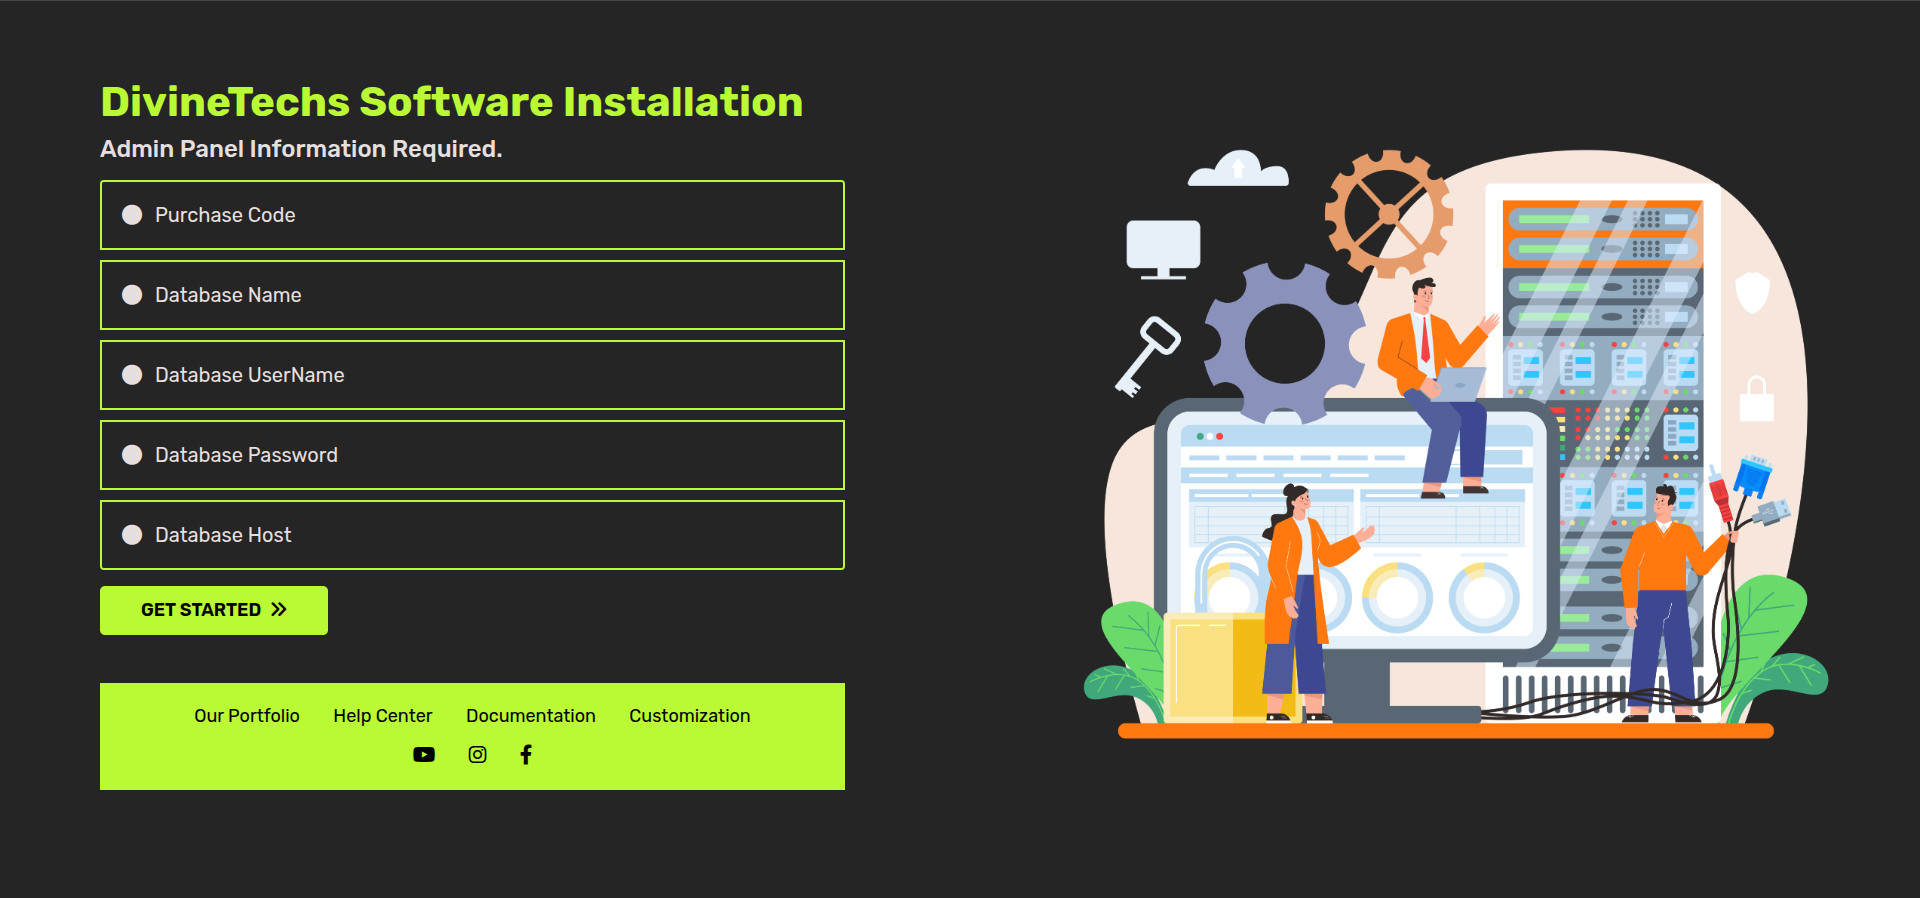
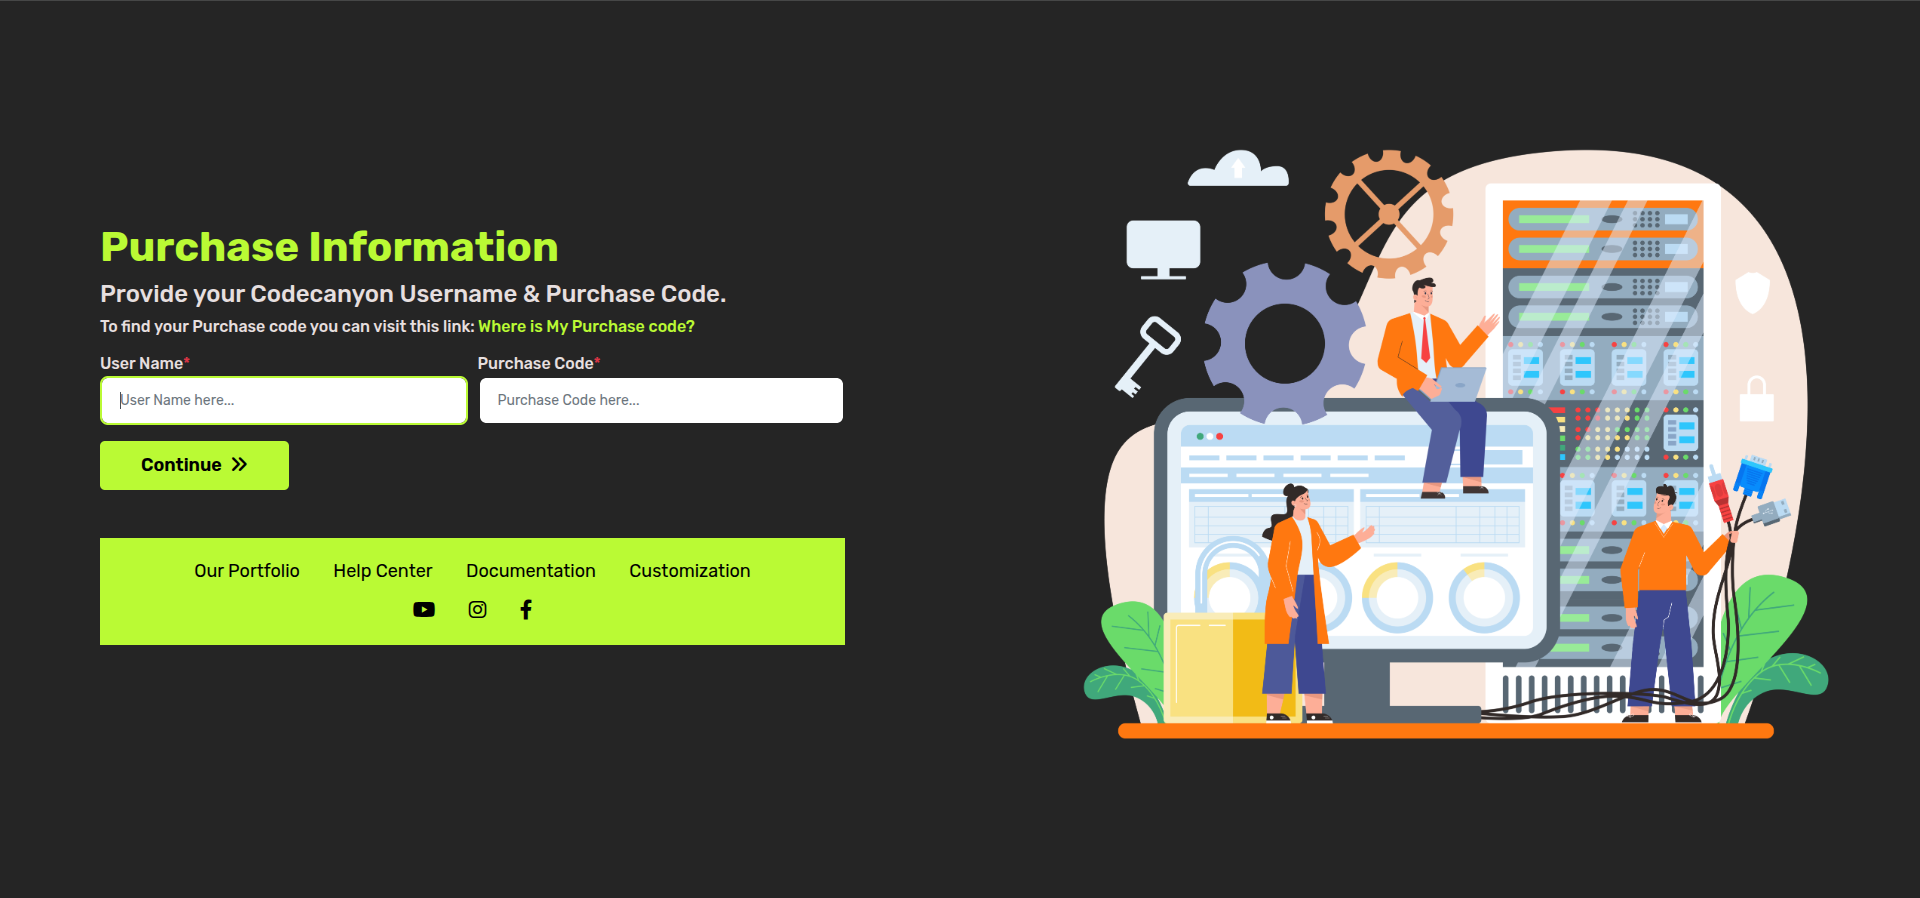
Purchase Code Validation
■ Here, you will need to insert the purchase code obtained from CodeCanyon to authenticate
your purchase and authorize your server to access the services.
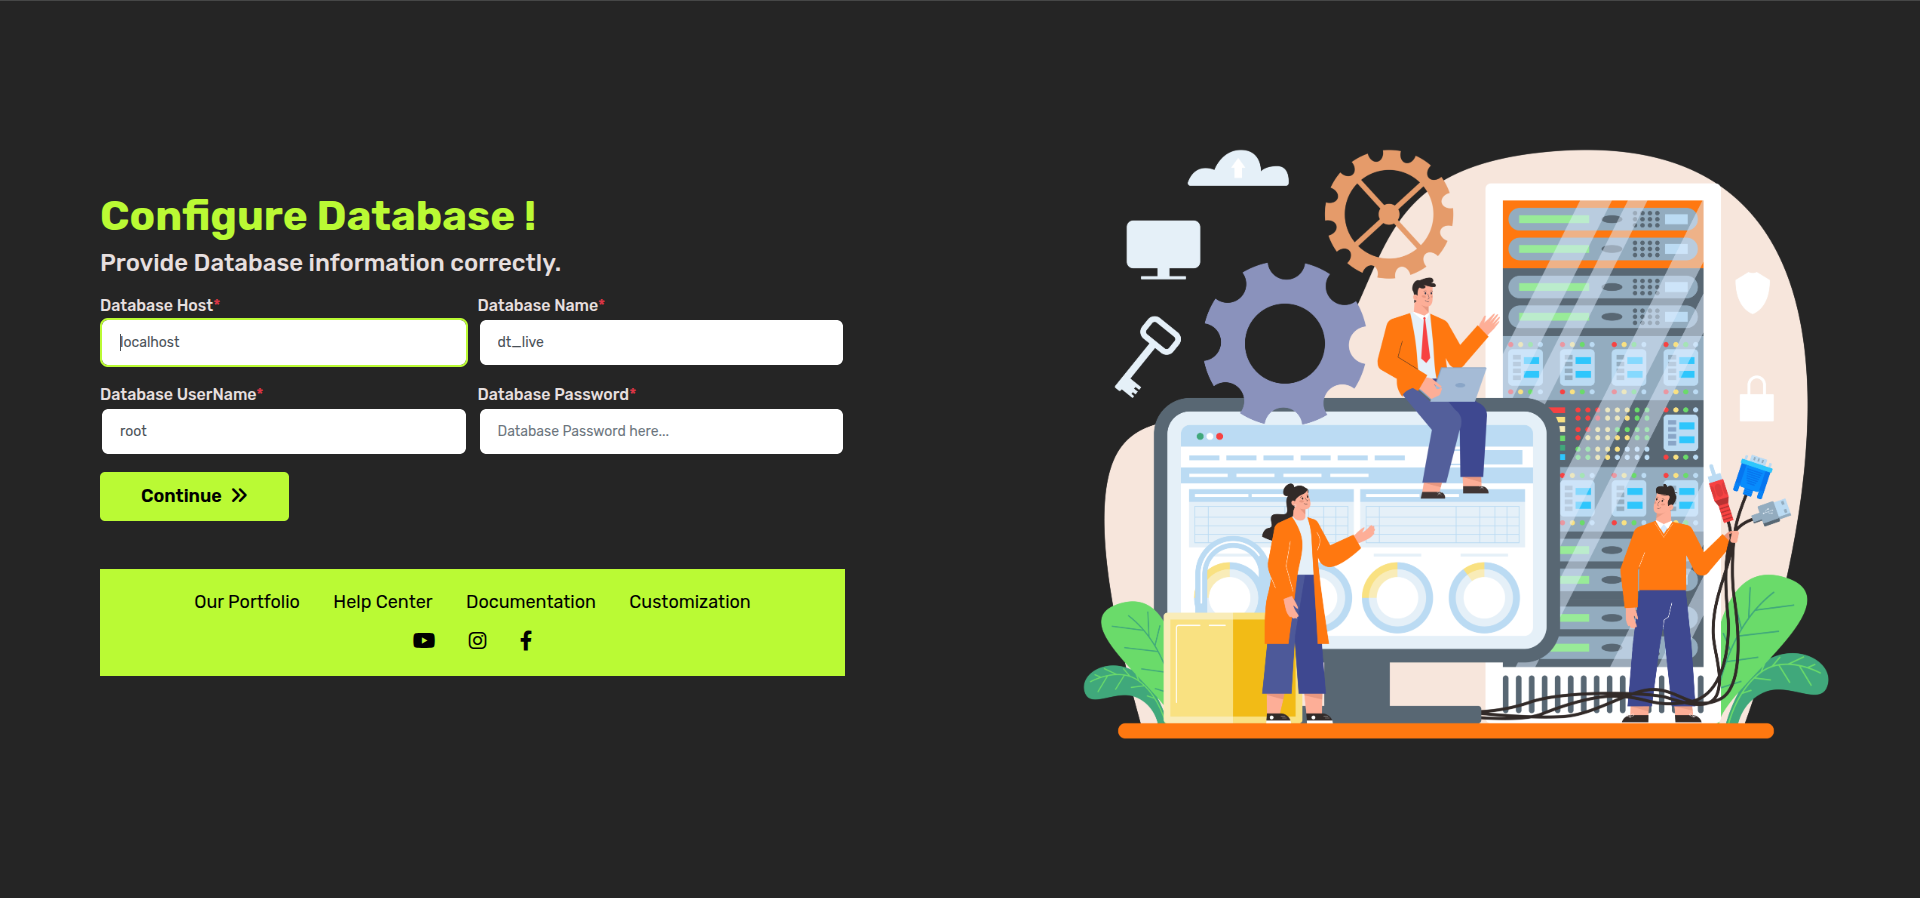
■ In this step, you need to provide the database connection details to configure your database properly.
Enter the following information:
● Database Host: The hostname of your database server (e.g., 'localhost').
● Database Name: The name of your database.
● Database User: The username for your database.
● Database Password: The password associated with the database user.
■ Once all details are entered, click on the "Continue" button to verify the database connection.
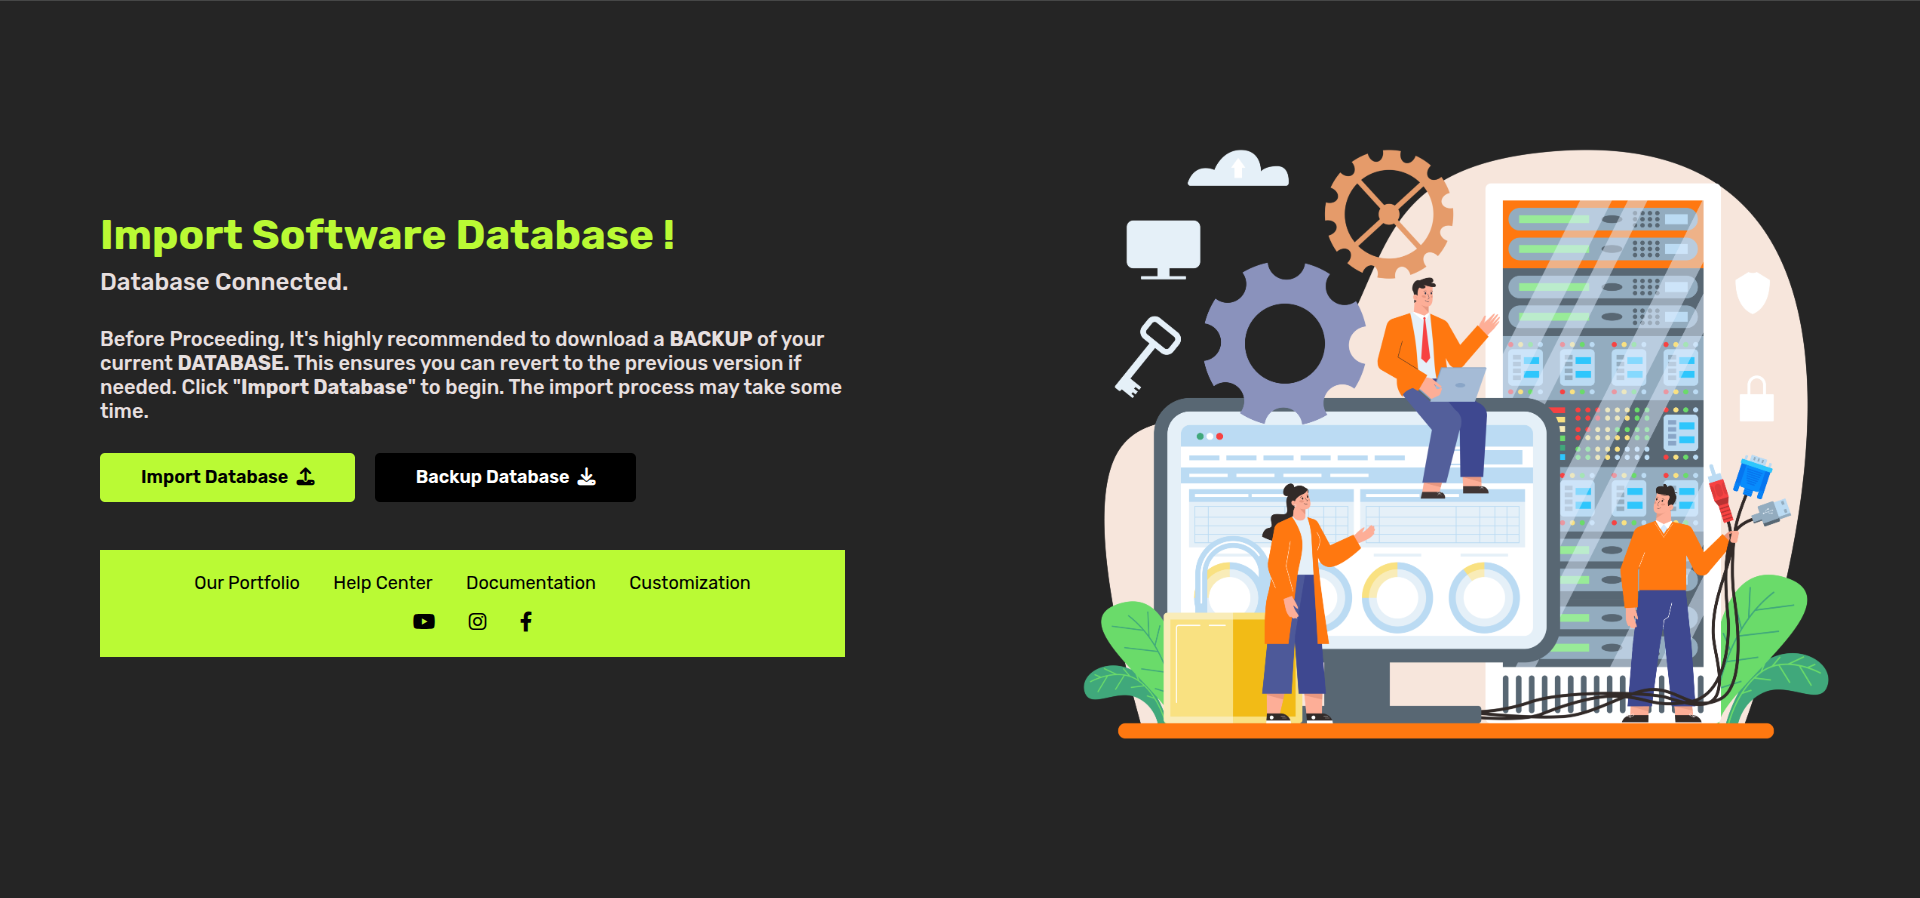
Import Database or Backup Existing Database
■ If you have an existing database, it’s recommended to back it up before proceeding. If this is a new installation, follow these steps to import the new database:
● Backup Existing Database: Create a backup of your current database to ensure no data is lost.
● Import New Database: For a new installation, click the "Import Database" button to load the required schema and data.
■ Ensure you have completed this step to set up the database correctly before moving forward.
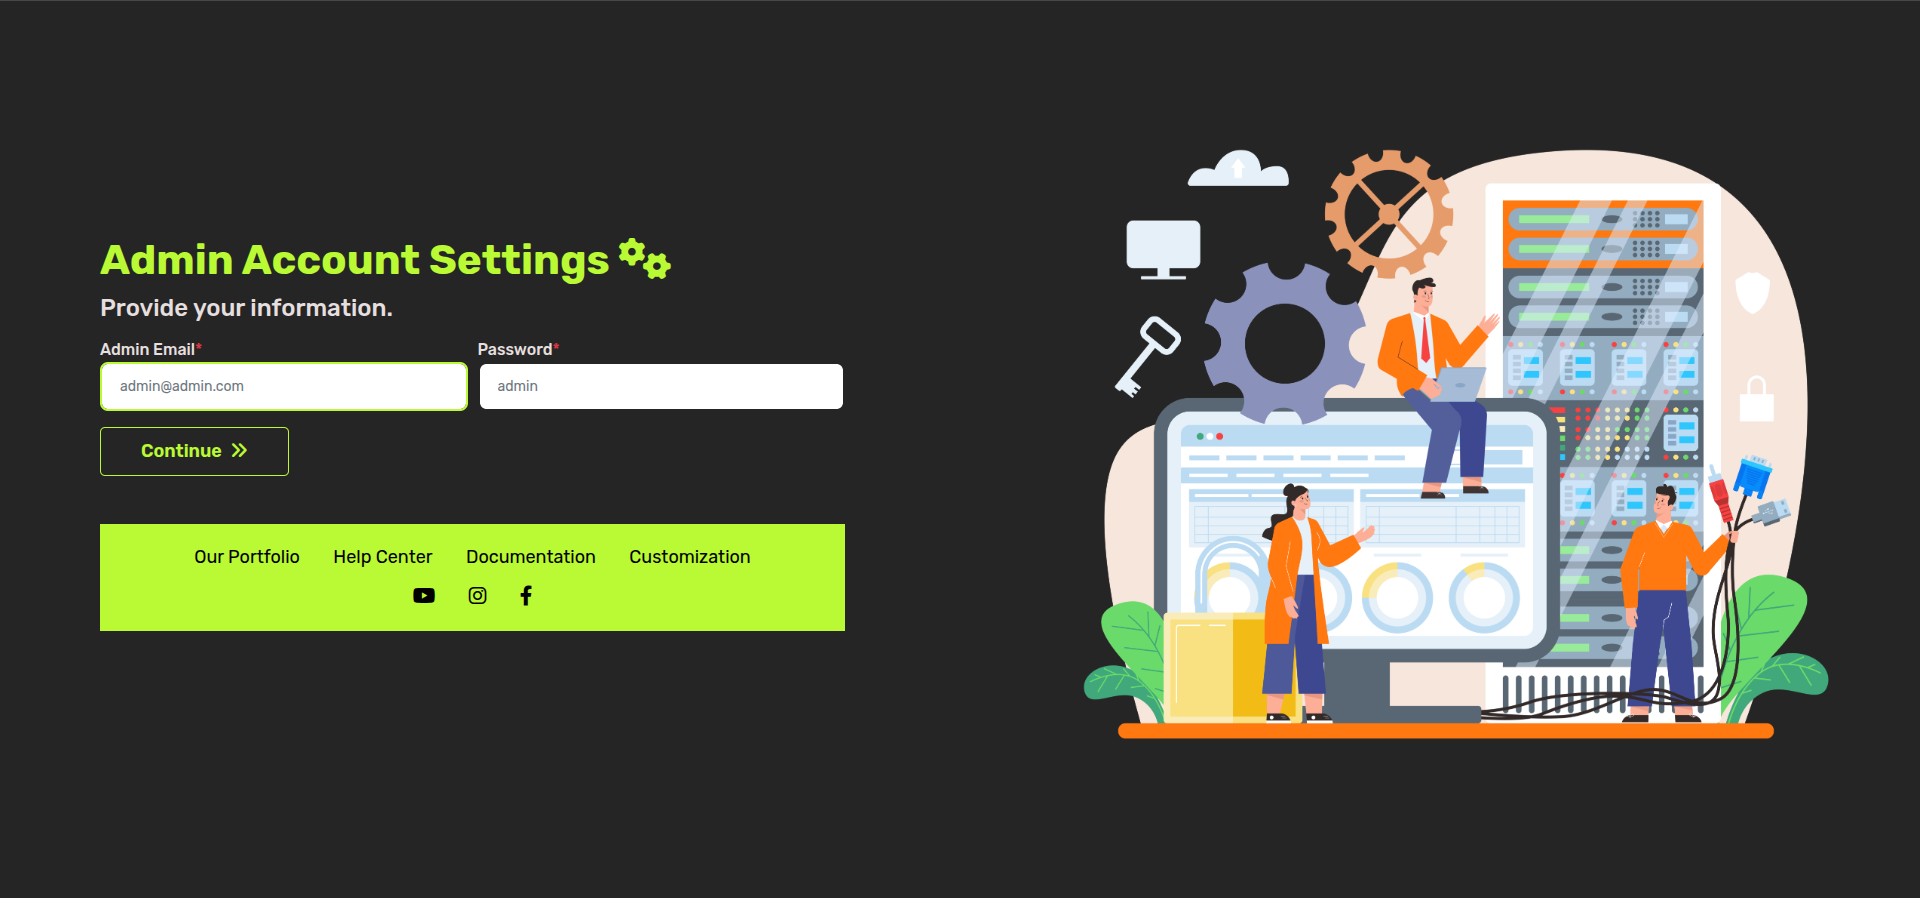
Admin Account Setup
■ To manage your application, you need to create an admin account. Enter the following details:
● Admin Email: Provide a valid email address for the admin account.
● Admin Password: Choose a secure password for the admin account.
■ Once you have entered these details, click "Continue" to proceed.
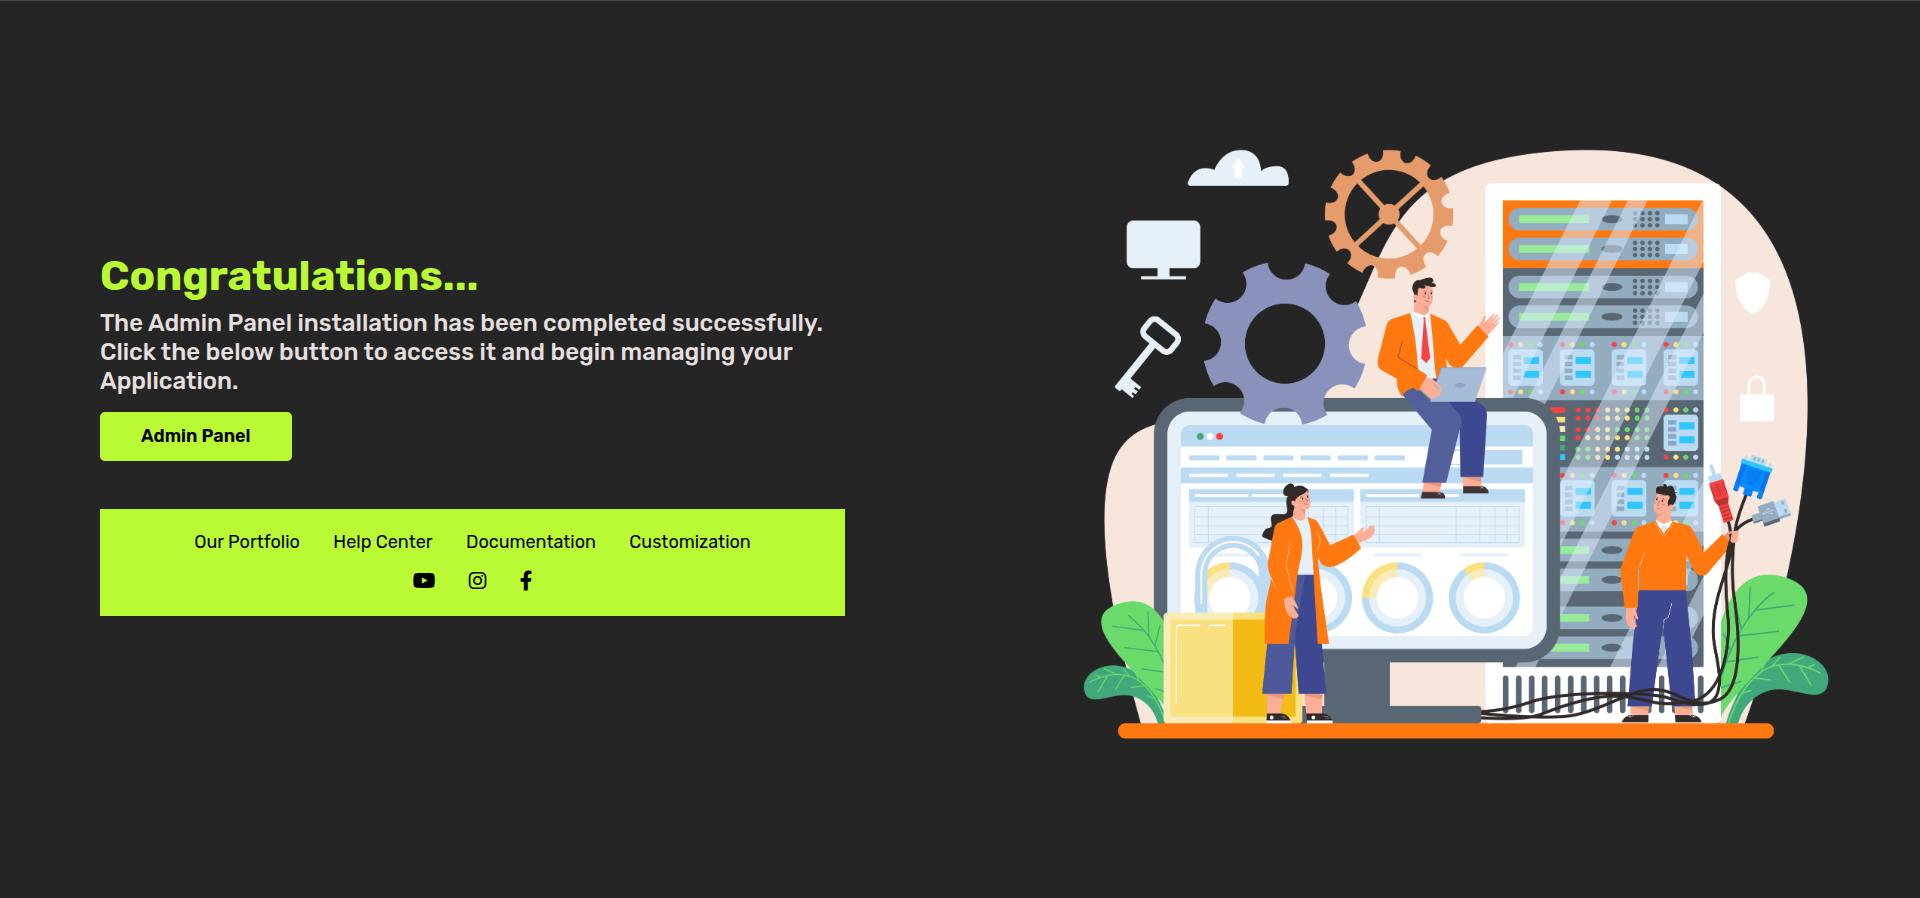
Complete Admin Panel Installation
■ The installation process is now complete. You can access the admin panel using the credentials you created.
● Completion Screen: You will see a confirmation screen indicating that the installation is successful.
● Access Admin Panel: Click on the "Admin Panel" button or navigate to the admin panel URL in your browser.
■ Congratulations! Your application is now installed and ready for use.
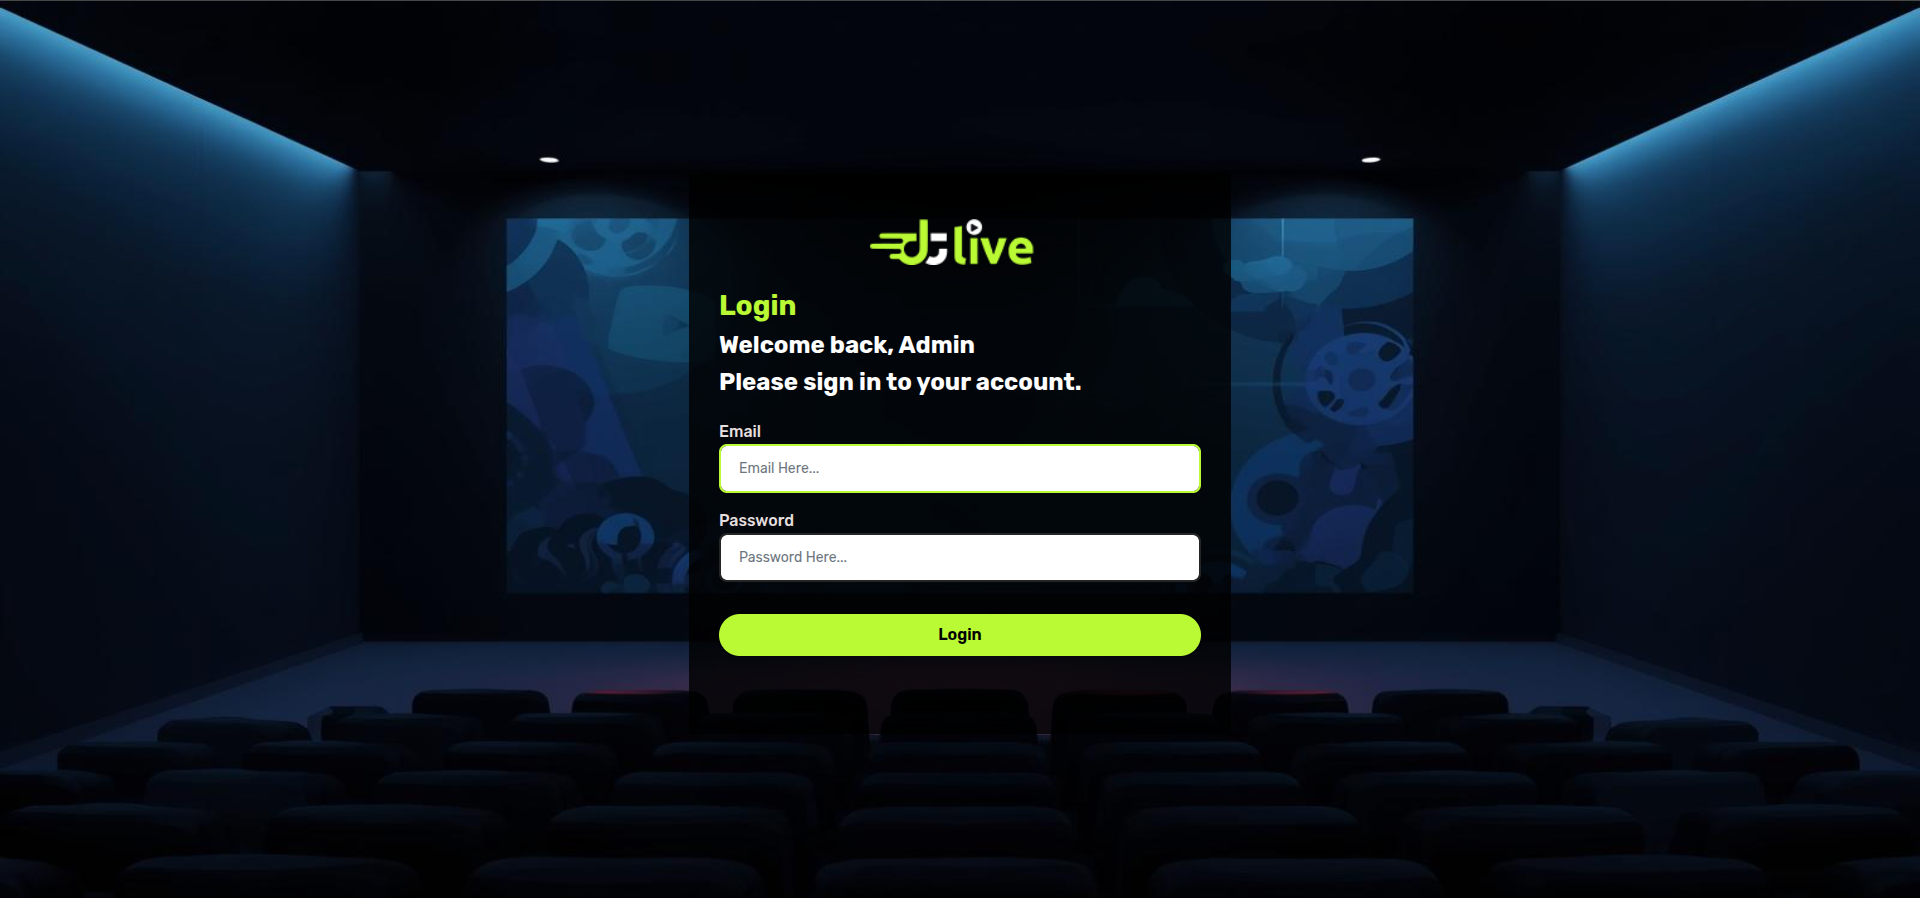
Admin Panel Login
■ The final step involves logging into the admin panel to start managing your application:
● Admin Login Page: You will be presented with the admin login page (as shown below).
● Enter Admin Credentials: Use the admin email and password you set up during the installation process to log in.
■ Once logged in, you can start configuring and managing your application from the admin panel.
Admin Panel Configuration
This section provides detailed instructions on configuring the admin panel for your Backand application.
How to Manage Types
The Type module allows you to create and manage content categories such as Movies, TV Shows, Live TV, Kids Content, and more. These Types are used across App, Web, and TV platforms.
Step 1 : Login Admin Panel
Step 2 : Go to Types in Sidebar
Step 3 : Add Type
Select Types (this is a main static type)
Add Name (this name is show on App, Web and TV)
Select Icon (only for TV App)
Save Type
Step 4 : This Type show in Sidebar on Content Section
Step 5 : Search & Filter Type
Step 6 : Edit Type
Step 7 : Delete Type
Step 8 : Hide-Show Status Manage
Step 9 : Type Short Order Mange
Step-by-Step Video Guide :
How to Configure Basic Items
The Basic Items module is used to manage essential master data such as Category, Language, Season, Avatar, and Channel. These items are required while adding and managing content across App, Web, and TV platforms.
Step 1 : Login Admin Panel
Step 2 : Go to Basic Items in Sidebar
Step 3 : Category Management
Categories are used while adding content such as Videos, Movies, TV Shows, and other media.
Add Category
Edit Category
Manage Show / Hide Status
Manage Sort Order
Delete Category
Step 4 : Language Management
Languages are used while adding content such as Videos, Movies, and TV Shows to define available audio or content language.
Add Language
Edit Language
Manage Show / Hide Status
Manage Sort Order
Delete Language
Step 5 : Season Management
Seasons are used while adding TV Show episodes to organize content season-wise.
Add Season
Edit Season
Manage Show / Hide Status
Manage Sort Order
Delete Season
Step 6 : Avatar Management
Avatars are used as profile images for users within the application.
Add Avatar
Edit Avatar
Manage Show / Hide Status
Manage Sort Order
Delete Avatar
Step 7 : Channel Management
Channels are used while adding content such as Videos, TV Shows, and Live TV.
Add Channel
Edit Channel
Manage Show / Hide Status
Manage Sort Order
Delete Channel
Step-by-Step Video Guide :
How to Add Producer
The Producer module is used to manage producers associated with Movies, TV Shows, and other content. Producers help identify content ownership and production details
across the DTLiveTV platform.
Step 1 : Login Admin Panel
Step 2 : Go to Producer in Sidebar
Step 3 : Add Producer
Add Producer Name
Upload Producer Image (if available)
Add Description or Details (optional)
Save Producer
Step 4 : Search & Filter Producer
Step 5 : Edit Producer
Step 6 : Delete Producer
Step 7 : Producer Content Detail
Step-by-Step Video Guide :
How to Add Cast
The Cast module is used to manage actors, actresses, and other cast members associated with Movies, TV Shows, and other content on the DTLiveTV platform.
Step 1 : Login Admin Panel
Step 2 : Go to Cast in Sidebar
Step 3 : Add Cast
Add Cast Name
Upload Cast Image
Add Description or Biography (optional)
Save Cast
Step 4 : Search Cast
Step 5 : Edit Cast
Step 6 : Manage Hide / Show Status
Step 7 : Delete Cast
Step-by-Step Video Guide :
How to Add Movies
The Movies module allows you to add and manage movie content on the DTLiveTV platform.
You can upload videos from the server, use external sources, configure trailers,
subtitles, and manage rent-based content.
Step 1 : Login Admin Panel
Step 2 : Go to Movies from Content Section in Sidebar
Step 3 : Add New Movie Content
Video Upload Type
Server Video (Upload File)
External URL (Enter External URL)
YouTube (YouTube Video URL)
Live Stream URL (file.m3u8)
VdoCipher ID (Secure Video ID)
Trailer Type
Server Video (Upload File)
External URL (Enter External URL)
YouTube (YouTube Video URL)
Subtitle Type
Server Video (Upload Subtitle File - .srt)
External URL (Subtitle URL - .srt)
Is Rent : Yes
Add Rent Price List and Select Price
Enter Rent Time Duration
Step 4 : Search Movie Content
Step 5 : Edit Movie Content
Step 6 : Manage Hide / Show Status
Step 7 : Delete Movie Content
Step-by-Step Video Guide :
How to Configure Live TV & Streaming URL
The Live TV module allows you to configure and manage live television channels using streaming URLs. Live TV content supports real-time streaming using
.m3u8 format.
Step 1 : Login Admin Panel
Step 2 : Go to Live TV from Content Section in Sidebar
Step 3 : Add Live TV Content
Video Upload Type
Live Stream URL
(Streaming URL must be in .m3u8 format)
Step 4 : Search Live TV Content
Step 5 : Edit Live TV Content
Step 6 : Manage Hide / Show Status
Step 7 : Delete Live TV Content
Step-by-Step Video Guide :
How to Configure Channel Content
The Channel Content module allows you to organize Movies and TV Shows under specific channels. This helps in creating channel-based content structures similar to TV networks.
Step 1 : Login Admin Panel
Step 2 : Add Type under Channel Content
Create or select a Type specifically for Channel Content to organize channel-based media.
Step 3 : Go to Channel from Content Section in Sidebar
Step 4 : Add Movies under Channel
Add Content
Search Content
Edit Content
Manage Hide / Show Status
Delete Content
Step 5 : Add TV Show under Channel
Add Content
Search Content
Edit Content
Manage Hide / Show Status
Delete Content
View Episode List
Add Episode
Search & Filter Episodes
Edit Episode
Delete Episode
Step-by-Step Video Guide :
How to Configure TV Show / Web Series
The TV Show / Web Series module allows you to manage episodic content by organizing seasons and episodes under a single show. This structure is ideal for series-based content.
Step 1 : Login Admin Panel
Step 2 : Go to TV Show / Web Series from Content Section in Sidebar
Step 3 : Add TV Show / Web Series Content
Add Content
Search Content
Edit Content
Manage Hide / Show Status
Delete Content
Step 4 : Episode Management
Episodes are used to manage individual parts of a TV Show or Web Series.
View Episode List
Add Episode
Search & Filter Episodes
Edit Episode
Delete Episode
Step-by-Step Video Guide :
How to Configure Upcoming Content
The Upcoming Content module is used to manage movies and TV shows that are not yet released.
This helps in promoting upcoming content and later converting it into released content.
Step 1 : Login Admin Panel
Step 2 : Add Type under Upcoming Content
Create or select a Type specifically for Upcoming Content.
Step 3 : Go to Upcoming from Content Section in Sidebar
Step 4 : Add Upcoming Movies
Add Content
Search Content
Edit Content
Manage Hide / Show Status
Mark as Released Content
Delete Content
Step 5 : Add Upcoming TV Shows
Add Content
Search Content
Edit Content
Manage Hide / Show Status
Delete Content
View Episode List
Add Episode
Search & Filter Episodes
Edit Episode
Mark Episode as Released Content
Delete Episode
Step-by-Step Video Guide :
How to Configure Kids Content
The Kids Content module is used to manage child-friendly movies and TV shows.
This section helps in organizing safe and age-appropriate content specifically for kids across App, Web, and TV platforms.
Step 1 : Login Admin Panel
Step 2 : Add Type under Kids Content
Create or select a Type specifically for Kids Content.
Step 3 : Go to Kids from Content Section in Sidebar
Step 4 : Add Kids Movies
Add Content
Search Content
Edit Content
Manage Hide / Show Status
Delete Content
Step 5 : Add Kids TV Shows
Add Content
Search Content
Edit Content
Manage Hide / Show Status
Delete Content
View Episode List
Add Episode
Search & Filter Episodes
Edit Episode
Delete Episode
Step-by-Step Video Guide :
How to Configure Short Films
The Short Films module is used to manage short-form video content.
This includes short films and episodic short content optimized for quick viewing across App, Web, and TV platforms.
Step 1 : Login Admin Panel
Step 2 : Add Type under Shorts Content
Create or select a Type specifically for Short Films content.
Step 3 : Go to Shorts from Content Section in Sidebar
Step 4 : Add Short Films
Add Content
Search Content
Edit Content
Manage Hide / Show Status
Delete Content
View Episode List
Add Episode
Search & Filter Episodes
Edit Episode
Delete Episode
Step-by-Step Video Guide :
How to Setup Banner
The Banner module is used to manage promotional banners displayed on the Home page and specific content sections. Banners help highlight featured content and improve content visibility across the platform.
Step 1 : Login Admin Panel
Step 2 : Go to Banner from Configuration Section in Sidebar
Step 3 : Add Banner on Home Page
Select Home from the top section
Select which Type to add Banner
Select Sub Video Type (if applicable)
Select Video for Banner
Banner Added Successfully
View Banner List
Change Banner Sort Order
Delete Banner
Step 4 : Add Banner on Specific Type
Select Top Type to add Banner
Select Sub Video Type (if applicable)
Select Video for Banner
Banner Added Successfully
View Banner List
Change Banner Sort Order
Delete Banner
Step-by-Step Video Guide :
How to Setup Section
The Section module allows you to create dynamic or manual content sections on the Home page or specific content types. Sections control how content is grouped, displayed, and ordered inside the application.
Step 1 : Login Admin Panel
Step 2 : Go to Section from Configuration Section in Sidebar
Step 3 : Add Section
Select where the Section should be displayed:
If the Section should appear on the Home page, select Home as Top Type
If the Section should appear inside a specific Type, select that Type
Enter Section Title
Enter Short Title
Select Video Type (Type of data you want to display)
Choose Section Type:
Dynamic - Data is auto-generated based on filters
Manually - Data is manually selected
Step 4 : If Section Type is Dynamic
Select Type
Select Sub Type (if applicable)
Select Category (Category you do not want to display)
Select Language (Language you do not want to display)
Select Screen Layout (How data will be displayed)
Set Number of Content (Total items to show)
Order by Upload (Latest uploaded content)
Order by View (Based on total views)
Select Premium Video (Premium or Free content)
Enable View All (Show View All button in App)
Save Section
Step 5 : If Section Type is Manually
Select Type
Select Sub Type (if applicable)
Select Screen Layout
Select Content (Manually choose content)
Save Section
Step 6 : Section Management Options
Show / Hide Section Status
Edit Section
Manage Section Sort Order
Delete Section
Step-by-Step Video Guide :
How to Manage Notification
The Notification module allows you to manage push notifications and email alerts for your App, Web, and TV users. You can add new notifications, configure OneSignal keys, and manage email/notification permissions.
Step 1 : Add Notification
Login to Admin Panel
Go to Notification option in the sidebar
View all existing notifications. You can search through the list.
Click Add, fill the form with required data and images, then click Save
The newly added notification will appear in the list
You can delete any notification from the list if required
Step 2 : Set OneSignal Keys
Click Notification Setting option on top-right corner
Fill the form with correct OneSignal keys and save
Step 3 : Set Email and Notification Permissions
Go to Notification Configuration option
Here you will see all notifications with Email and Push Notification options
You can enable or disable all notifications using the main checkbox
You can enable or disable specific notifications using their relative checkboxes and save changes
Step-by-Step Video Guide :
How to Create Package & Coupon
The Package & Coupon module allows you to manage subscription plans and discount coupons for your App, Web, and TV users. Packages define subscription tiers, while Coupons provide promotional discounts.
Step 1 : Manage Package
Login to Admin Panel
Go to Subscription inside Package option in the sidebar
Add a new Package
View the list of existing Packages
Manage Hide / Show Status for any Package
Edit Package details
Delete Package if required
Step 2 : Manage Coupon
Go to Financial inside Coupon option in the sidebar
Add a new Coupon
View the list of existing Coupons
Manage Hide / Show Status for any Coupon
Edit Coupon details
Delete Coupon if required
Step-by-Step Video Guide :
Setup App
This section will guide you through setting up the App for your Backand application.
Change the AppName
Before setting up the Admin Panel, make sure you have the following tools and environment ready:
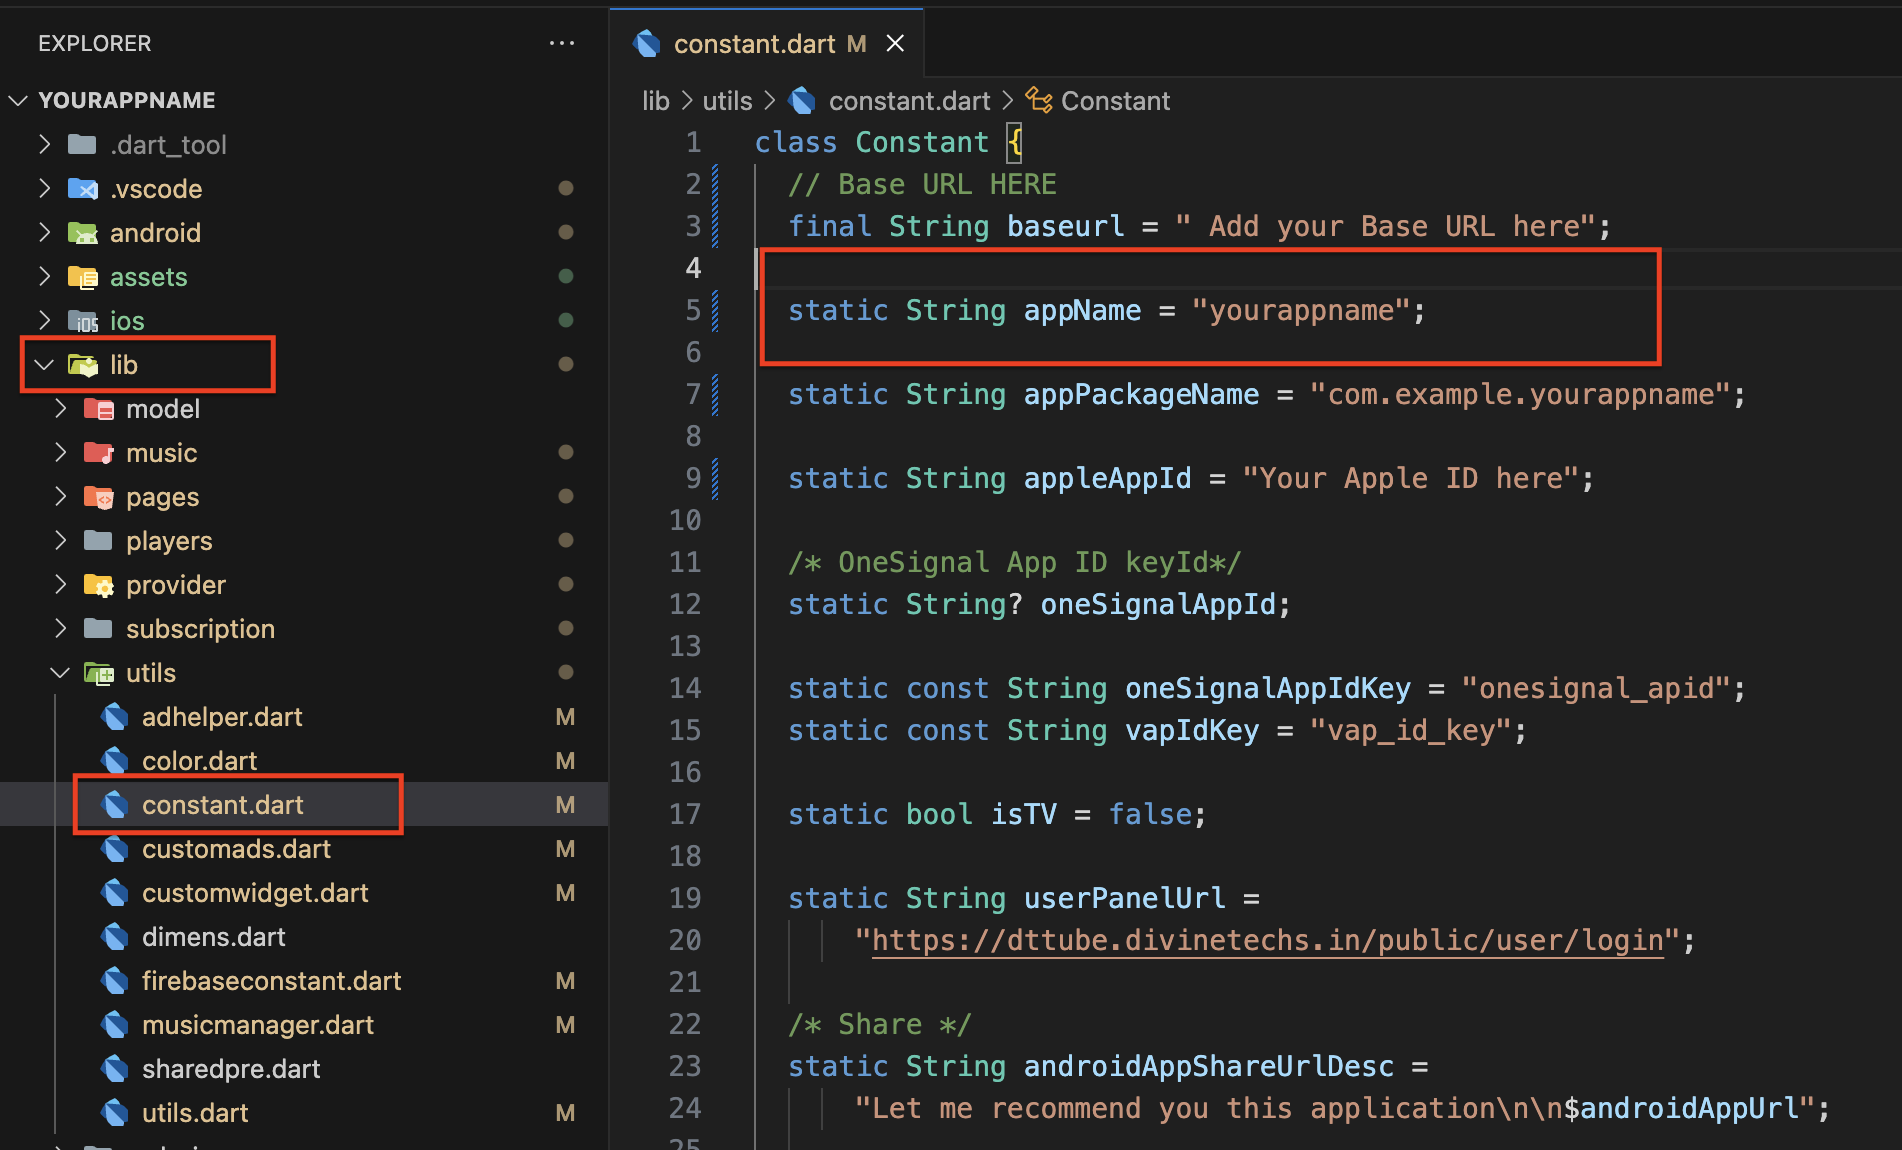
Step 1: Modify the Constant File
Make sure you have Apache web server Installed. If not, run the following Command in your terminal:
Open the Constant.dart file in your project.
static String appName = "yourappname";
Find the line where the app name is defined:
Change 'yourappname' to your desired app name. For example:
static String appName = "MyNewAppName";
Step 2: Rename the App Using Flutter Command
Open your terminal or command prompt.
Run the following command to activate the rename package:
flutter pub global activate rename
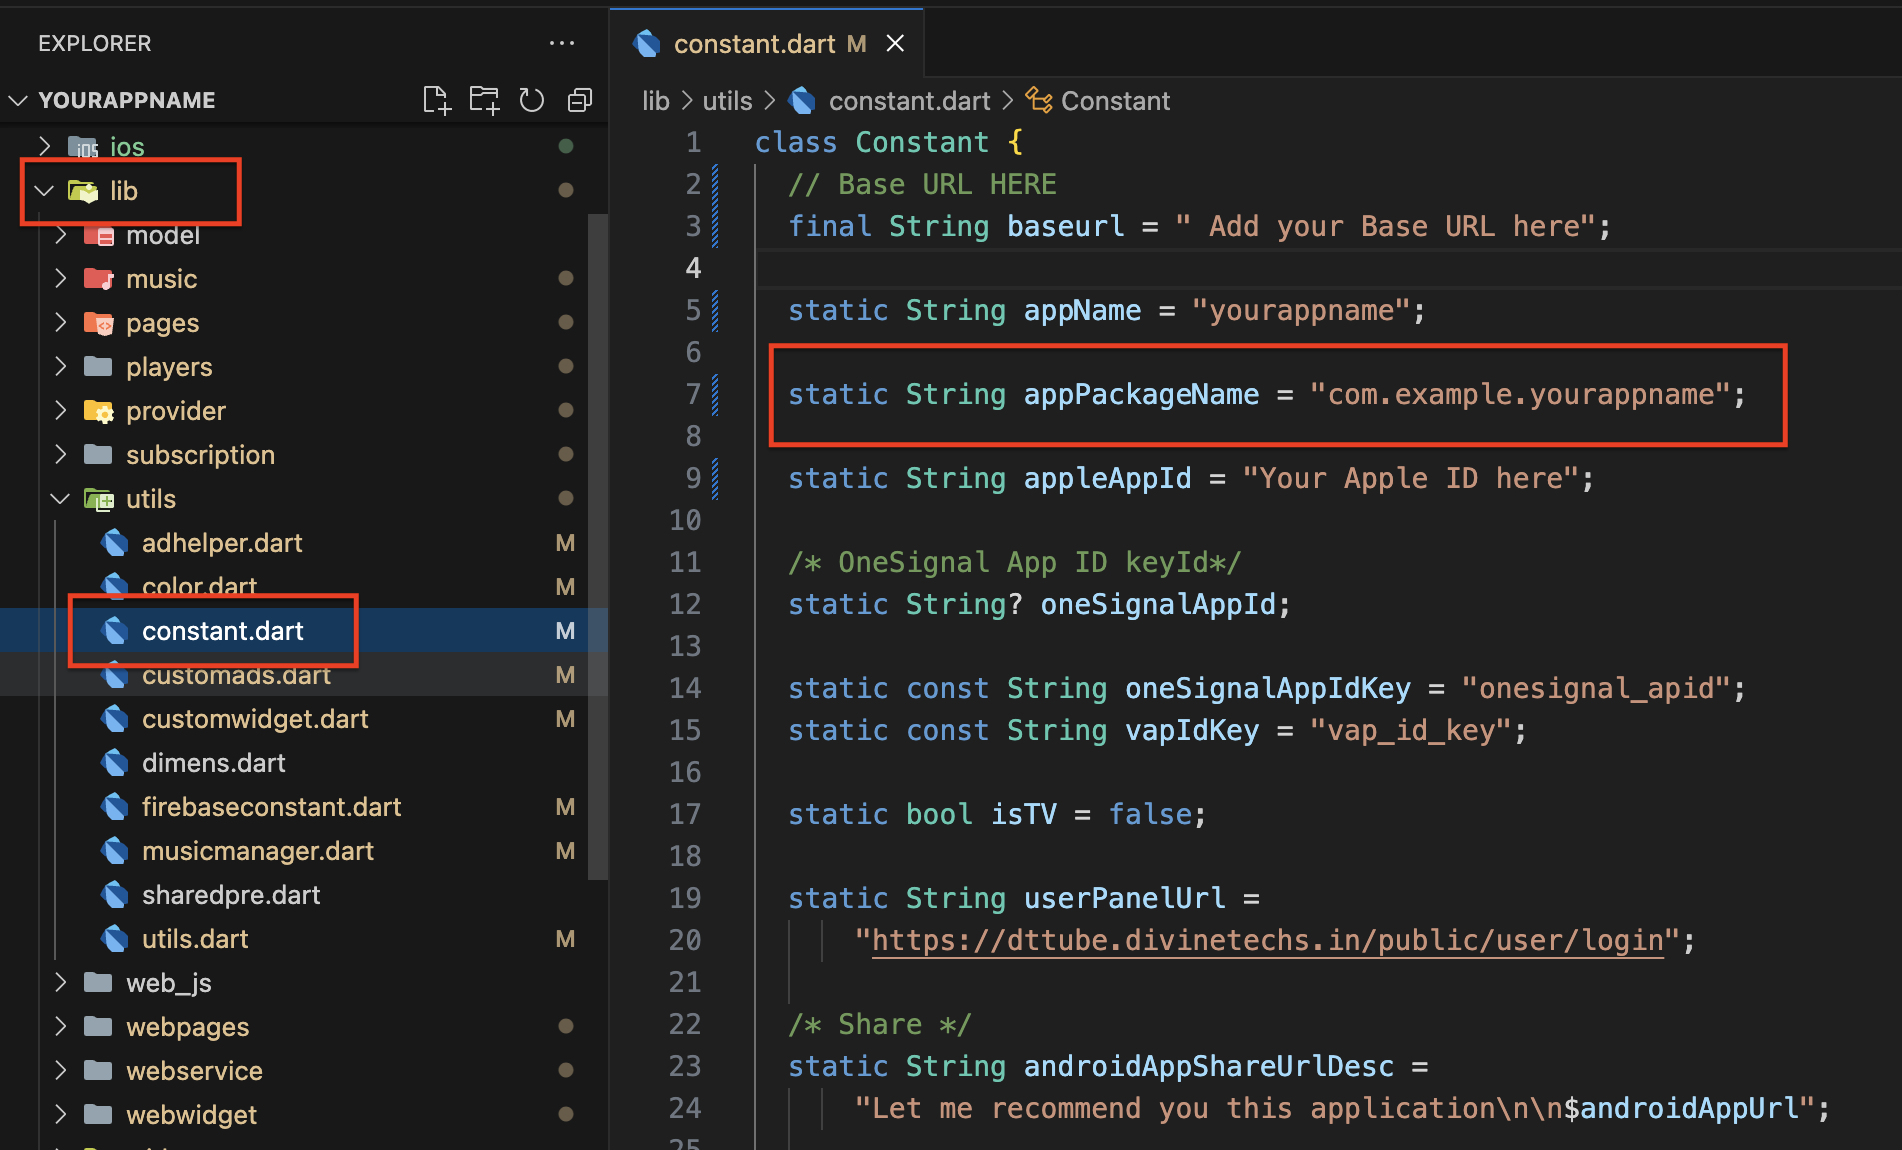
Use the rename command to set the new app name across iOS, Android, and web platforms. Replace "YourAppName" with your desired app name:
Use the rename command to set the new package name for both Android and iOS platforms.
Replace "com.example.yourappname" with your desired package name:
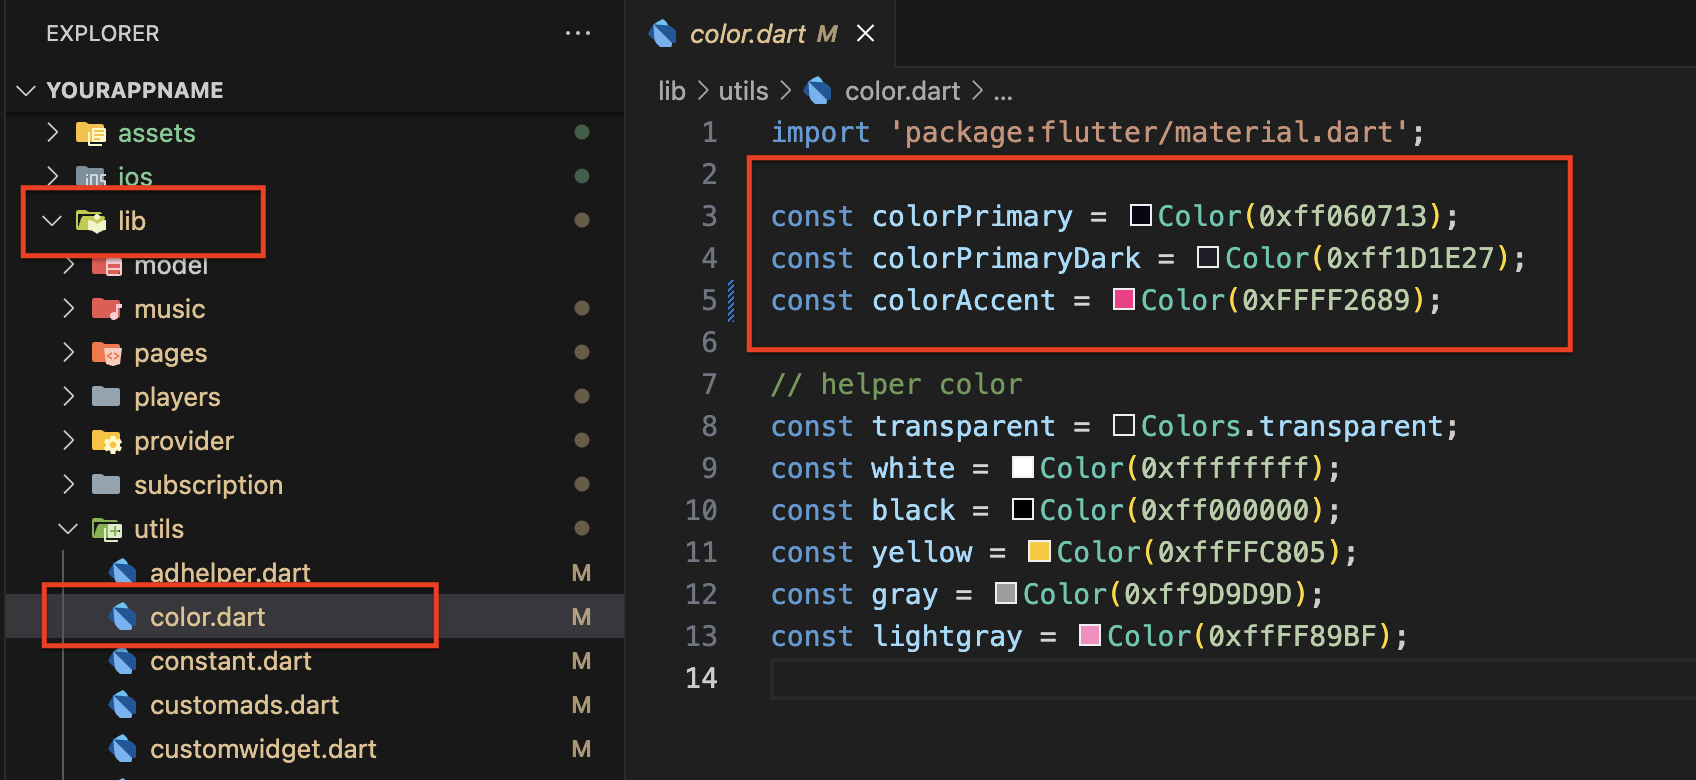
Step 2: Update Other Colors According to Your Branding
Review the file to find and update any other color constants according to your app's branding.
Replace the hex color codes for these additional colors as needed to match your design specifications.
Step-by-Step Video Guide :
Change the Base URL
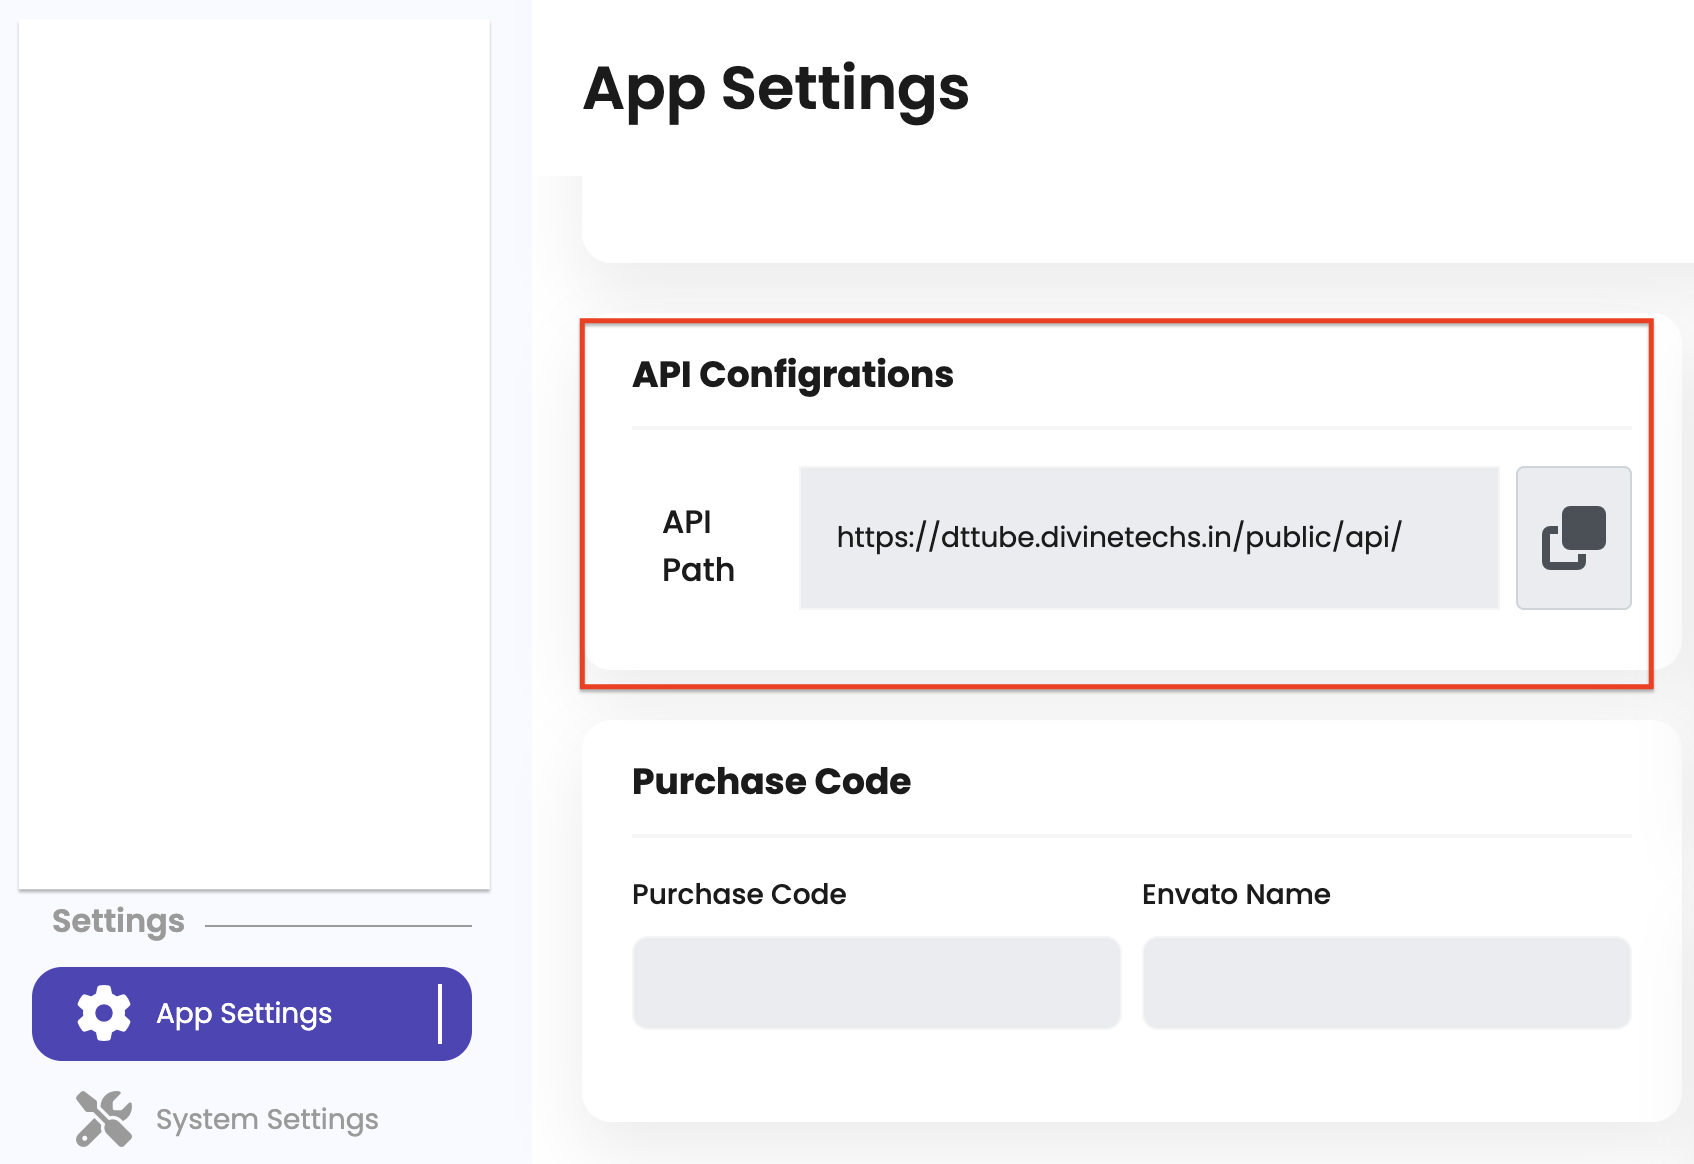
Step 1: Copy Base URL from Admin Panel
Log in to your admin panel.
Navigate to the app settings section where the base URL is provided.
Copy the base URL from the admin panel. Refer to the screenshot below for guidance.
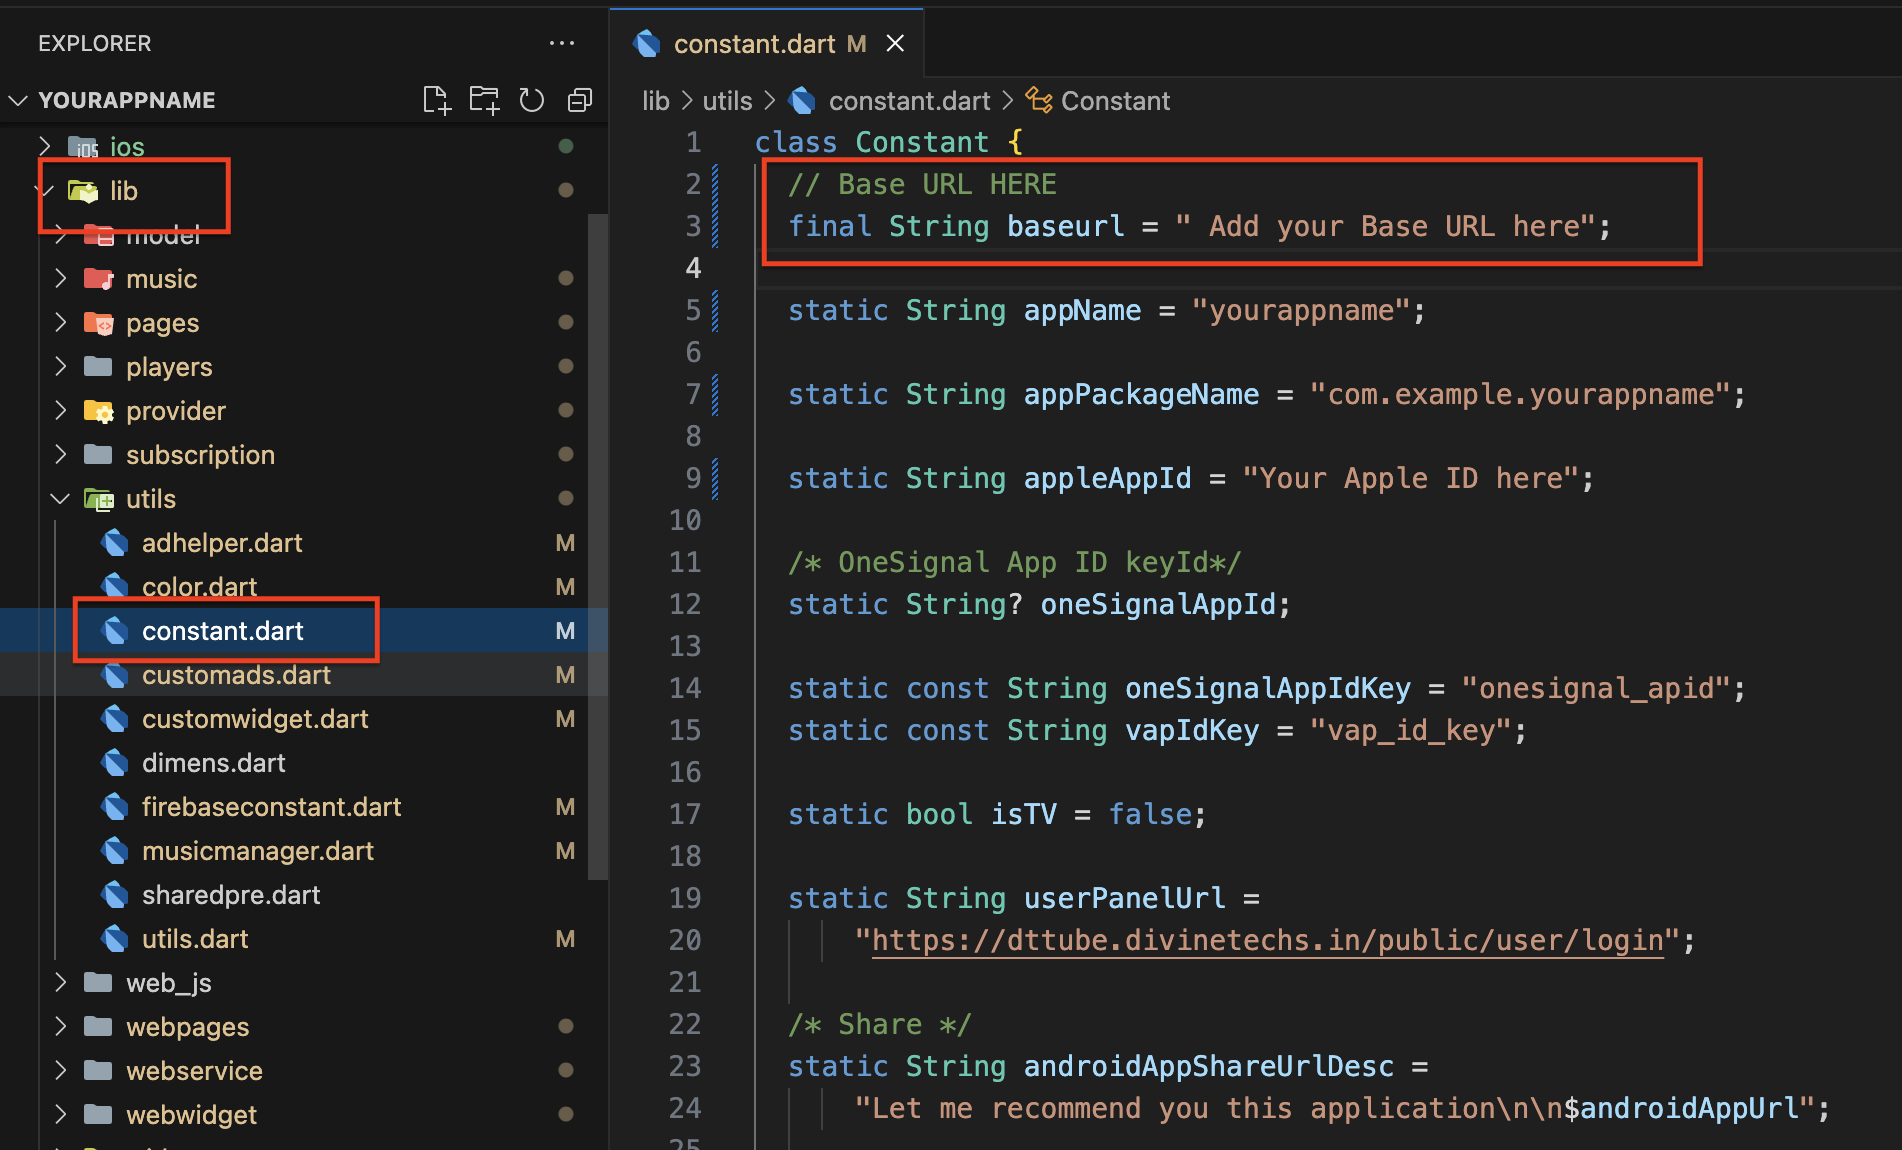
Step 2: Paste the Base URL in App Constants
Open the Constant.dart file in your project.
Locate the line where the base URL is defined:
final String baseurl = " Add your Base URL here";
Replace "https://example.com" with the base URL you copied from the admin panel. For example:
final String baseurl = "https://yourbaseurl.com";
check screenshot below
Ensure that you have set up the admin panel correctly before proceeding with this step. If the admin panel is not set up, the app will not run
and will be stuck on the splash screen. You can follow the admin panel documentation to learn how to set it up.
Click here
Step-by-Step Video Guide :
Change the Splash Screen
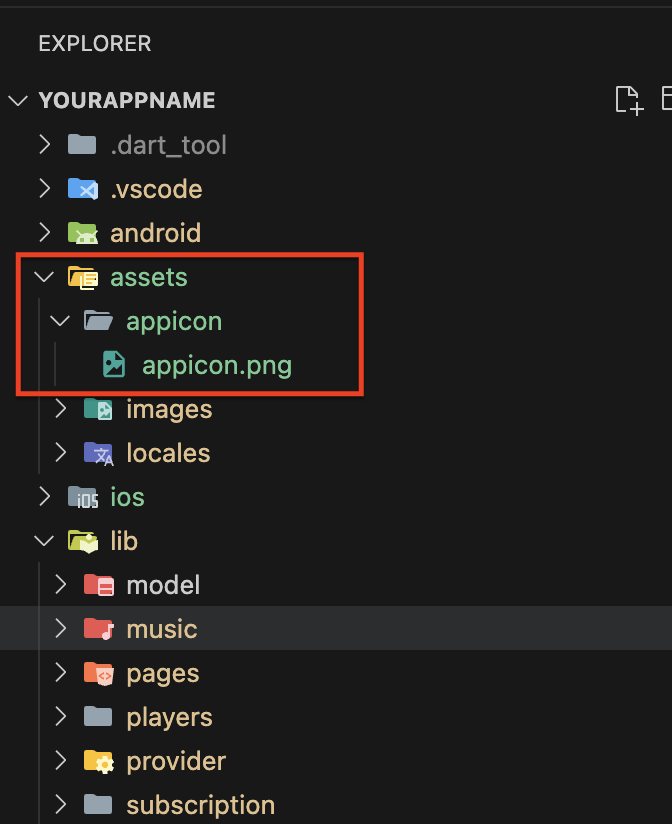
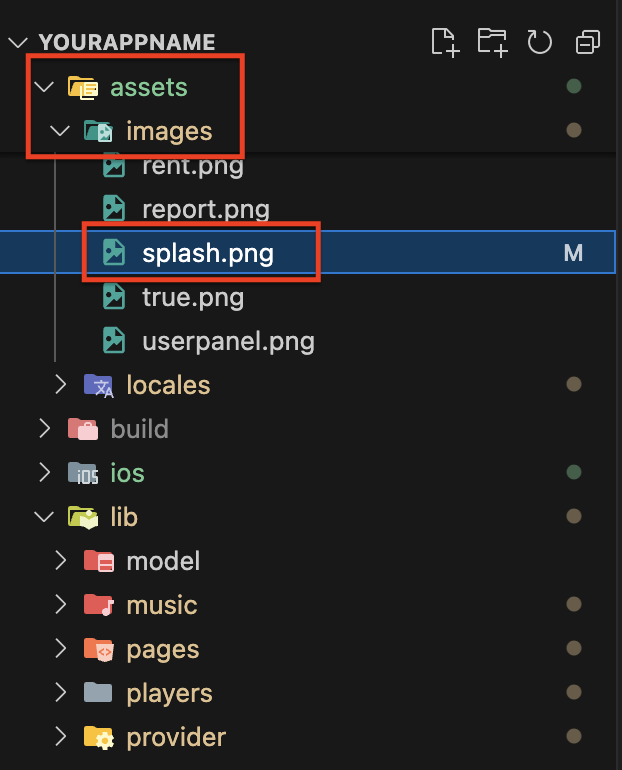
Step 1: Prepare Your Splash Screen Design
Ensure that your splash screen design is ready and saved as splash.png.
Make sure the image dimensions and resolution are appropriate for your app's splash screen.
Step 2: Replace the Splash Screen Image
Navigate to the assets/images folder in your project.
Replace the existing 'splash.png' file with your new 'splash.png' file.
Ensure that the splash.png file is named correctly and placed in the assets/images directory.
Step-by-Step Video Guide :
Firebase Setup on App
This section will guide you through setting up the App for your Backand application.
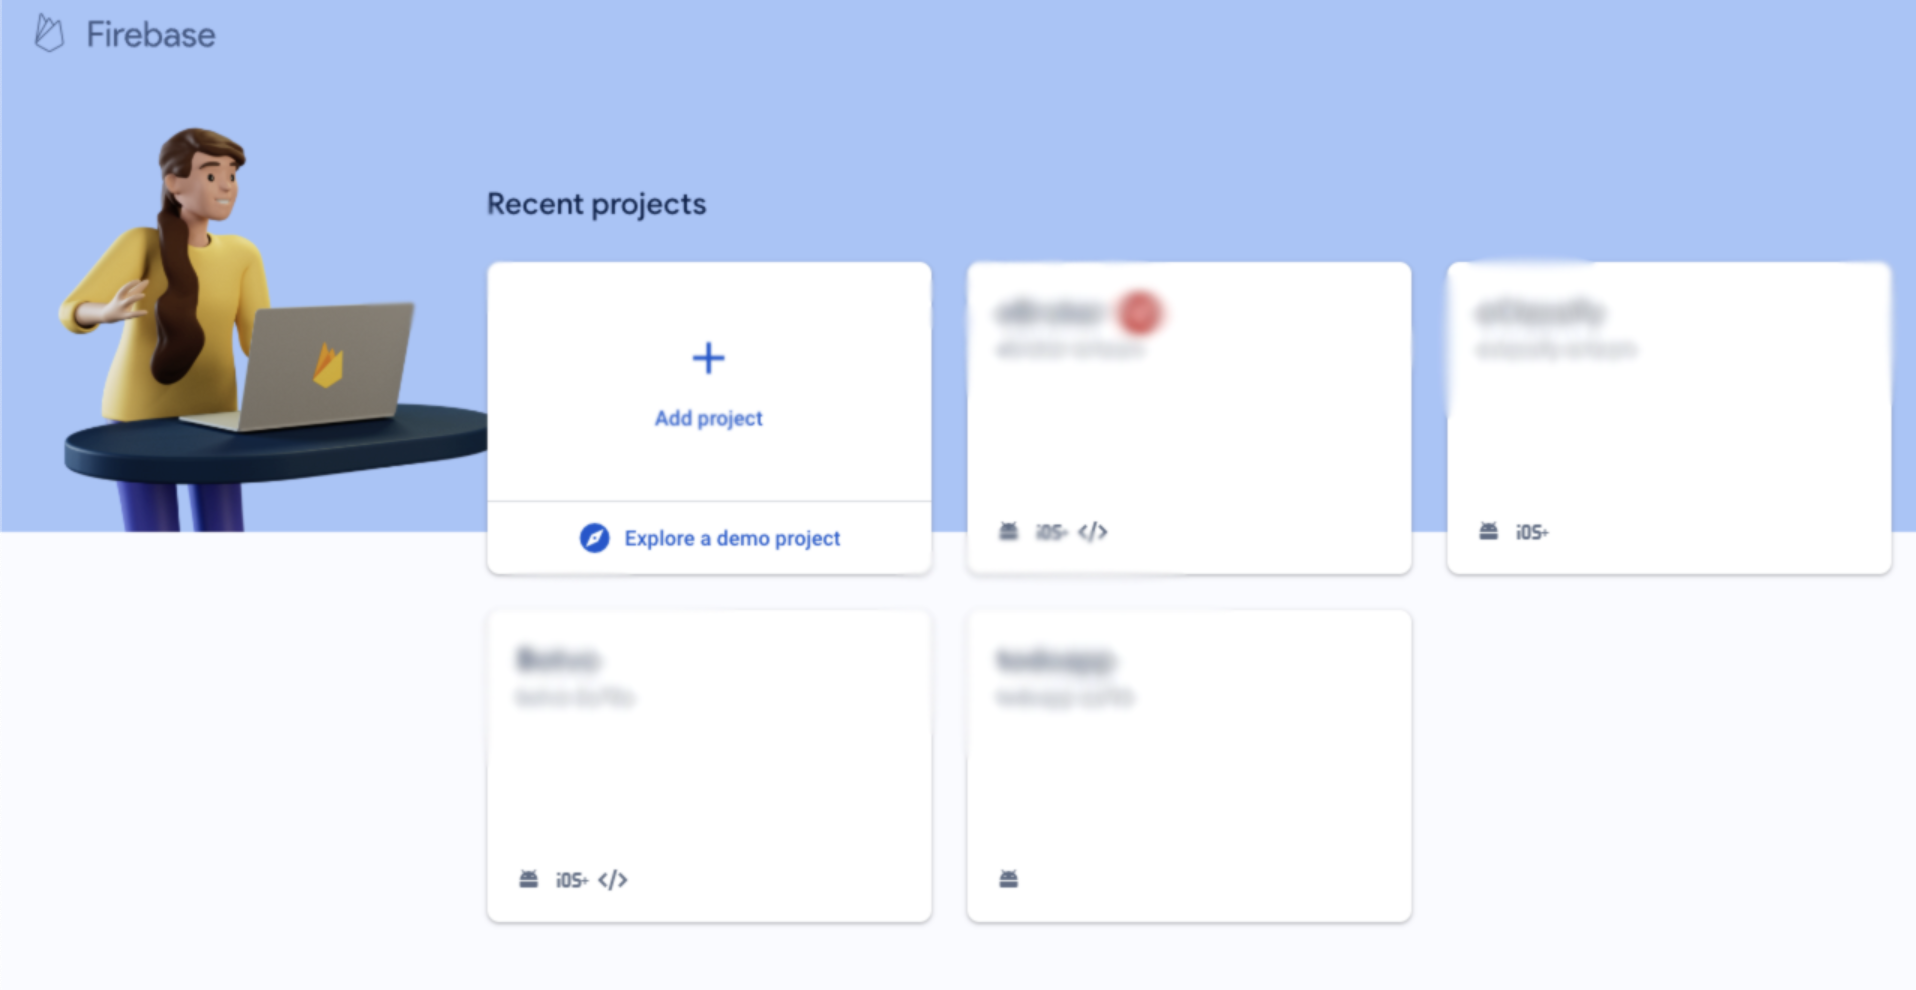
Create a Firebase Project
Before setting up the Admin Panel, make sure you have the following tools and environment ready:
Sign in with your Google account or create a new one.
Click on "Get Started" to set up your first project.
Step 3: Create a New Project:
Click on the "Add project" button.
Enter a project name and choose a suitable project ID
Select your country/region and click "Create Project."
Example Screenshot
Step-by-Step Video Guide :
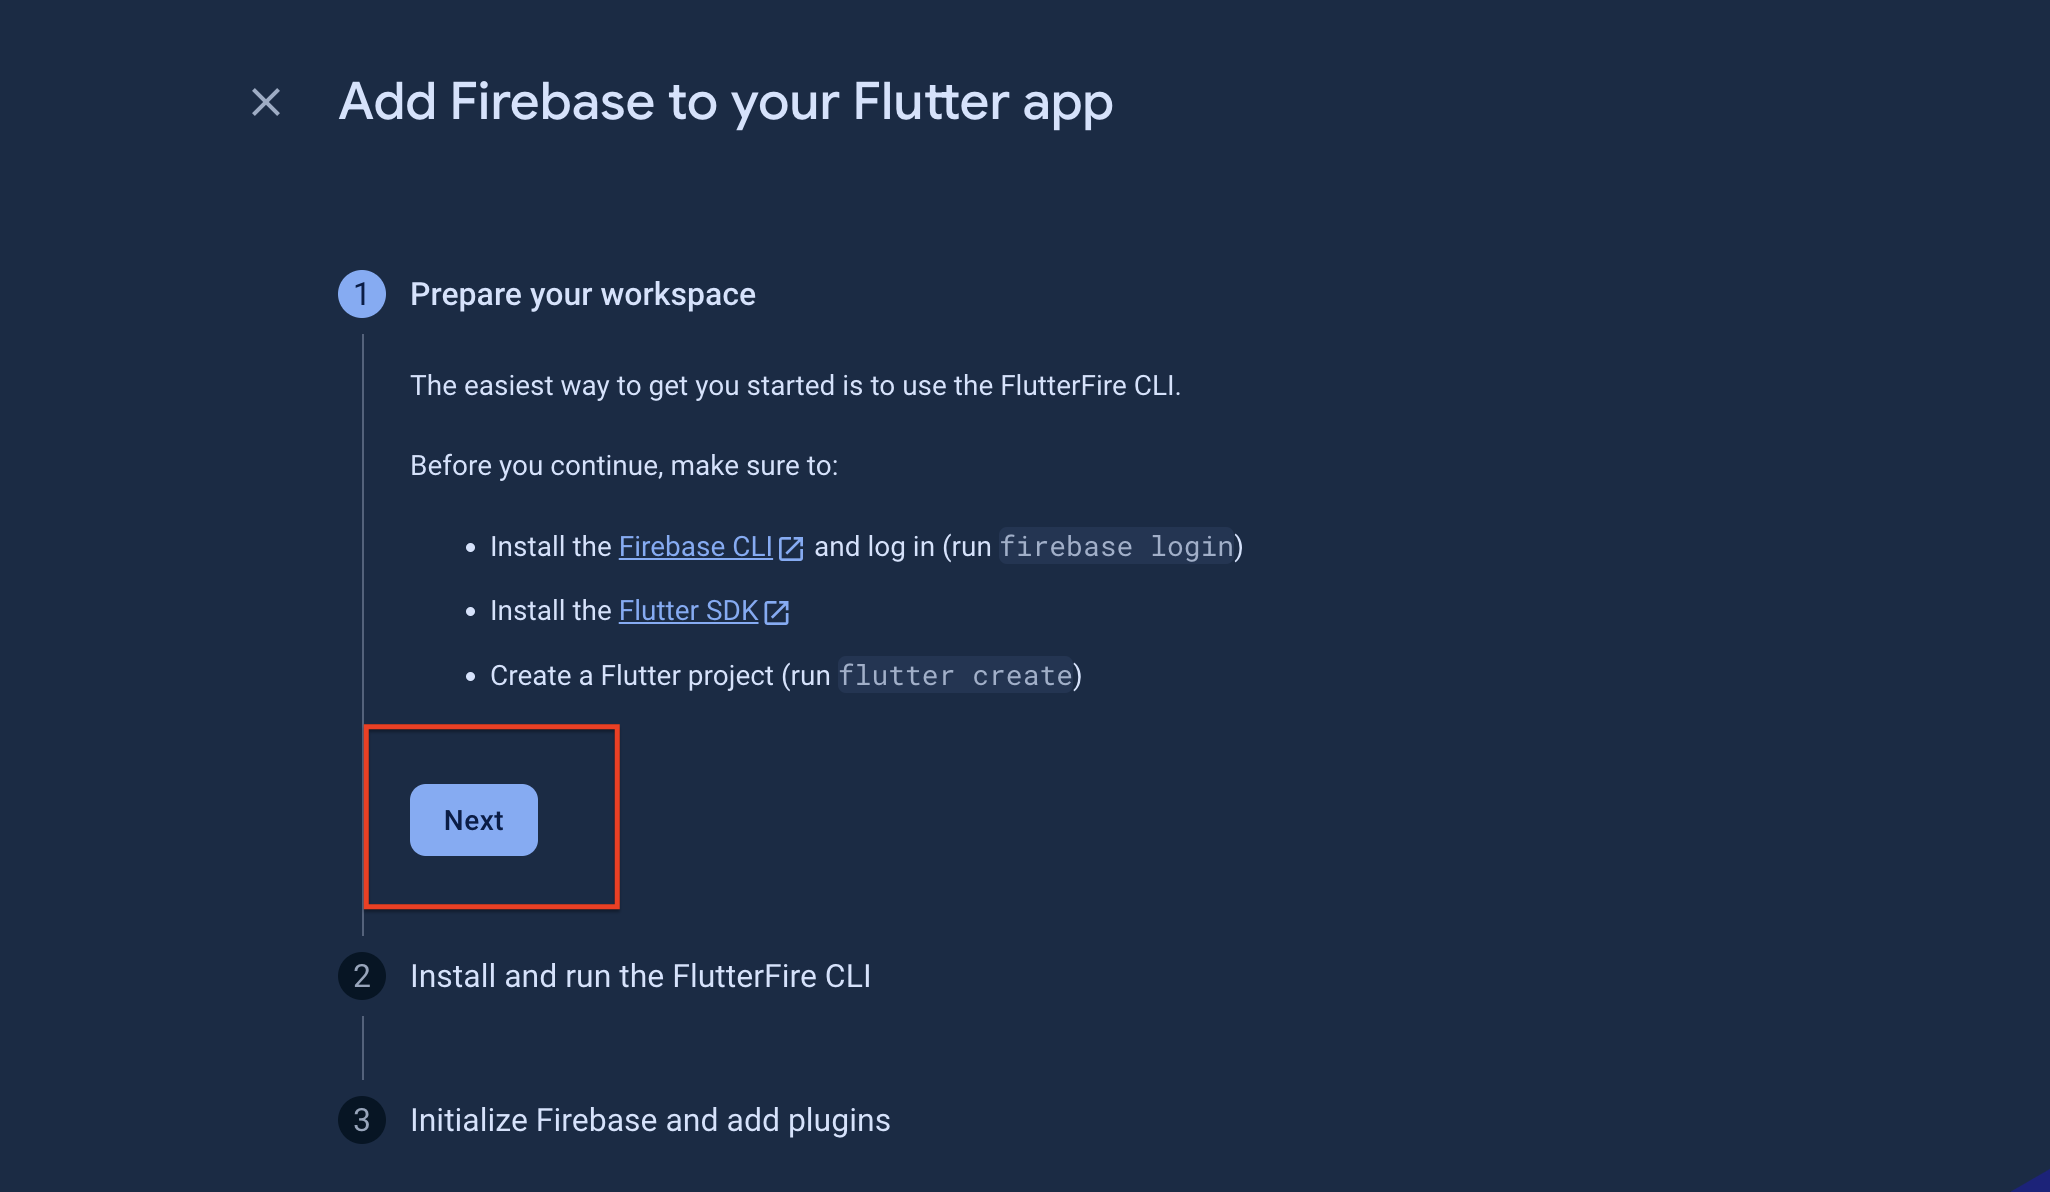
Firebase Configuration with App
Step 1: Go to Firebase Dashboard:
After creating your project, go to the Firebase Dashboard.
Click on the Flutter icon as shown in the screenshot below.
Note: Make sure to change the package name first.
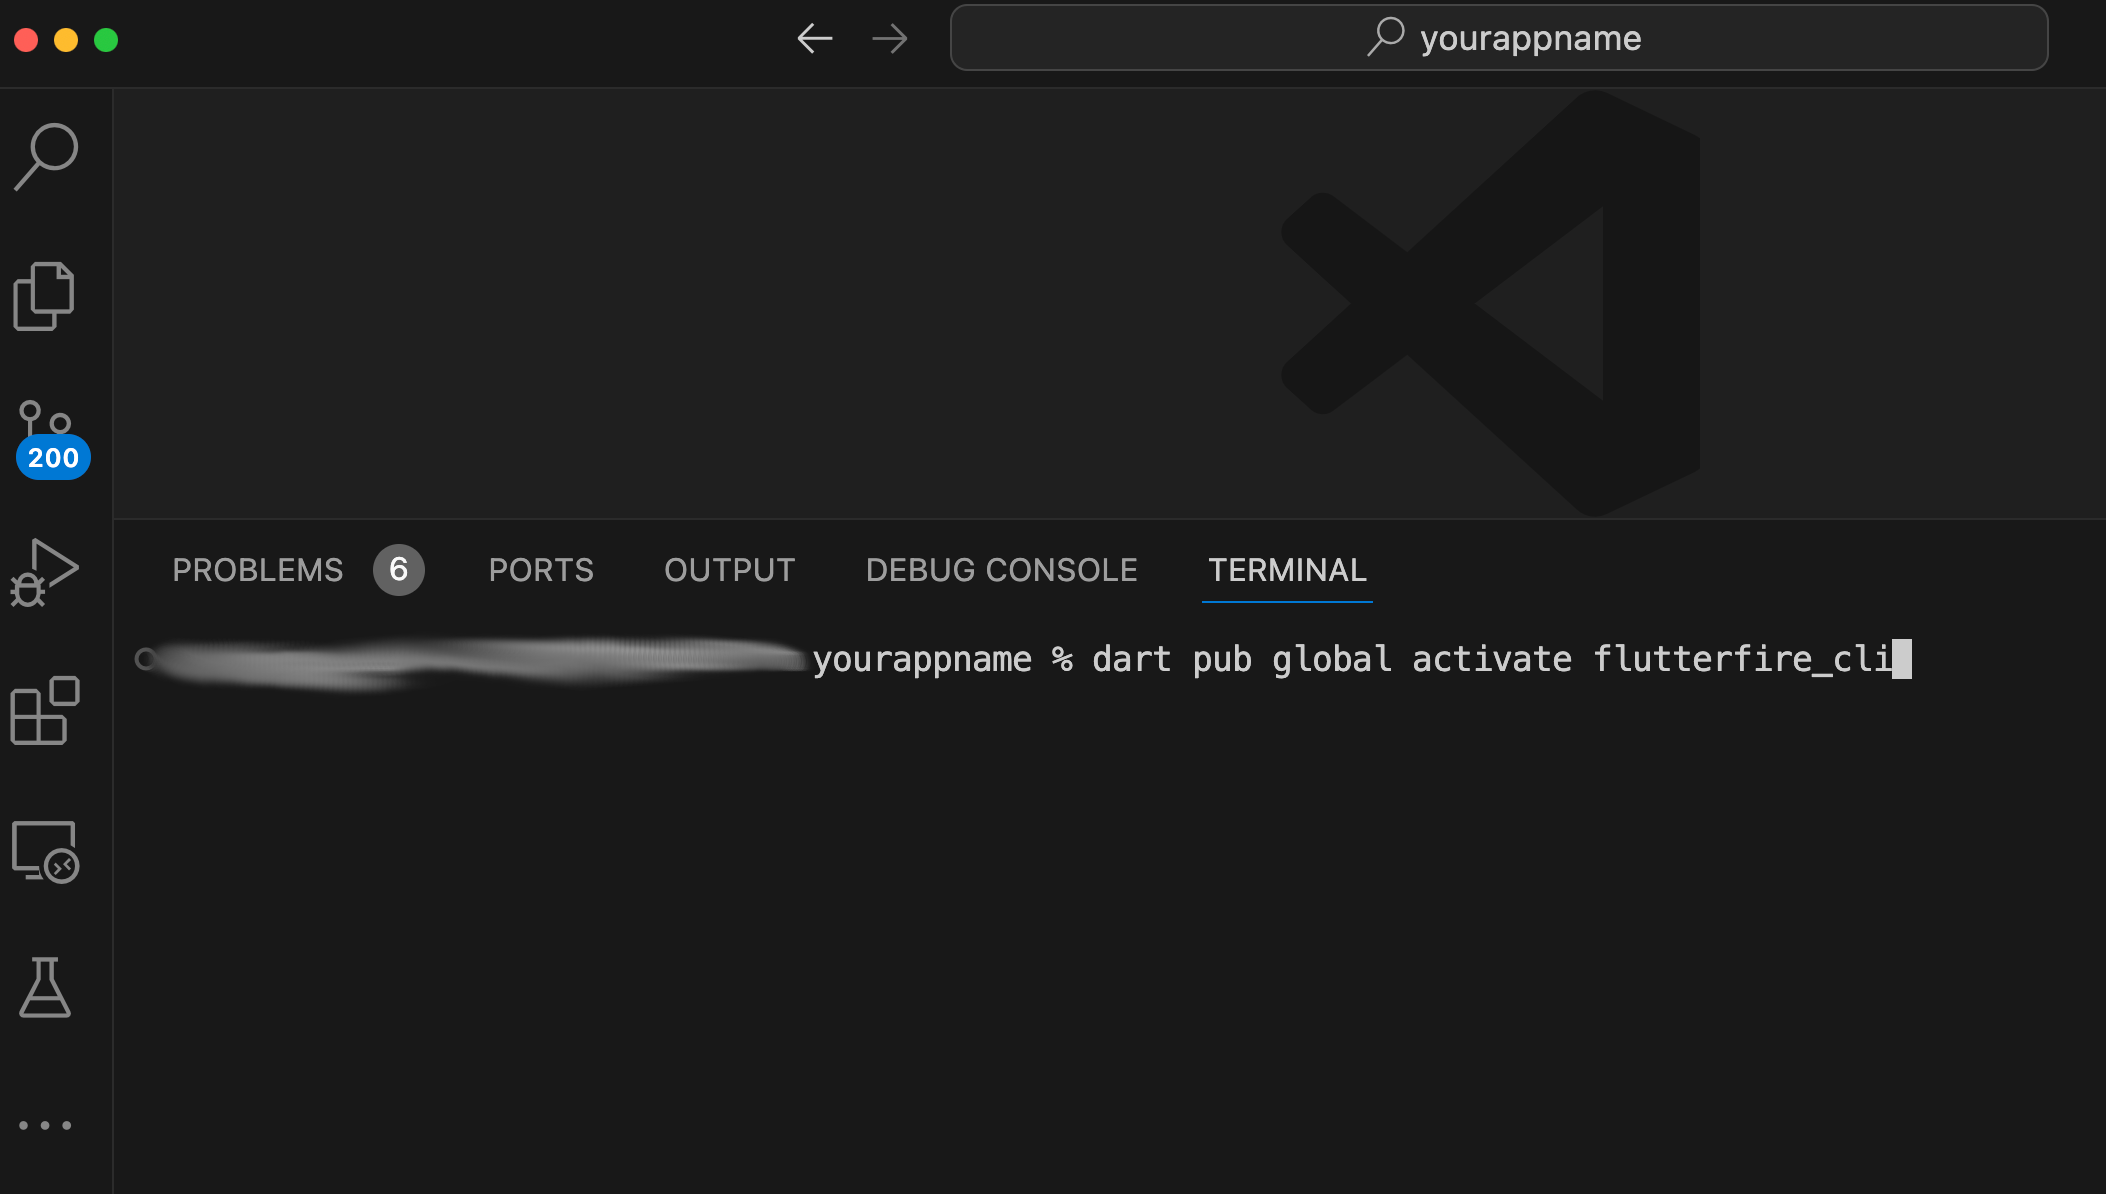
Step 2: Login to Firebase on IDE (VSCode/Android Studio):
Open your IDE and run the following command in the terminal to login to Firebase & this command will redirect you to a browser where you will need to allow permissions to access Firebase.
firebase login
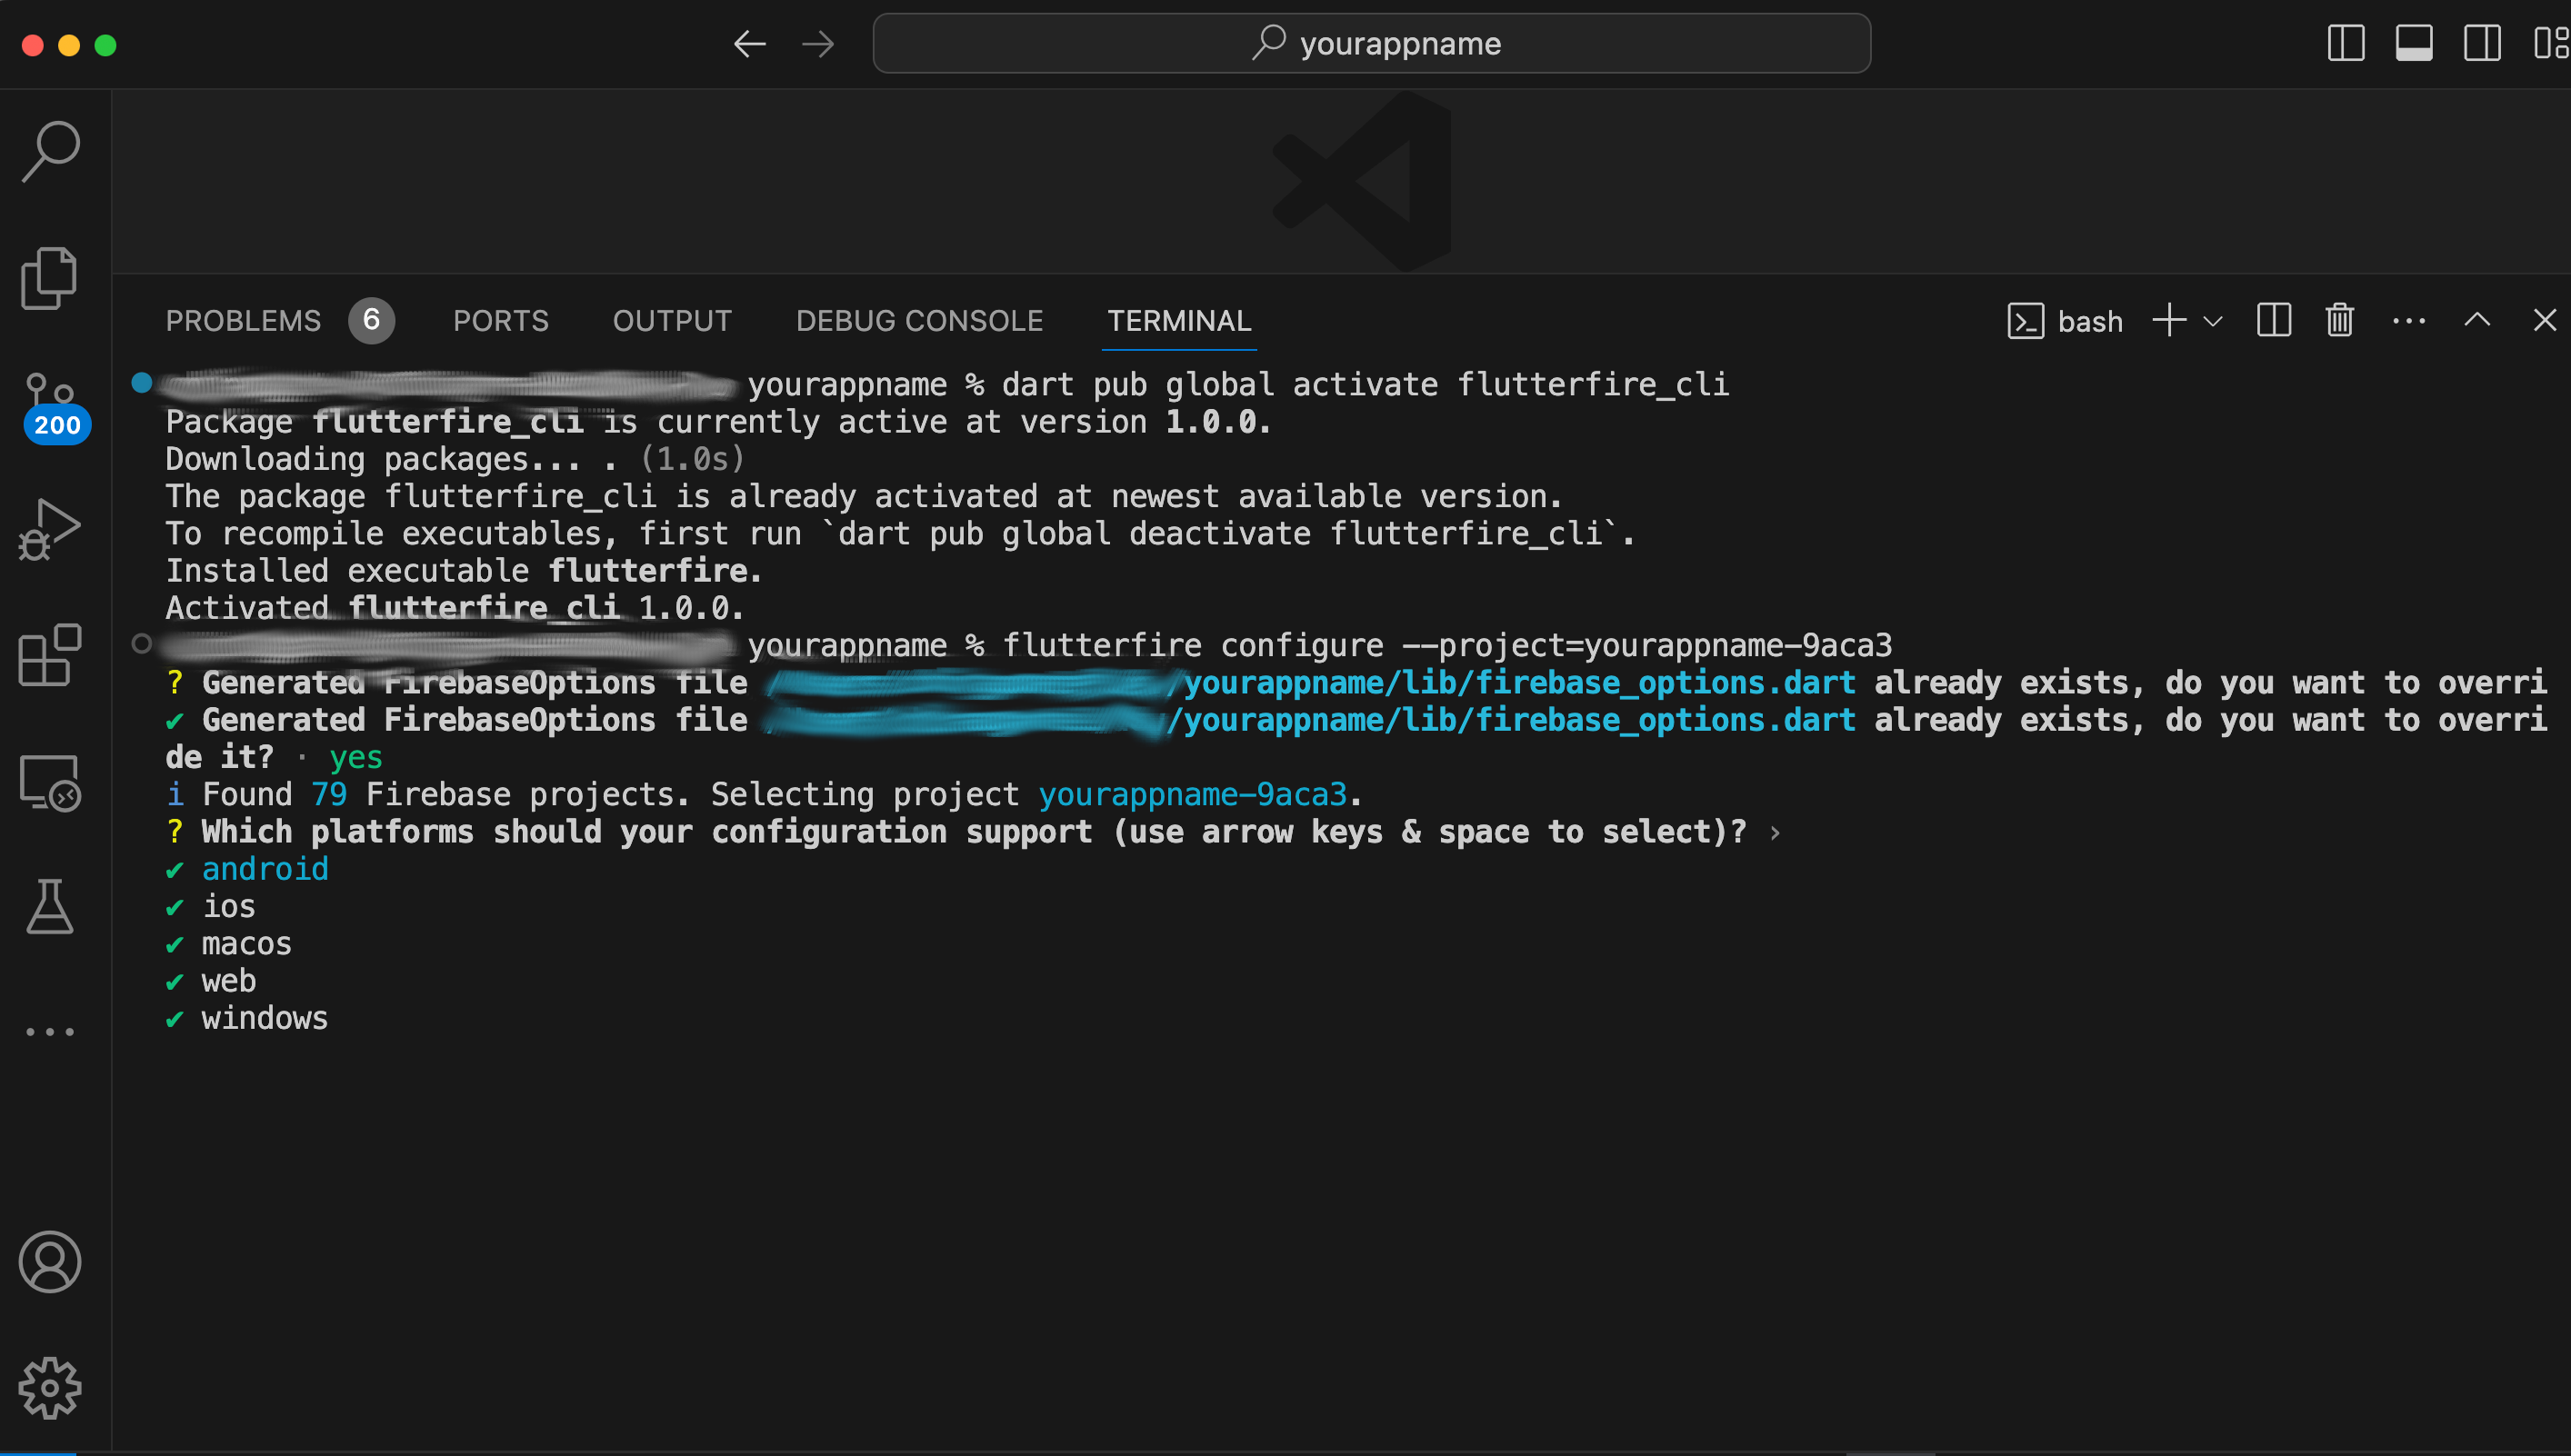
Activate FlutterFire CLI:
Run the following command in the terminal to activate the FlutterFire CLI:
dart pub global activate flutterfire_cli
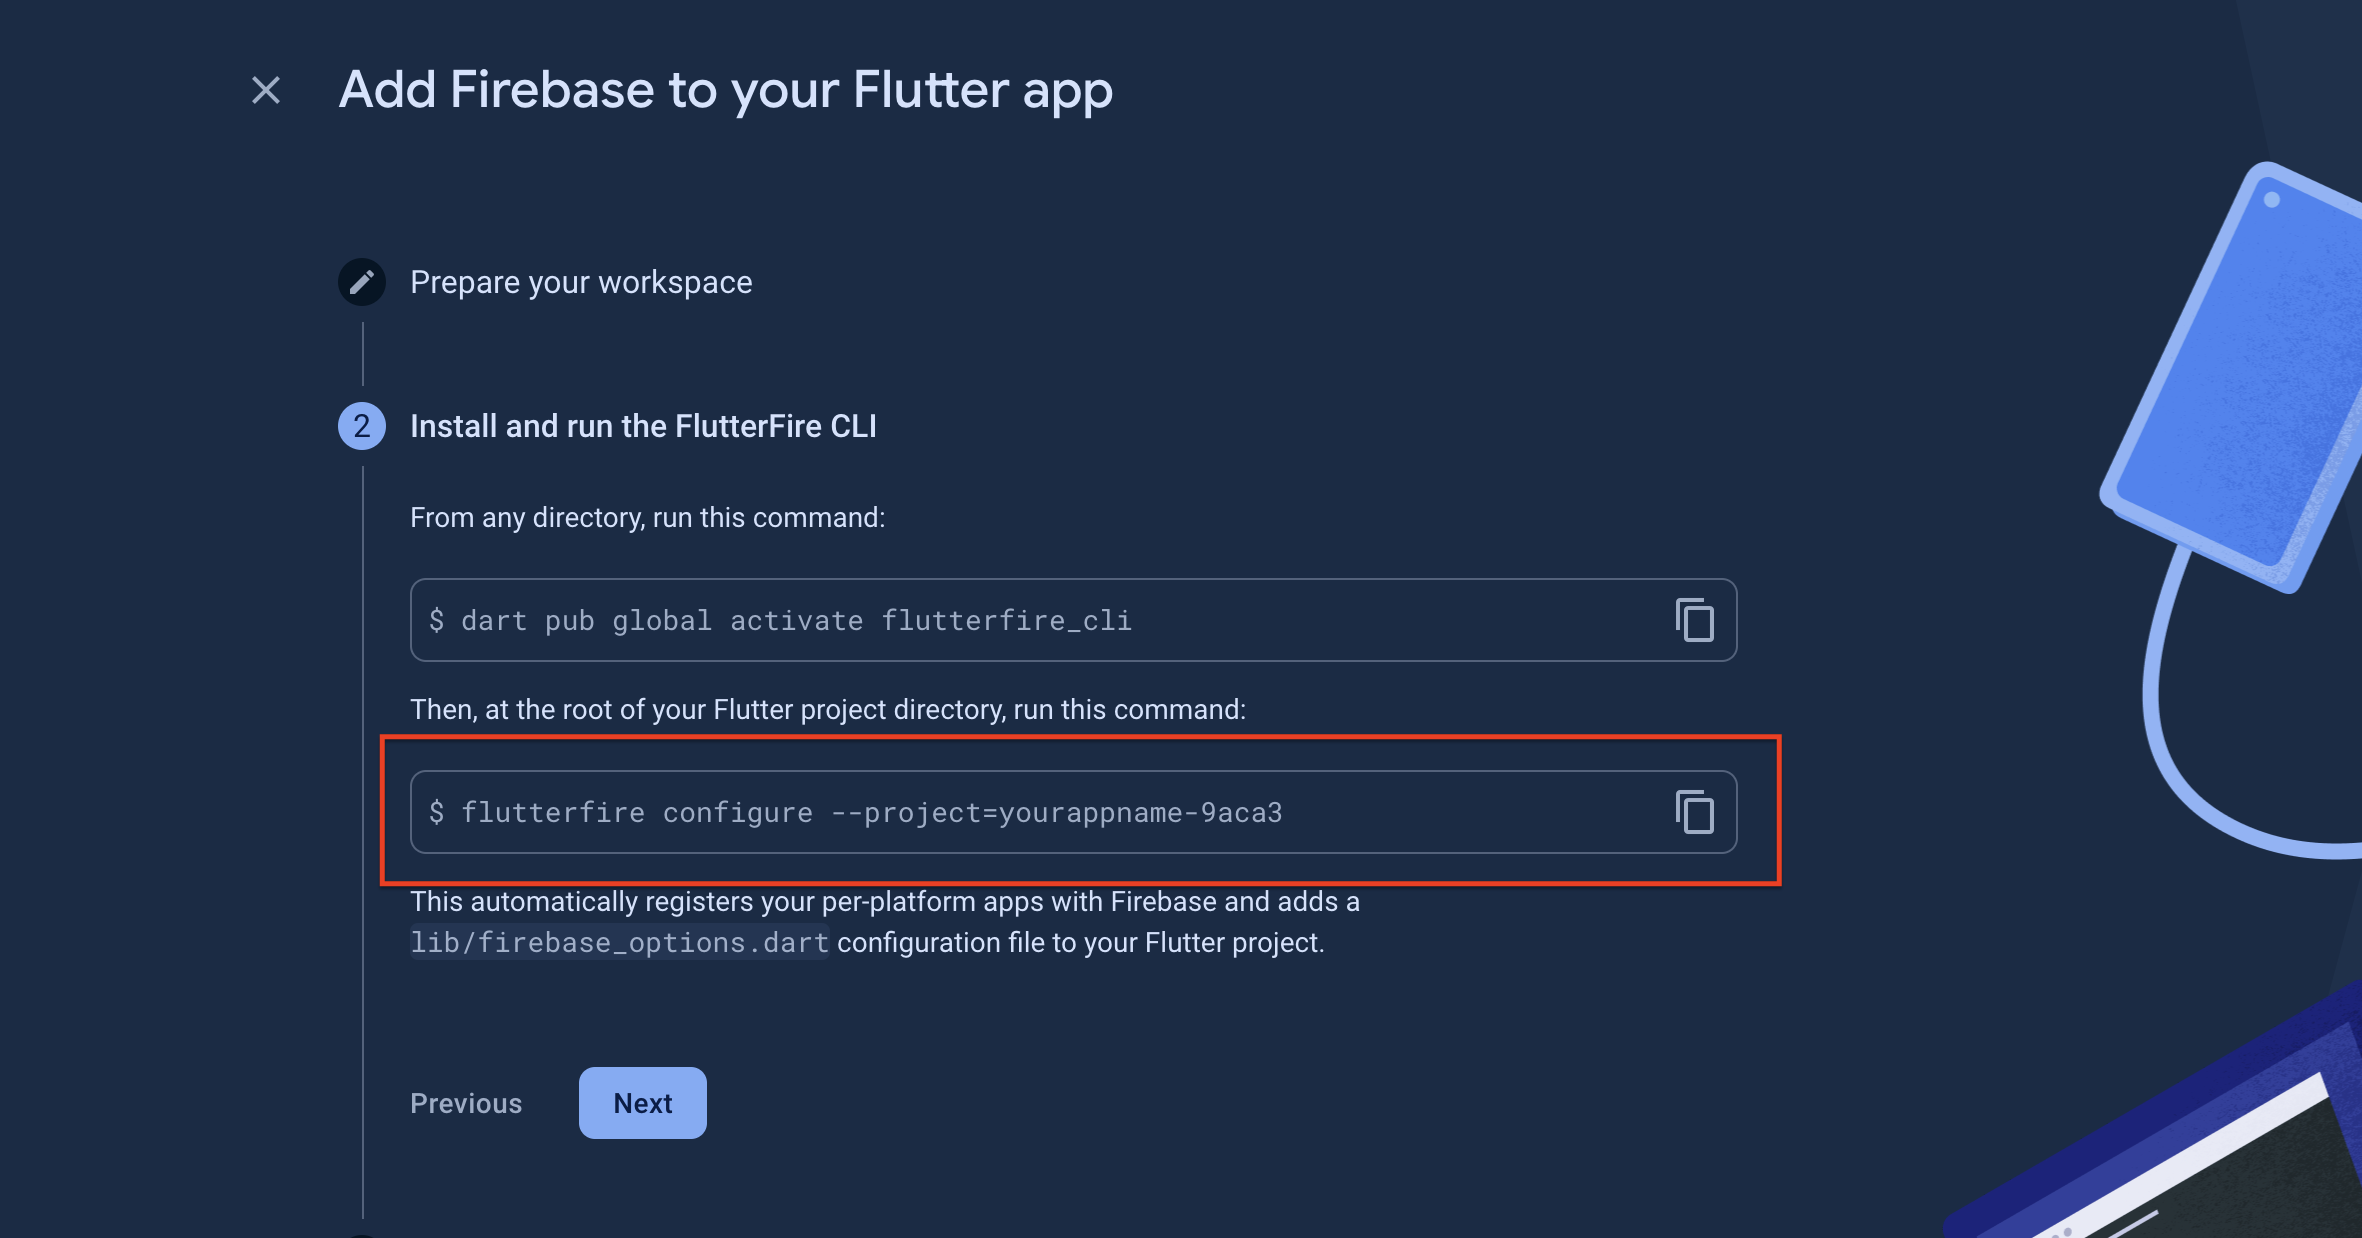
Copy command from your firebase as per below screenshot & Run in the terminal:
If prompted with Generated FirebaseOptions file /lib/firebase_options.dart already exists, do you want to override it? (y/n),
press y and hit enter to overwrite.
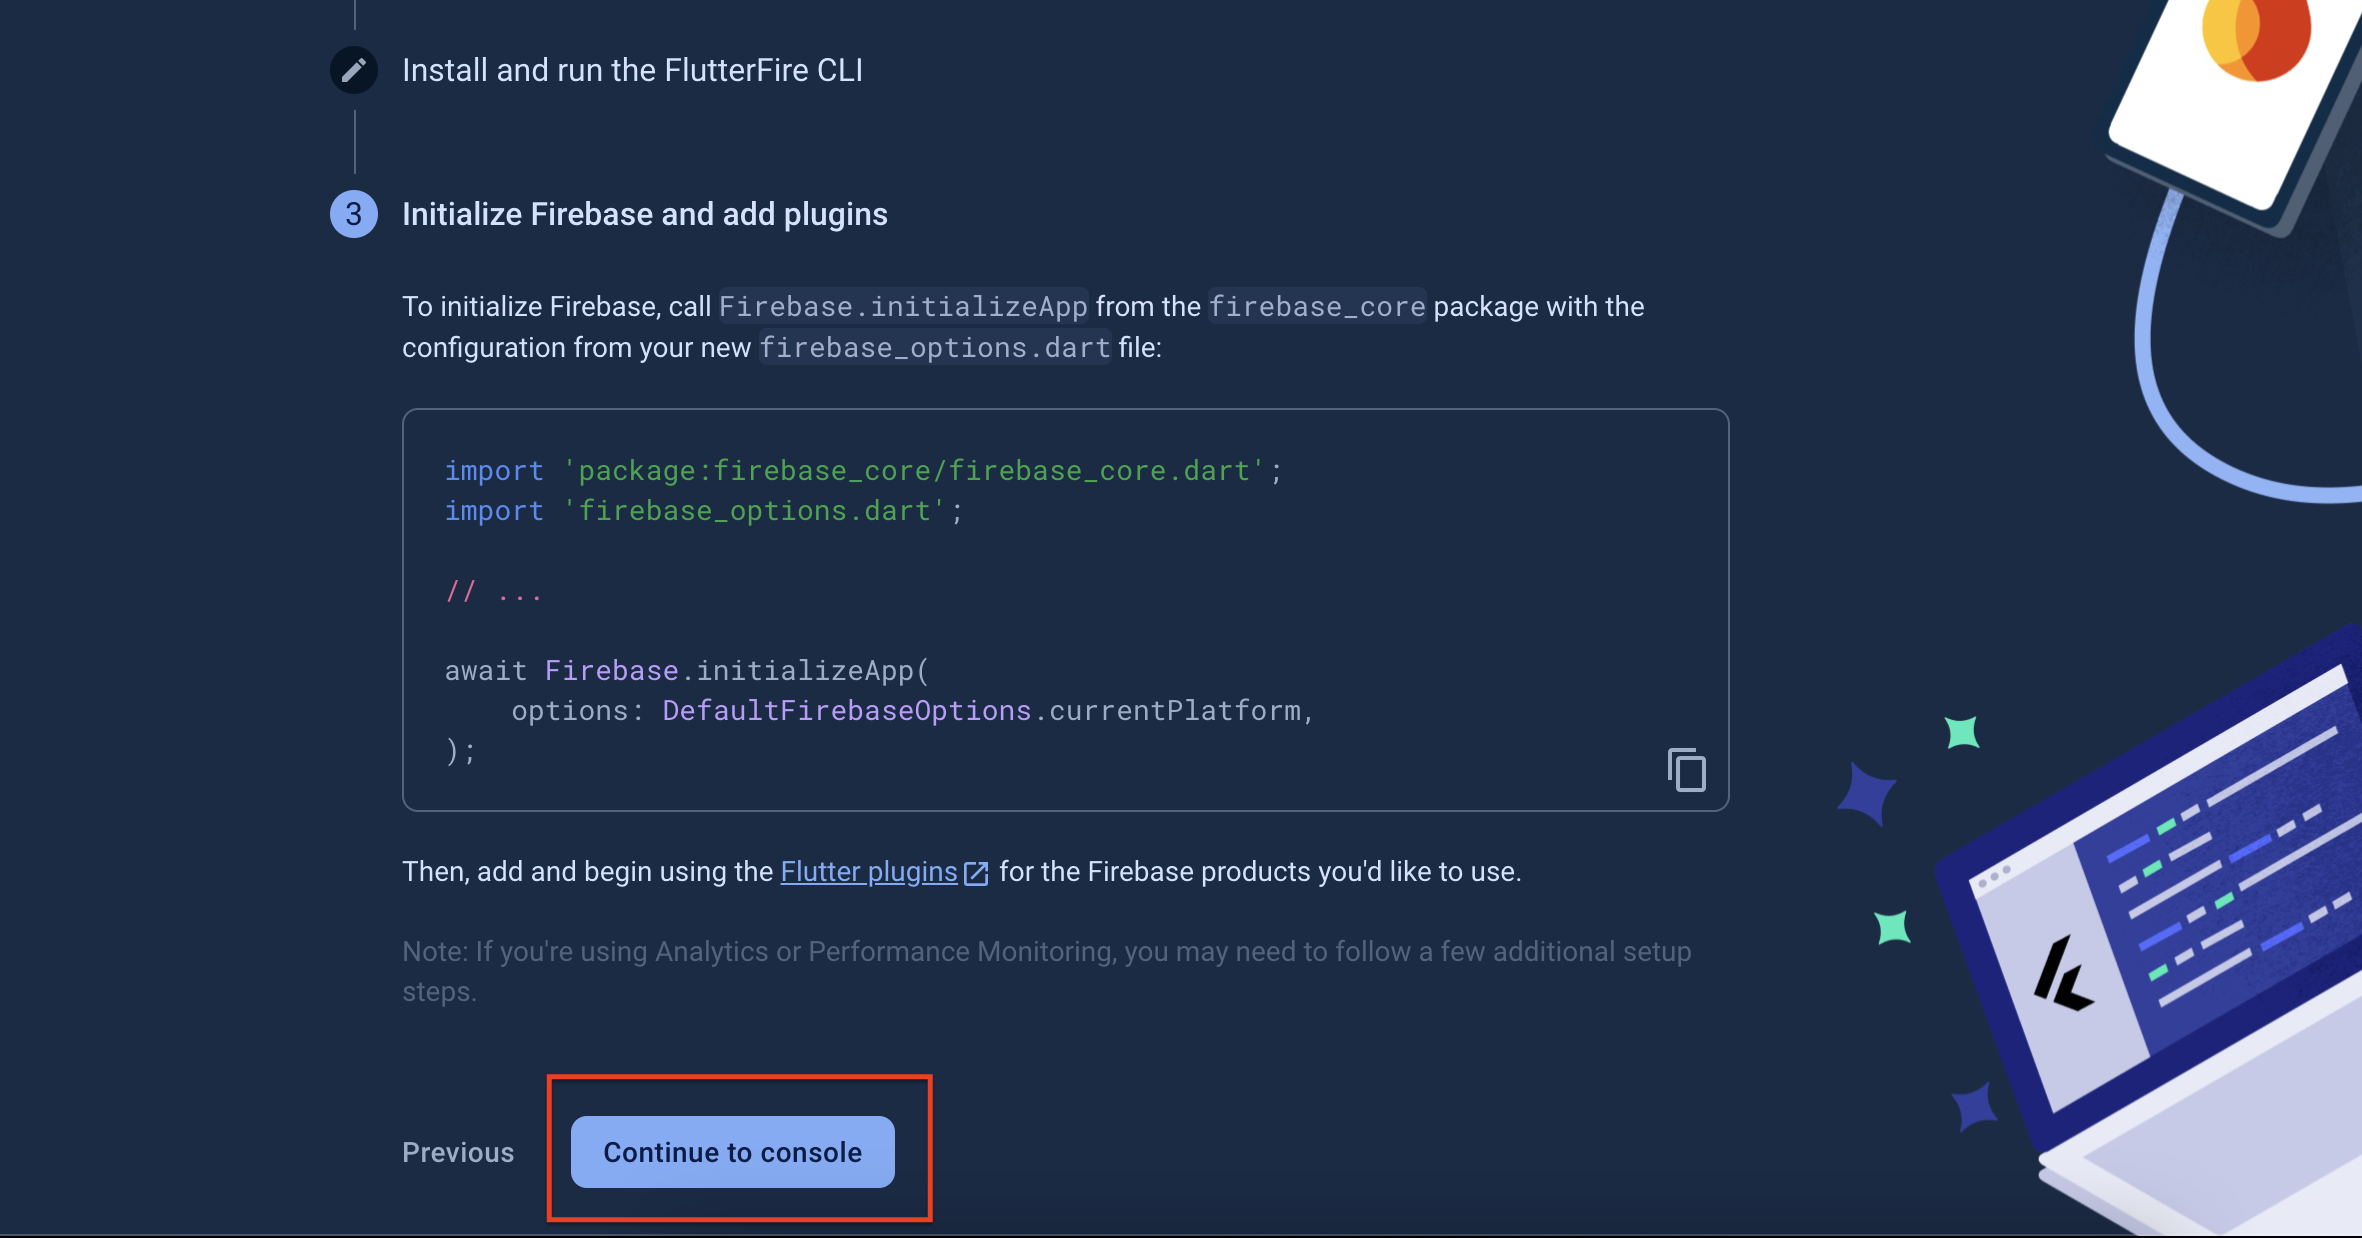
You will be prompted to select the platforms your configuration should support.
Use the arrow keys and space to select all platforms (android, ios, macos, web, windows) and press enter.
After running the command, click on “Continue to console” as shown in the screenshot below.
Note: If you face any issues while installing the FlutterFire CLI tool or running Firebase commands, you may need to set up Firebase manually.
Please note that manual setup of Firebase is not covered under our support. If the official SDKs do not work, we recommend referring to the
official Firebase documentation for further assistance.
Step-by-Step Video Guide :
Add Firebase to Android App
Get SHA1 & SHA256 Keys
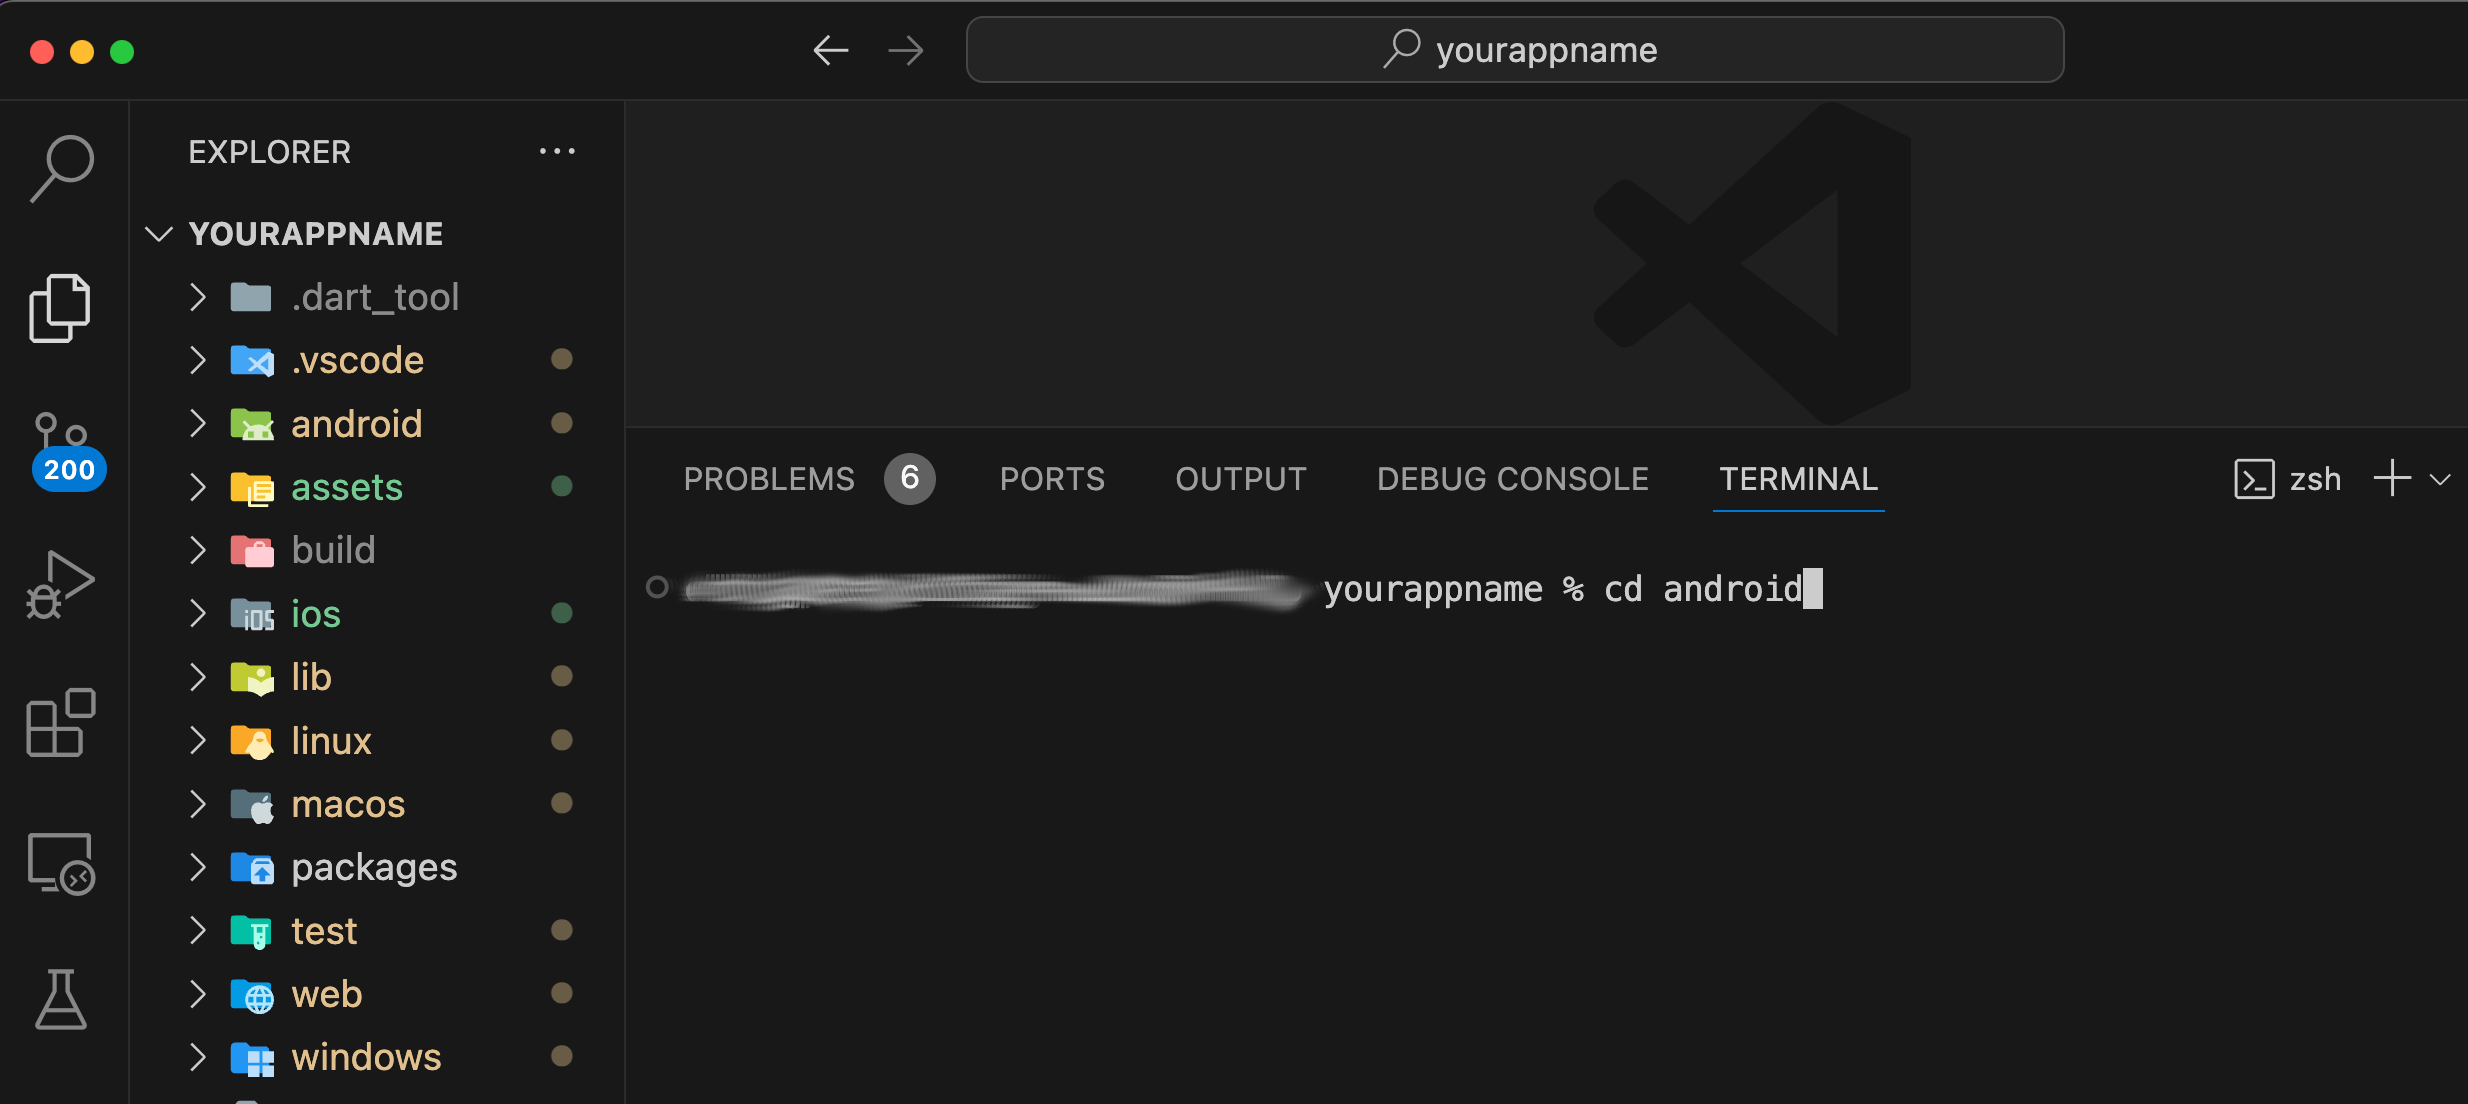
Go to your project directory in VS Code & Open the terminal.
Run cd android to navigate to the Android directory:
cd android
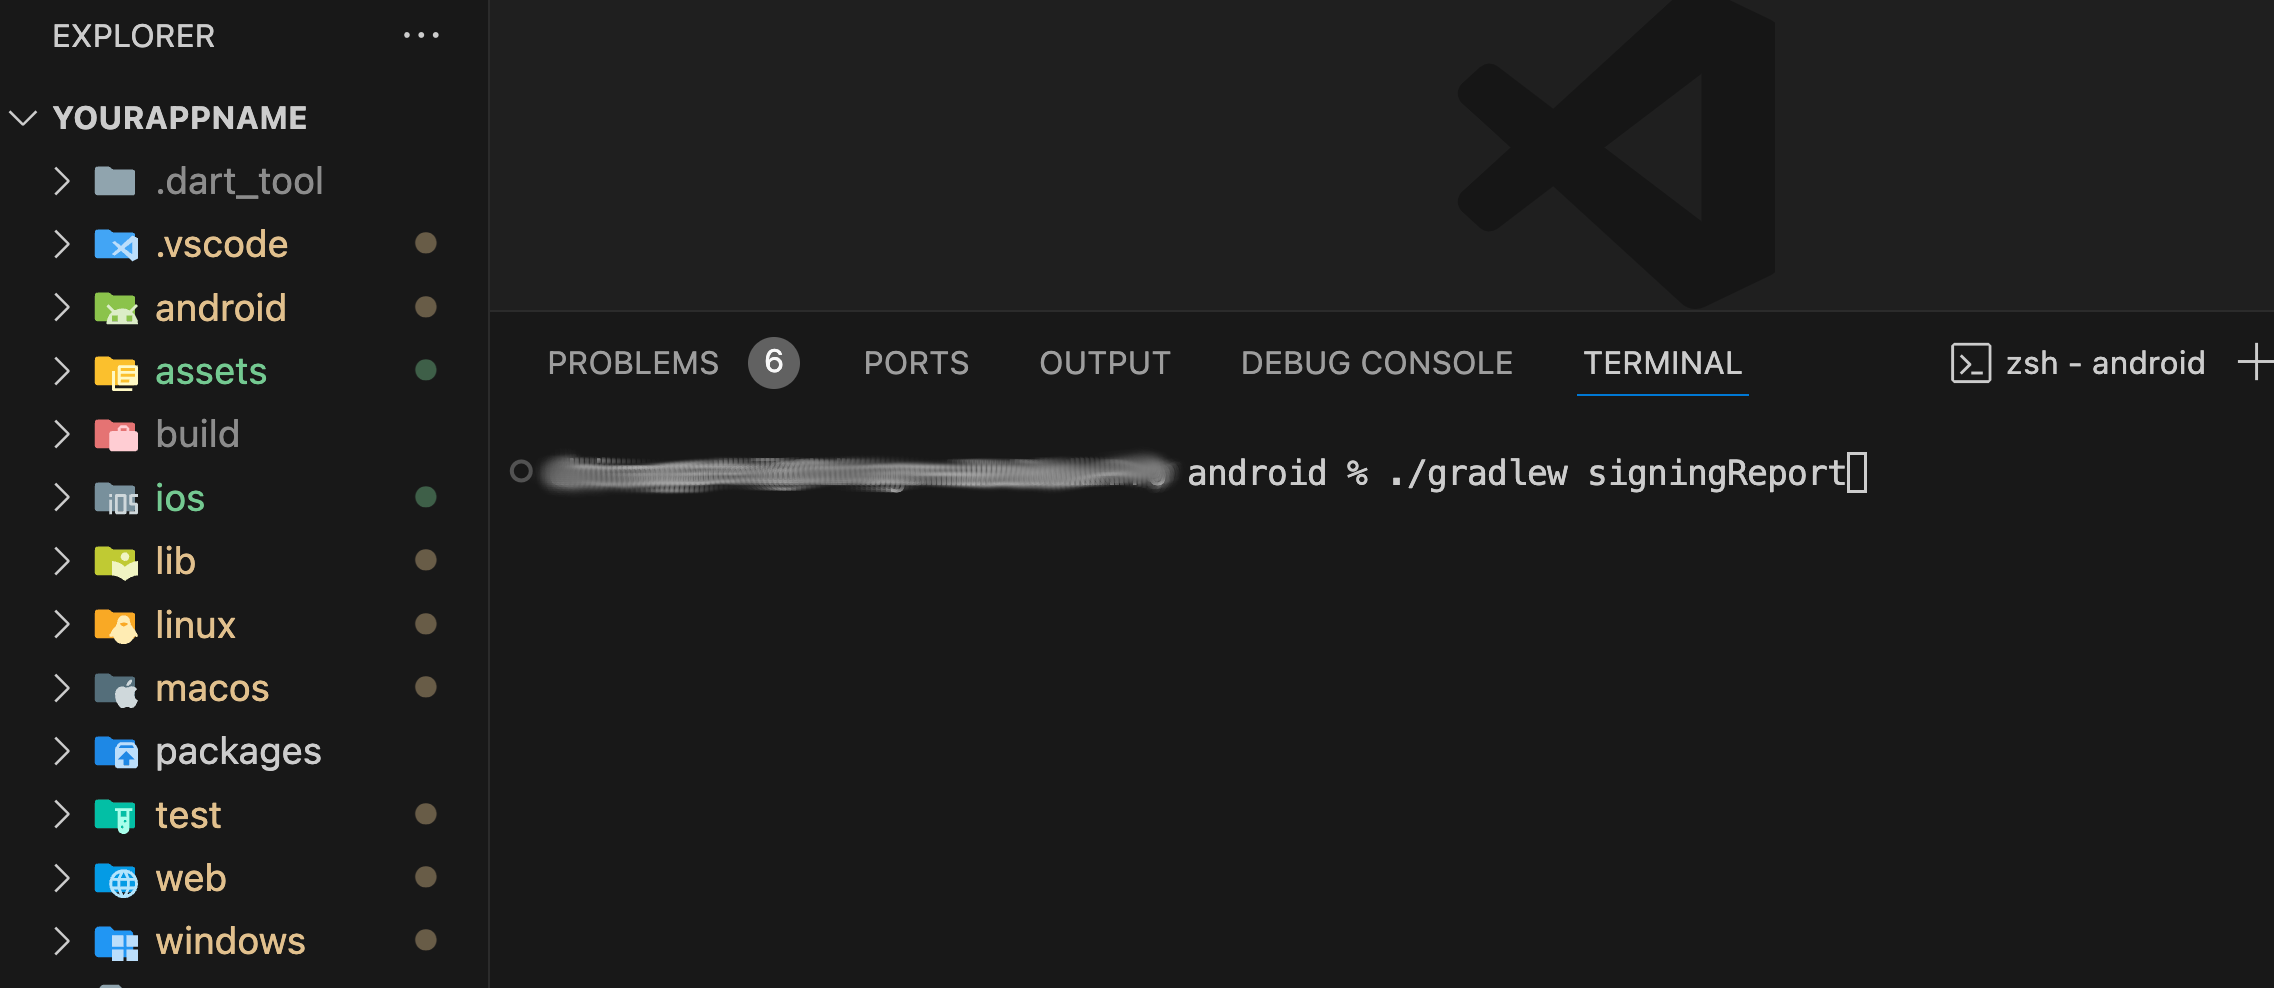
Run ./gradlew signingReport to generate the signing report:
./gradlew signingReport
It will display the SHA1 and SHA256 keys similar to the screenshot below.
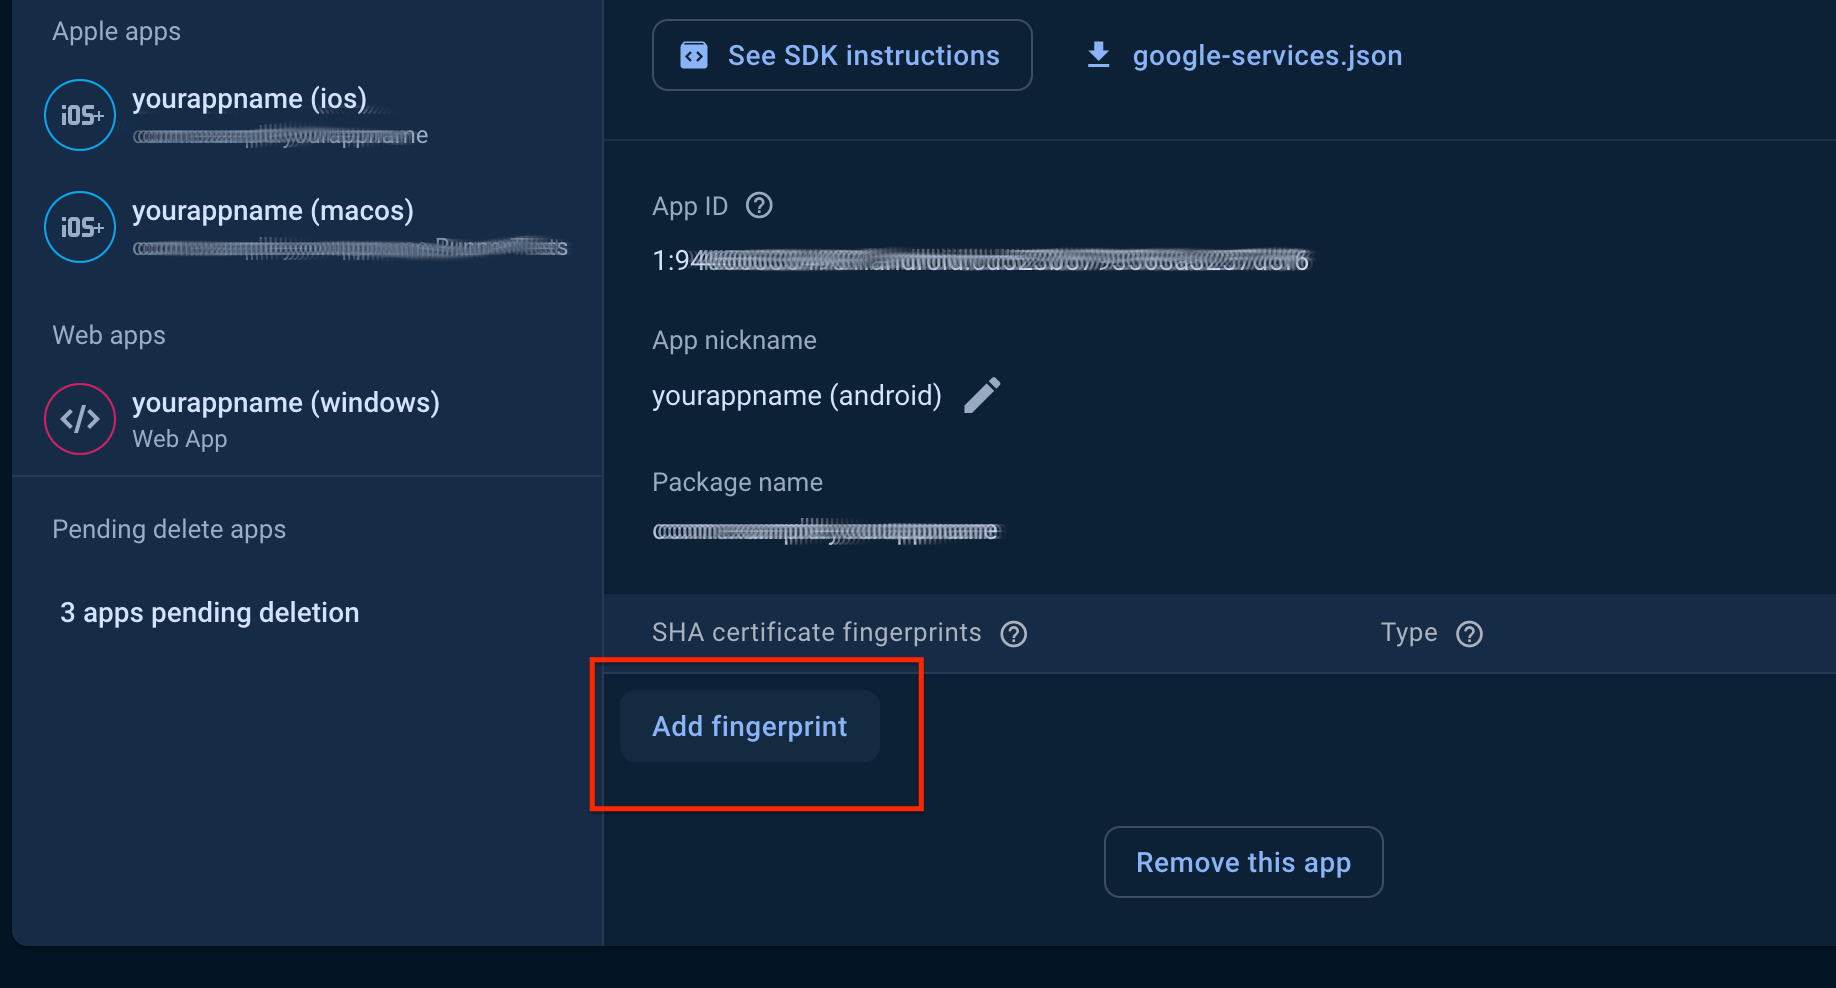
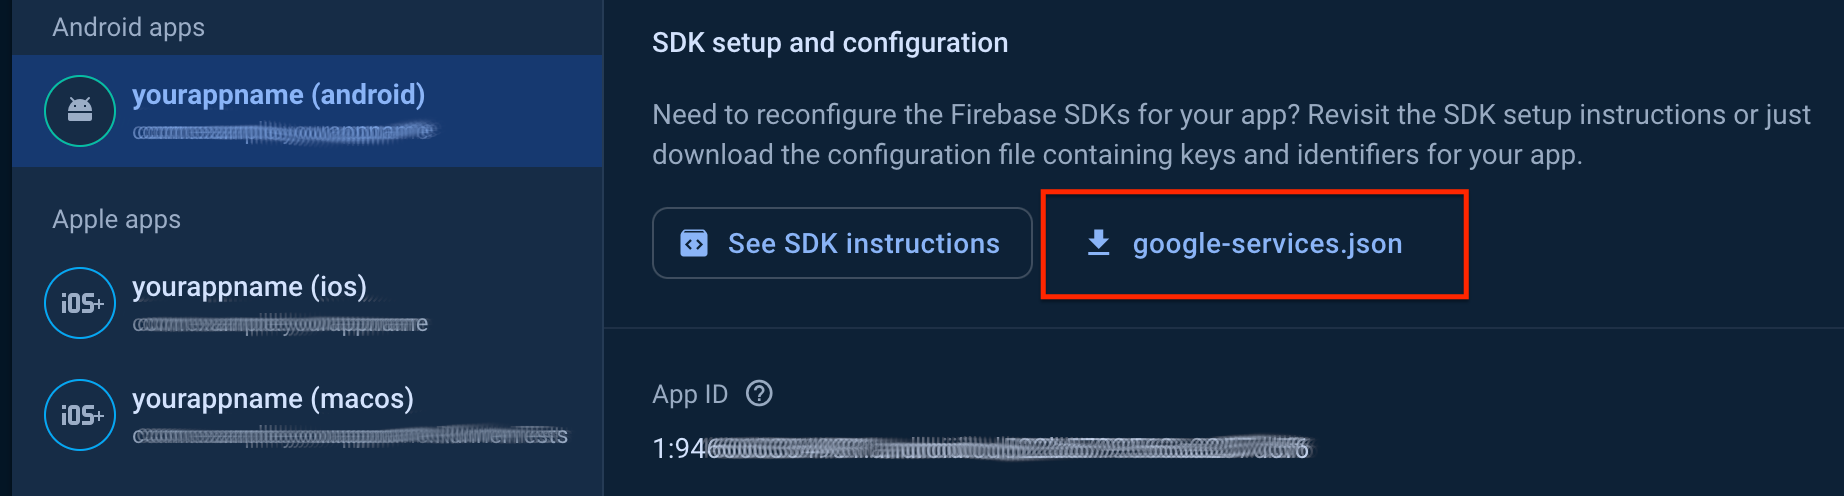
Navigate to your Firebase project settings & Add the generated SHA1 and SHA256 keys to your Firebase project one by one.
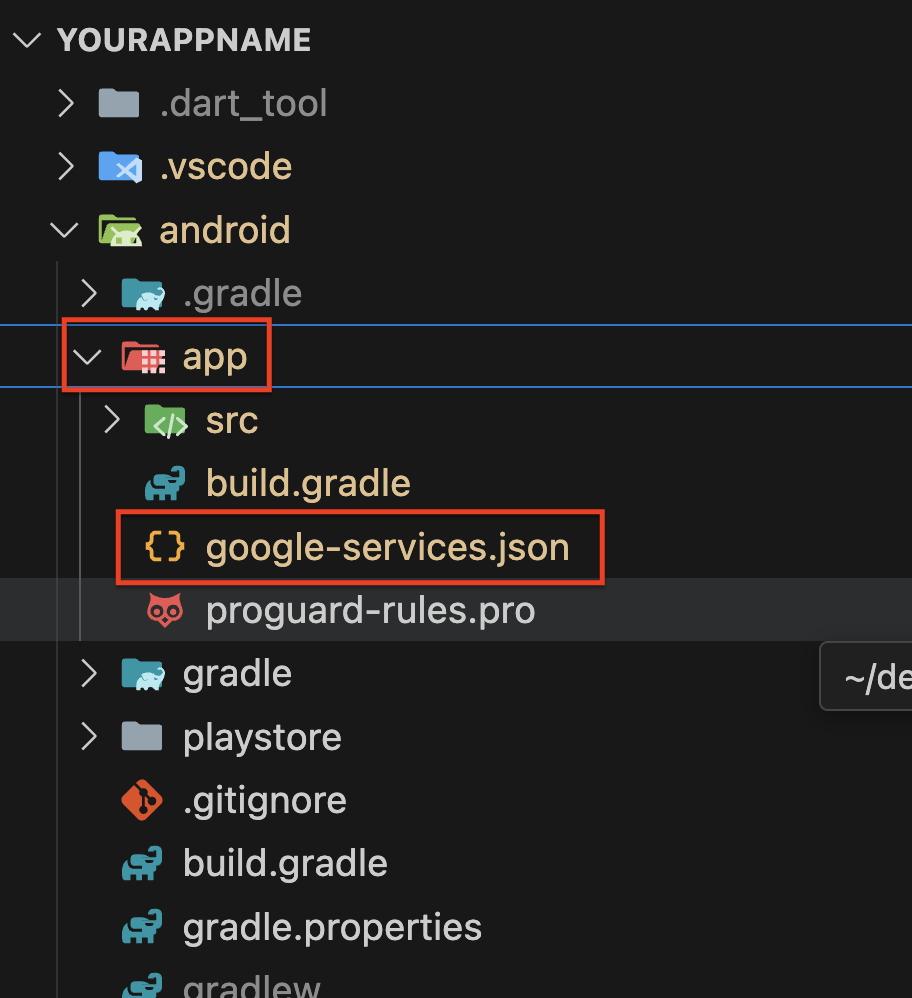
After adding the keys, download the google-services.json file from your Firebase project settings.
Place the google-services.json file in the android/app directory of your Flutter project.If the file already exists, replace it with the new one.
Note: Ensure that you follow each step carefully to correctly configure Firebase for your Android app.
Verify that the google-services.json file is placed in the correct directory and that the SHA keys are added to Firebase.
Step-by-Step Video Guide :
Add Firebase to iOS App
Download GoogleService-Info.plist
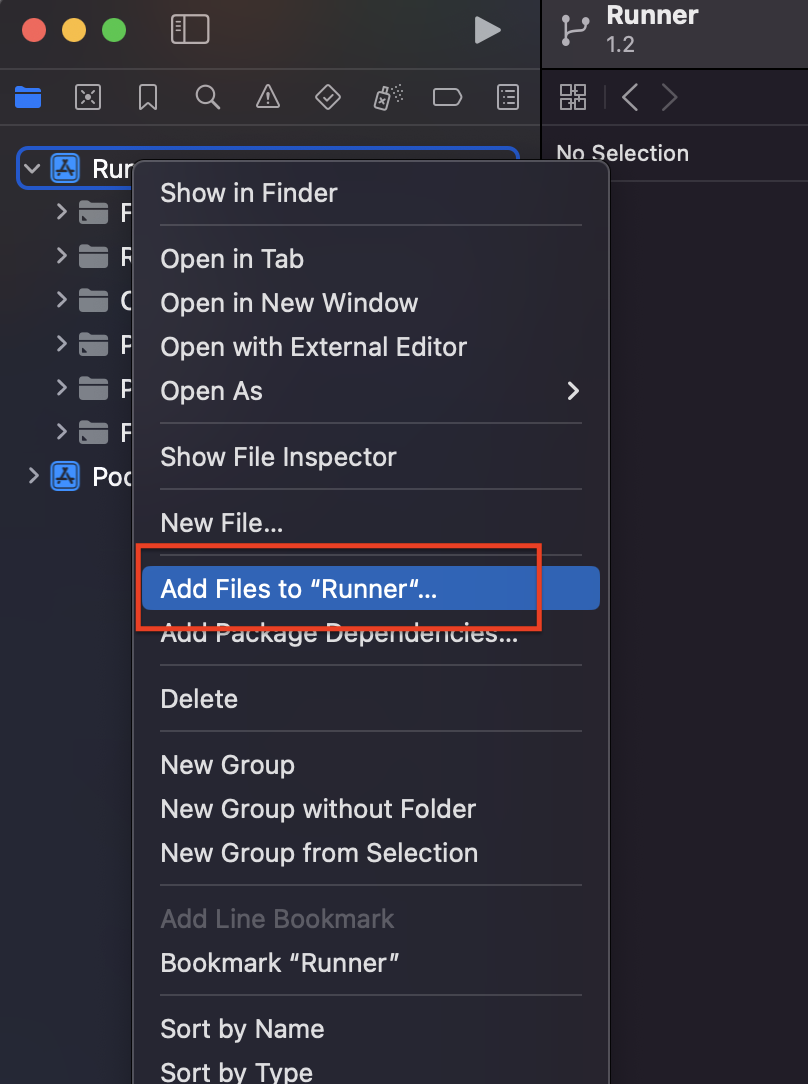
Go to your project directory in VS Code & Open the terminal.In the Firebase Console, Select your project & Download the GoogleService-Info.plist file.
Place the GoogleService-Info.plist file in the 'ios/Runner' directory of your Flutter project.
                                                    •   Open Xcode.
	                                                •	Right-click on the project name in the project navigator.
	                                                •	Select “Add Files to [your project name]”.
	                                                •	Select the GoogleService-Info.plist file you downloaded.
Example Screenshot:
Note:
• Ensure that the GoogleService-Info.plist file is added correctly to your Xcode project.
• Verify that the file is placed in the correct directory (ios/Runner) in your Flutter project.
Note
You’ve successfully set up Firebase for your Apps.
Now you can start integrating Firebase services such as Firestore, Authentication, and Analytics to enhance your app.
Step-by-Step Video Guide :
Enable Firebase Authentication ( Mobile - Gmail - Apple )
Overview
To enable login with OTP, Gmail, and Apple, you need to configure Firebase Authentication.
If you skip this step, you will not be able to log into the app.
Step-by-Step Instructions
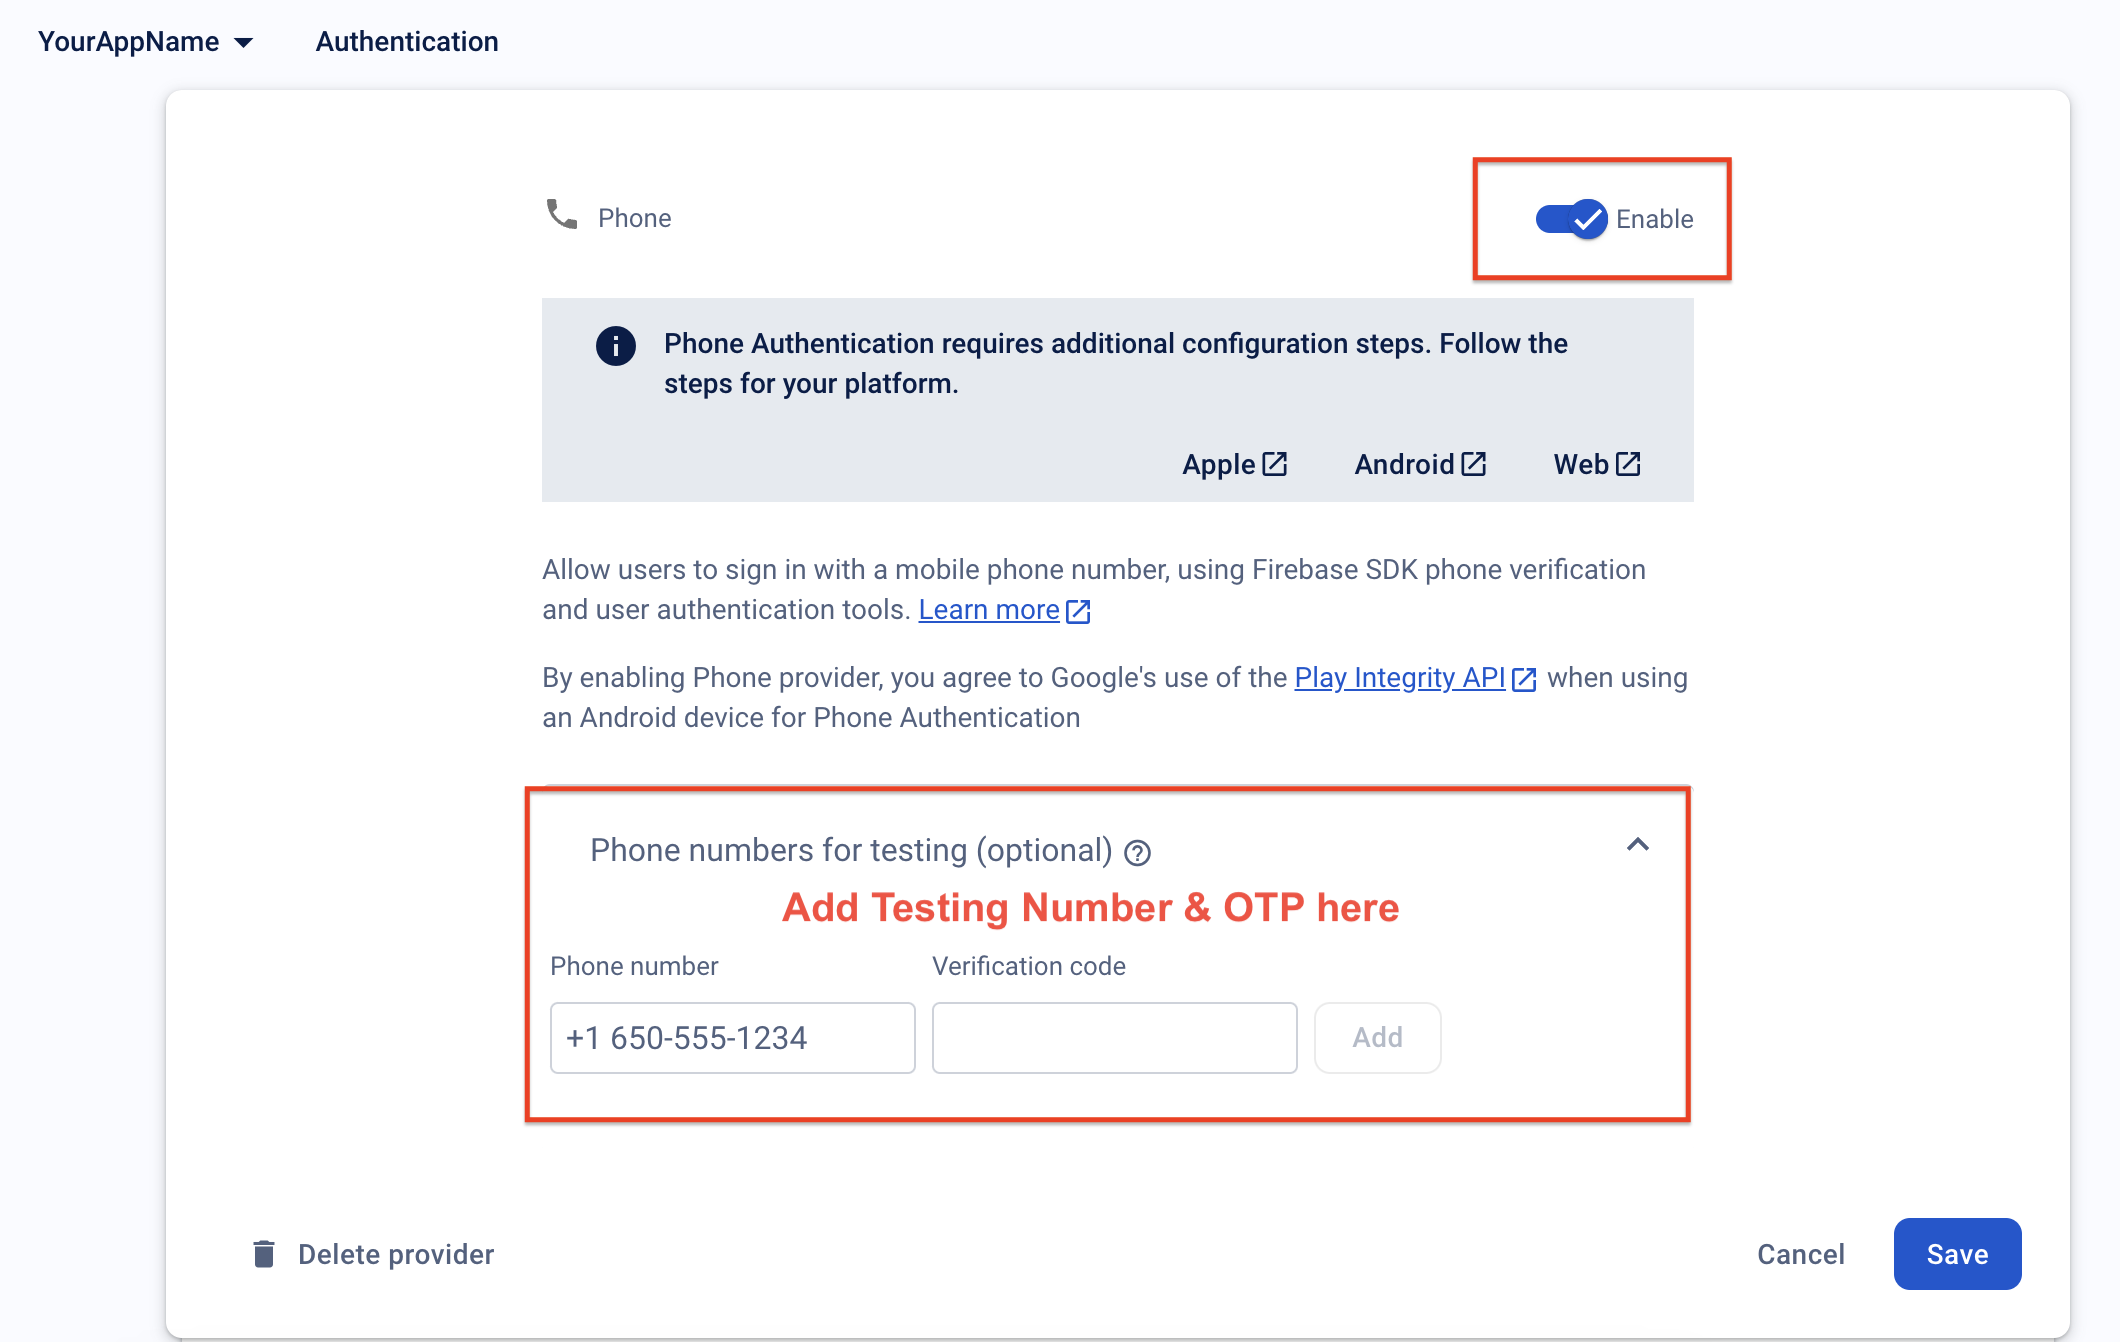
Step 1: Mobile Auth
In the Firebase Console, go to the Authentication section. Turn on the Phone login by tapping on the switch button as shown in the image below.
Add a Firebase testing number for testing purposes to avoid temporary blocks due to multiple logins with the same number or device.
Example Screenshot:
Step 2: Gmail - Apple Auth
Tap on the switch button to enable Gmail login as shown in the image below.
Tap on the switch button to enable Apple login as shown in the image below.
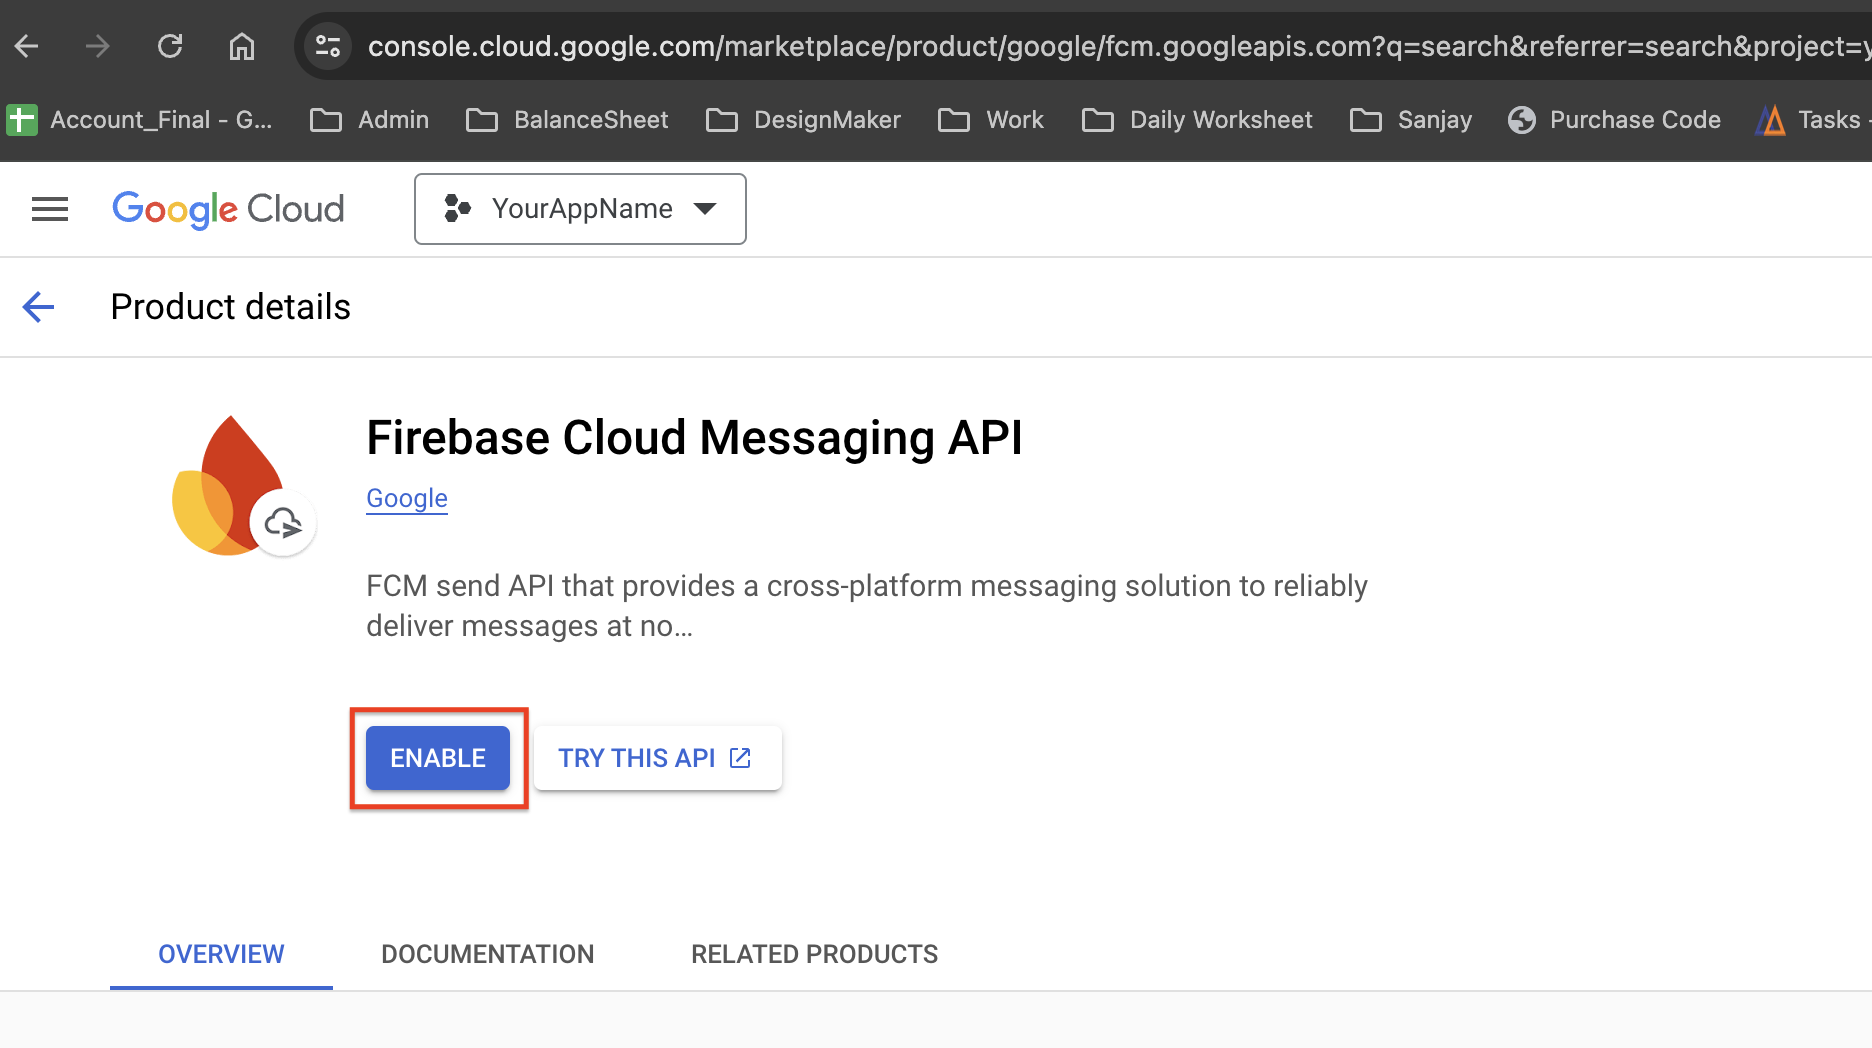
Step 2: Configure Cloud Messaging API for Gmail & OTP Release App
Search for “Firebase Cloud Messaging” on Google Cloud Console and enable it as shown in the screenshot below.
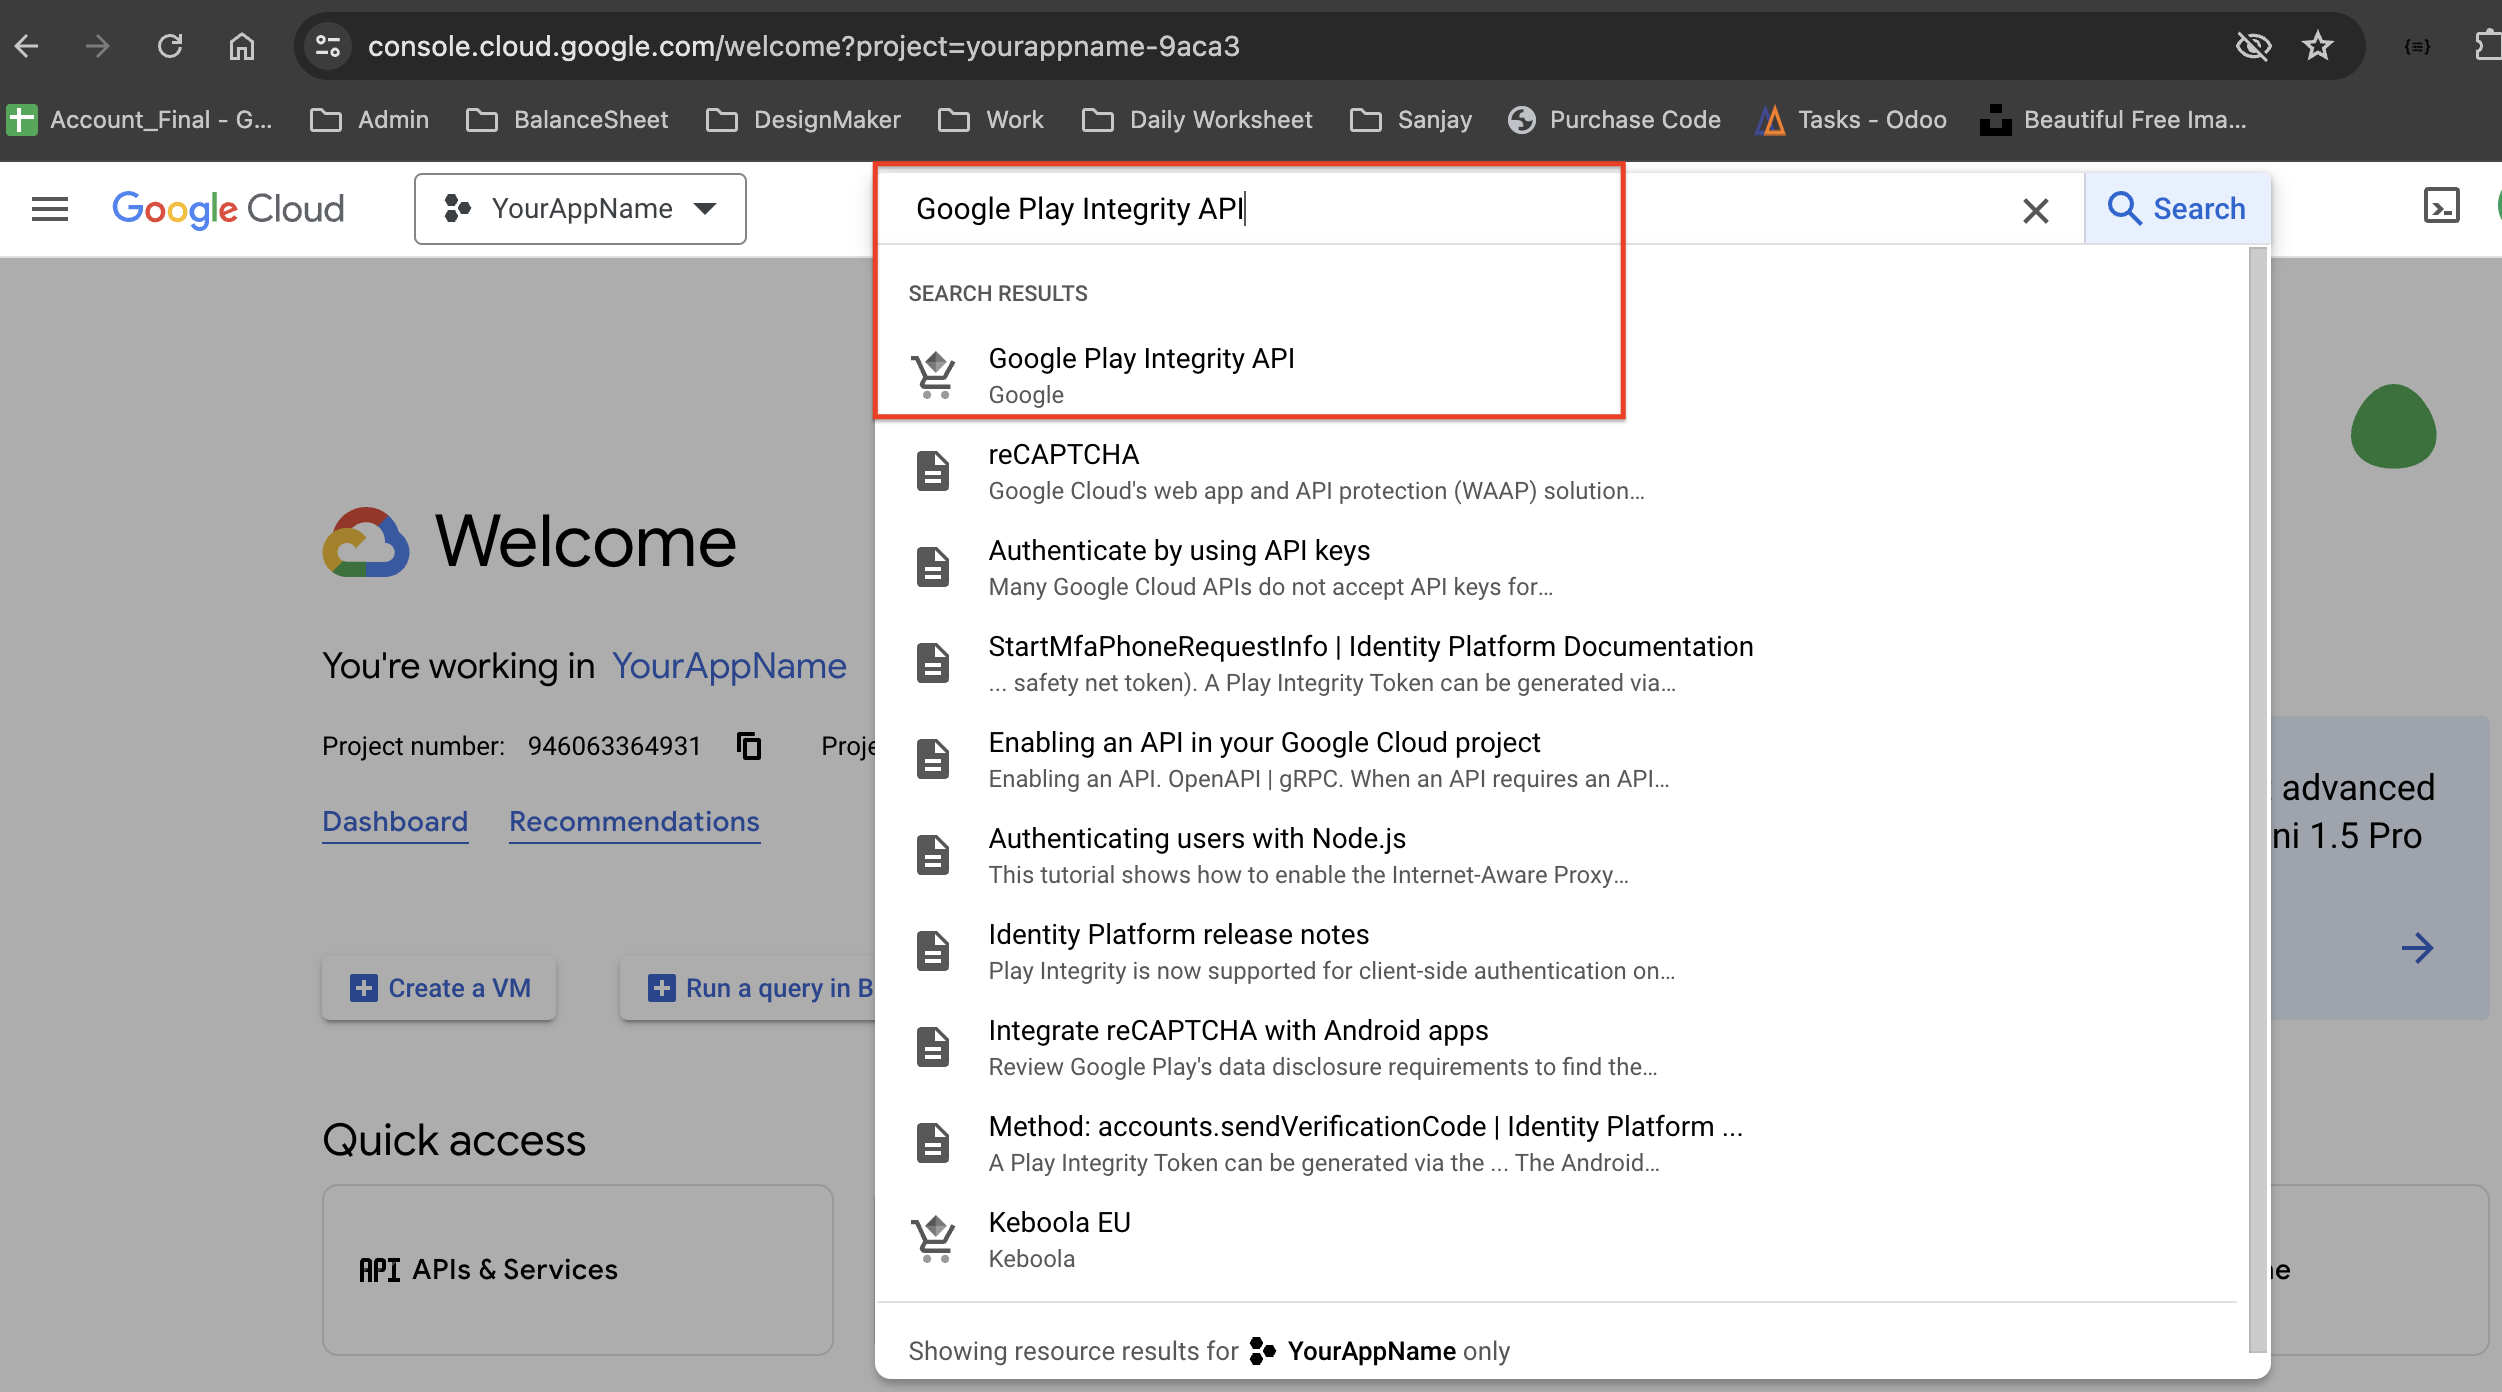
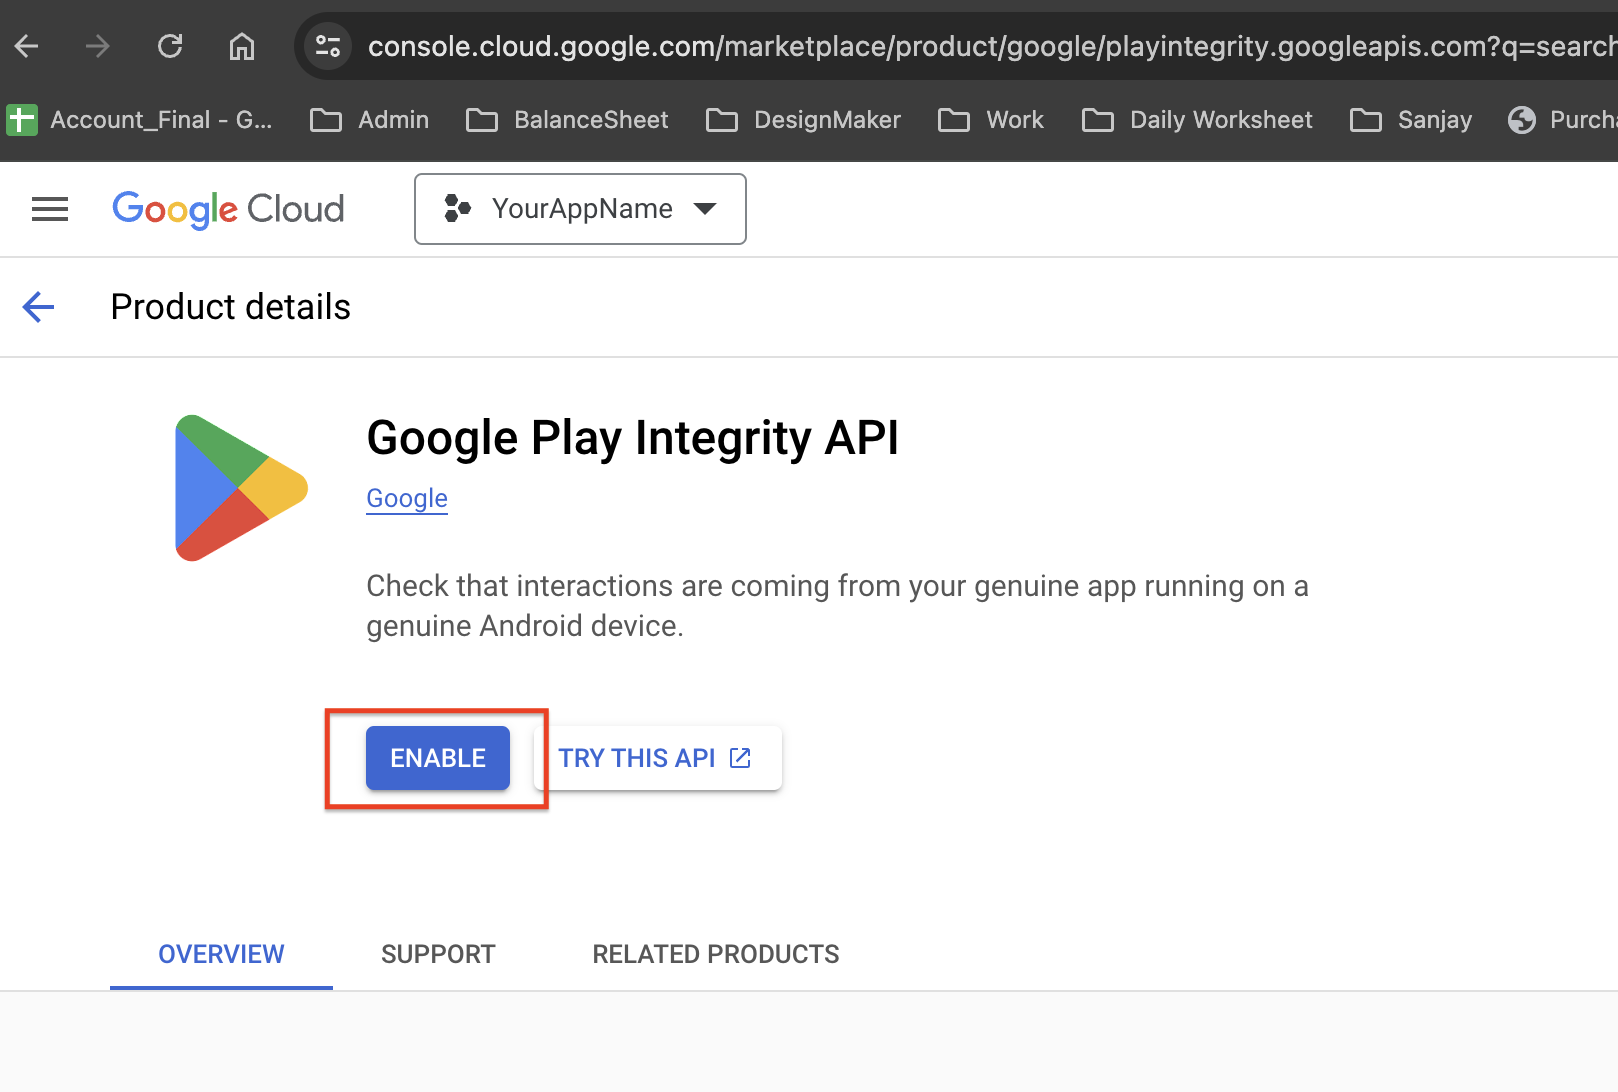
Search for “Google Play Integrity” on Google Cloud Console and enable it as shown in the screenshot below.
Note:
Make sure to add a Firebase testing number for testing purposes.
If you login multiple times with the same number or device, Firebase may temporarily block you.
Step-by-Step Video Guide :
Push Notification Setup ( Android - iOS App )
Overview
Setting up push notifications is essential for engaging users with timely alerts and updates.
This section provides detailed, step-by-step instructions to configure push notifications for both Android and iOS platforms using OneSignal and Firebase.
By following these steps, you'll be able to send notifications that enhance user experience and engagement in your mobile app.
1) Android Setup
Step 1: Generate Firebase Service Account Key
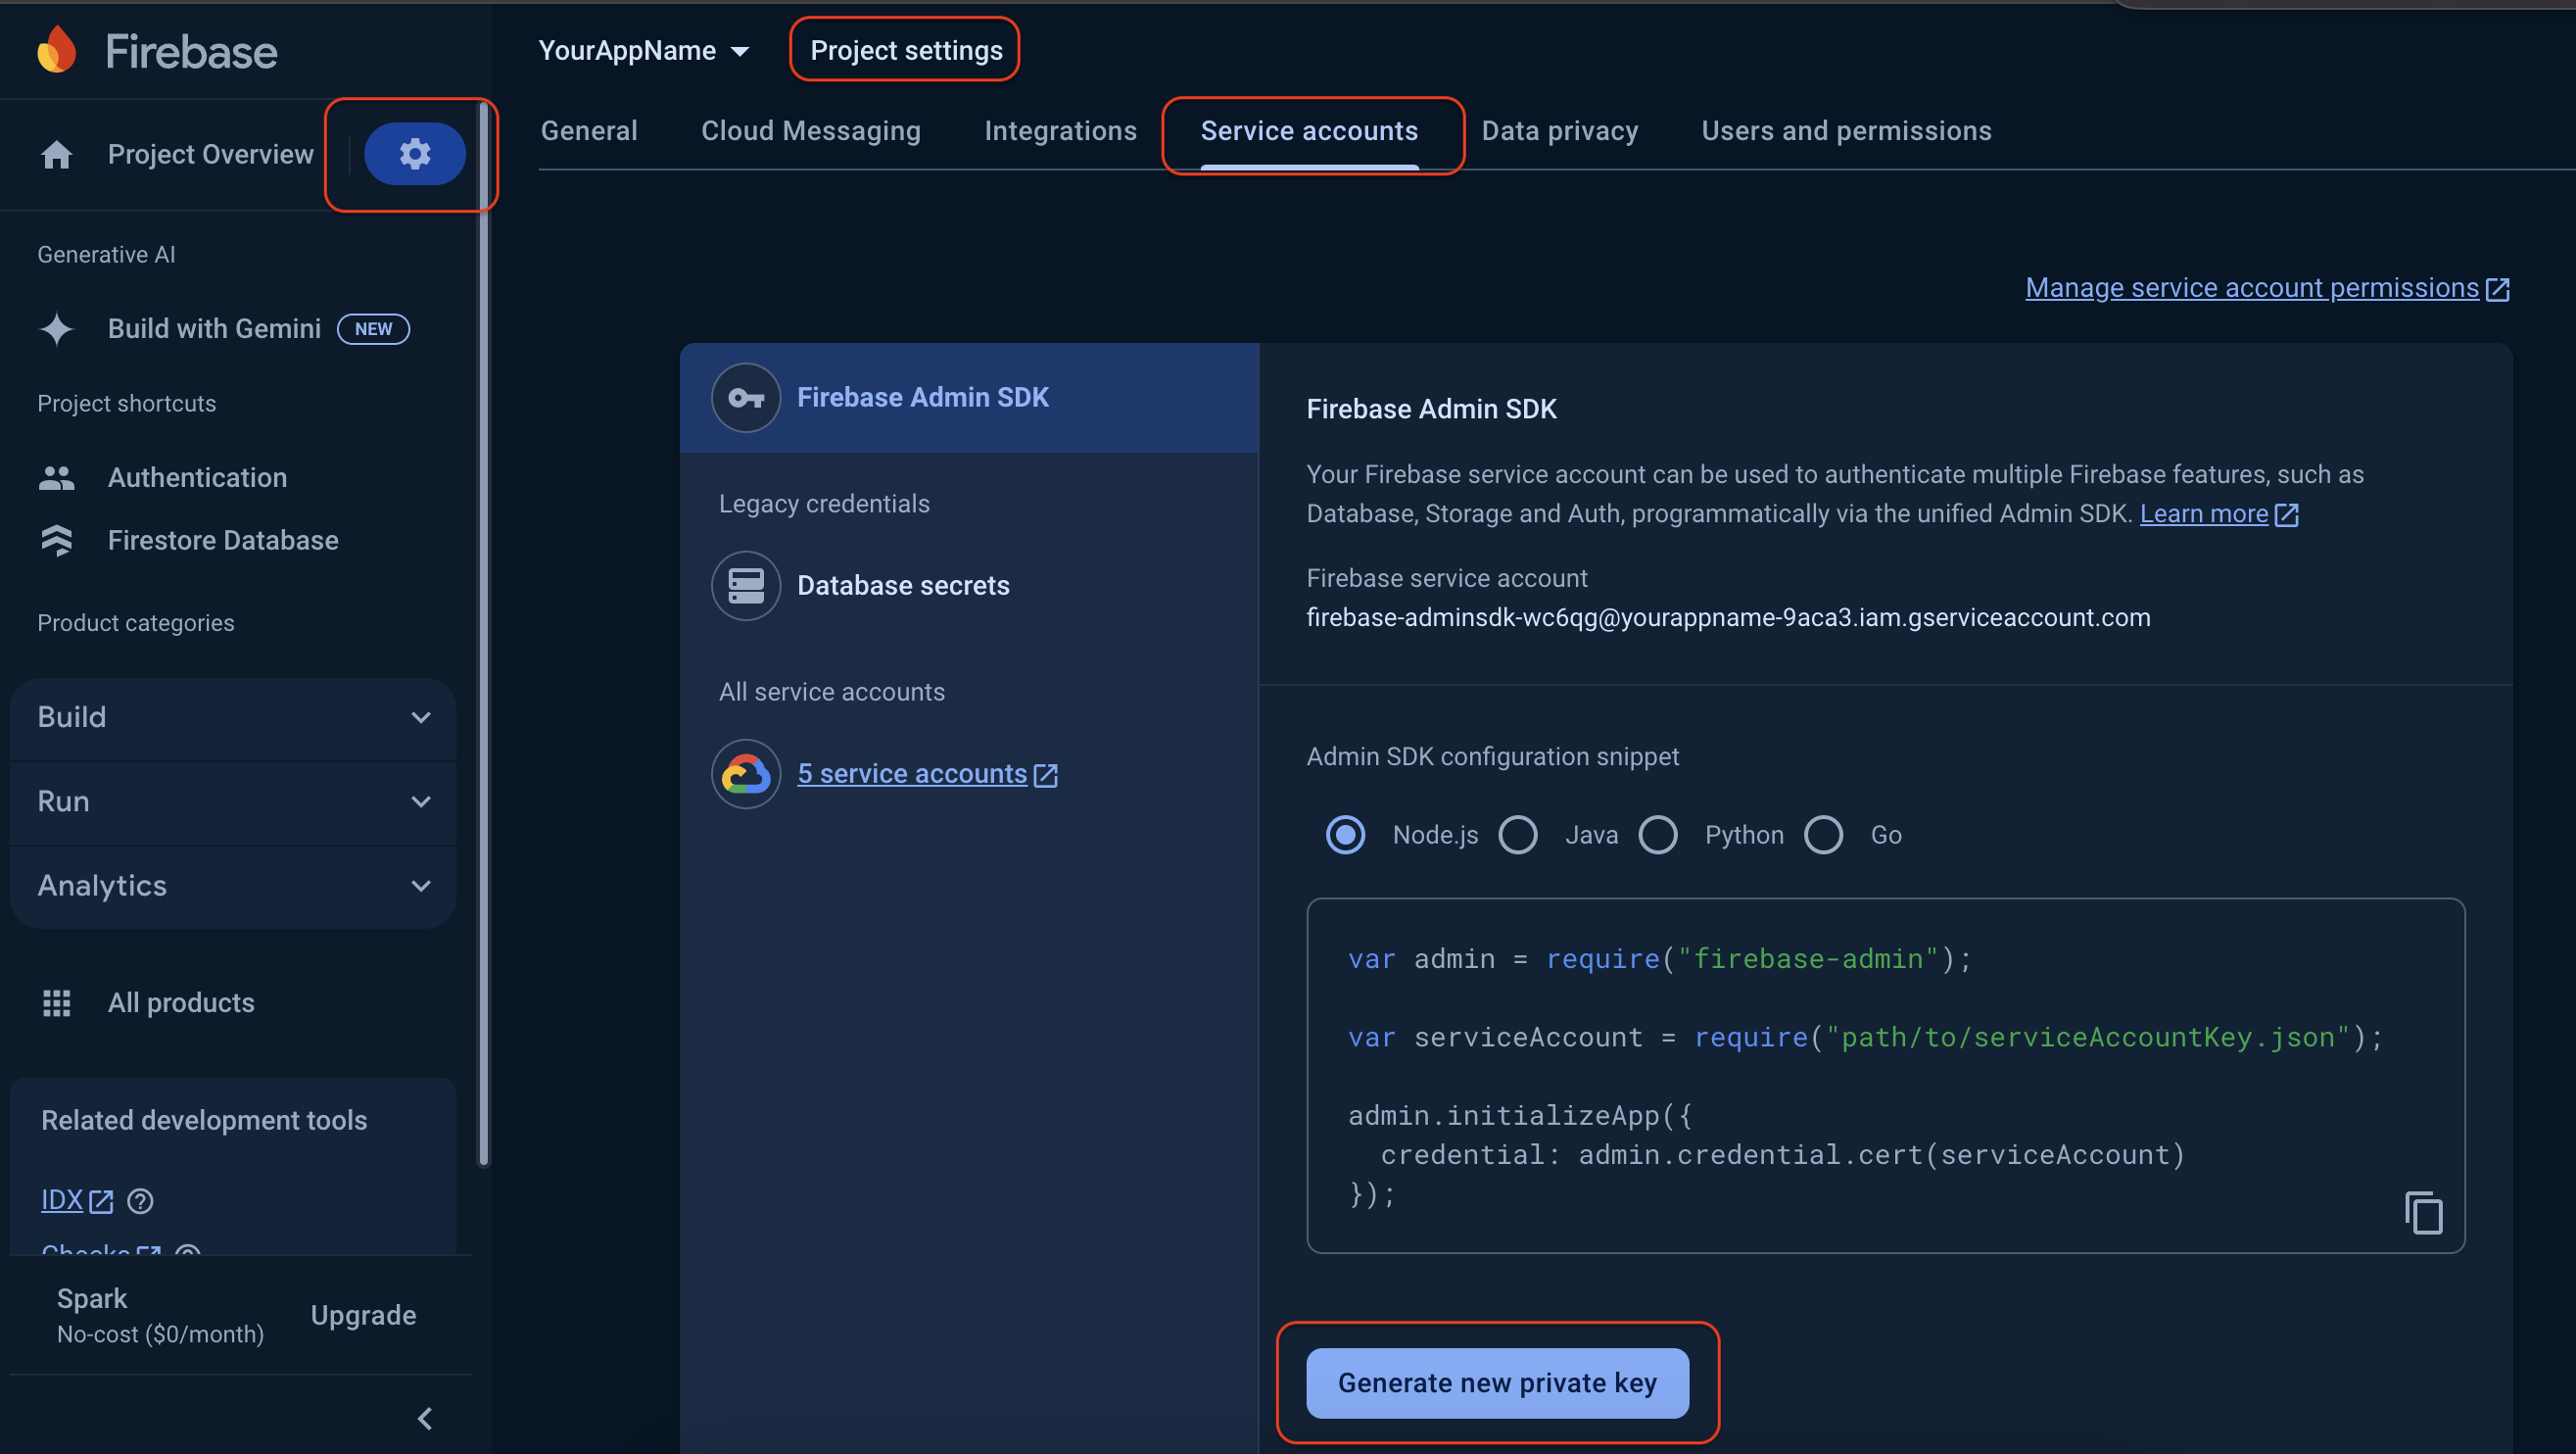
Open Firebase Console and navigate to Project Settings then Select the Service Accounts tab & Click on Generate new private key;
a file will be downloaded. Save this file in a secure location.
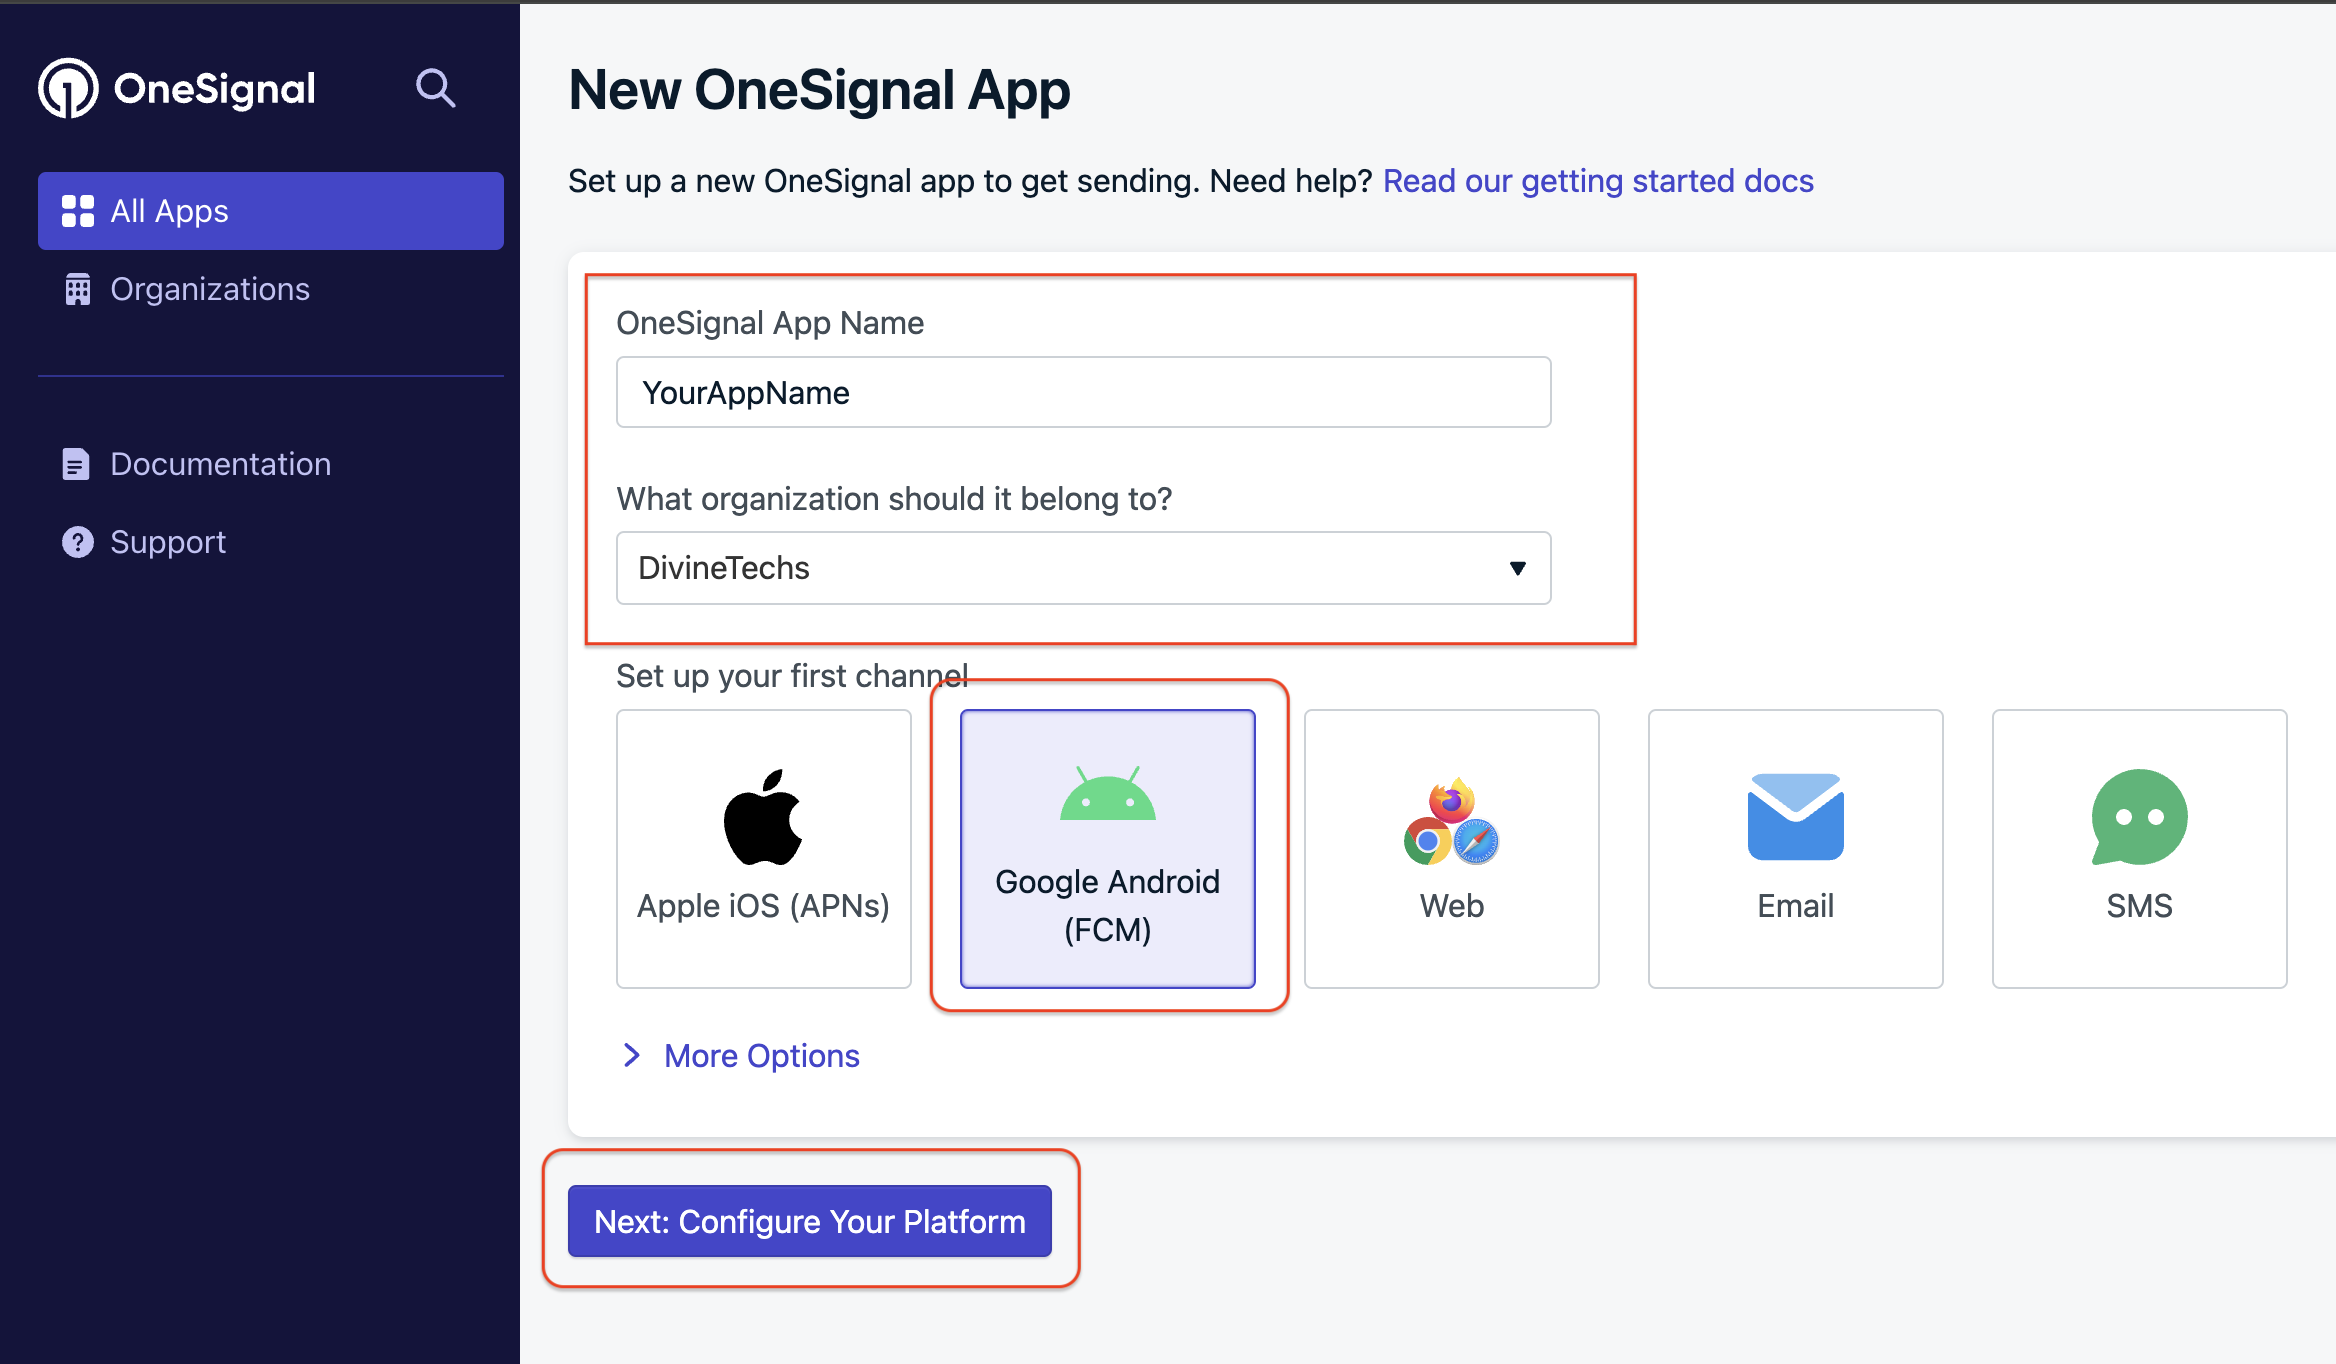
Create a new app by entering the App Name and Organization Name (create an organization if it doesn’t exist) & Select Google Android (FCM) as the platform. Click on Next
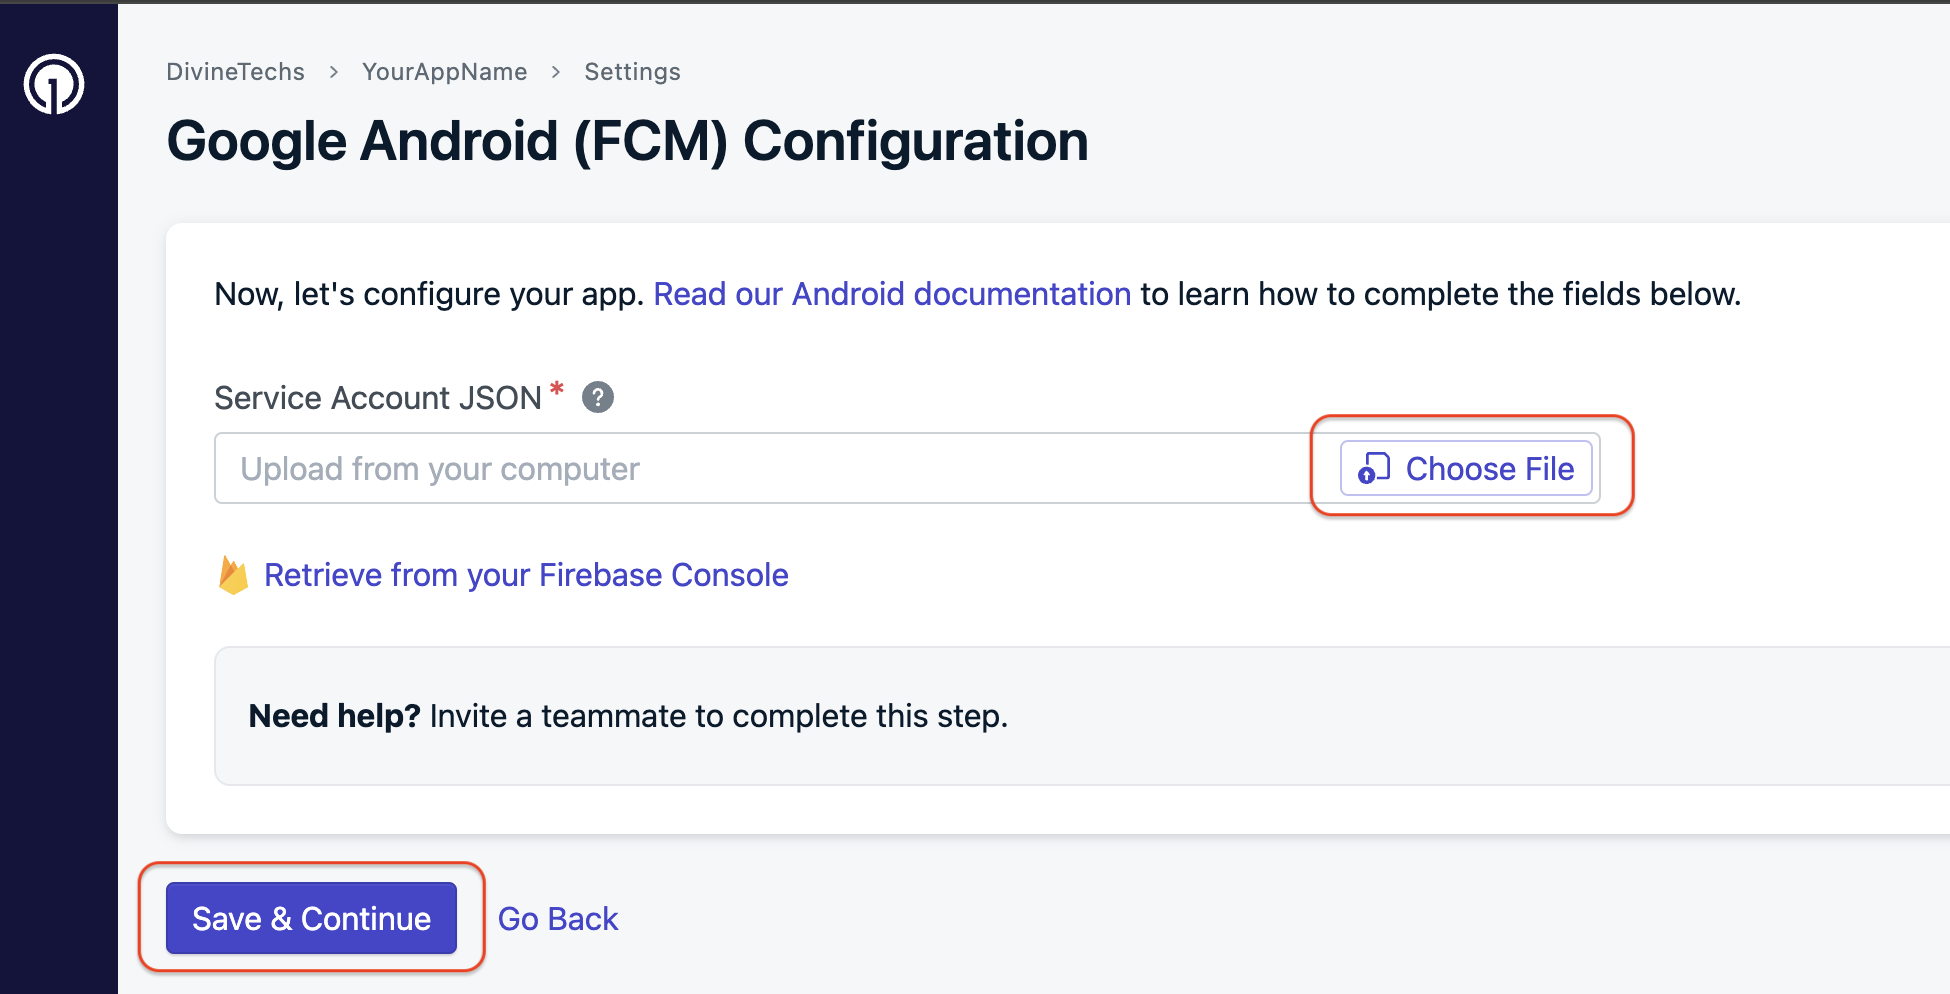
Upload the Firebase service account key file downloaded in Step 1. & Click Save & Continue.
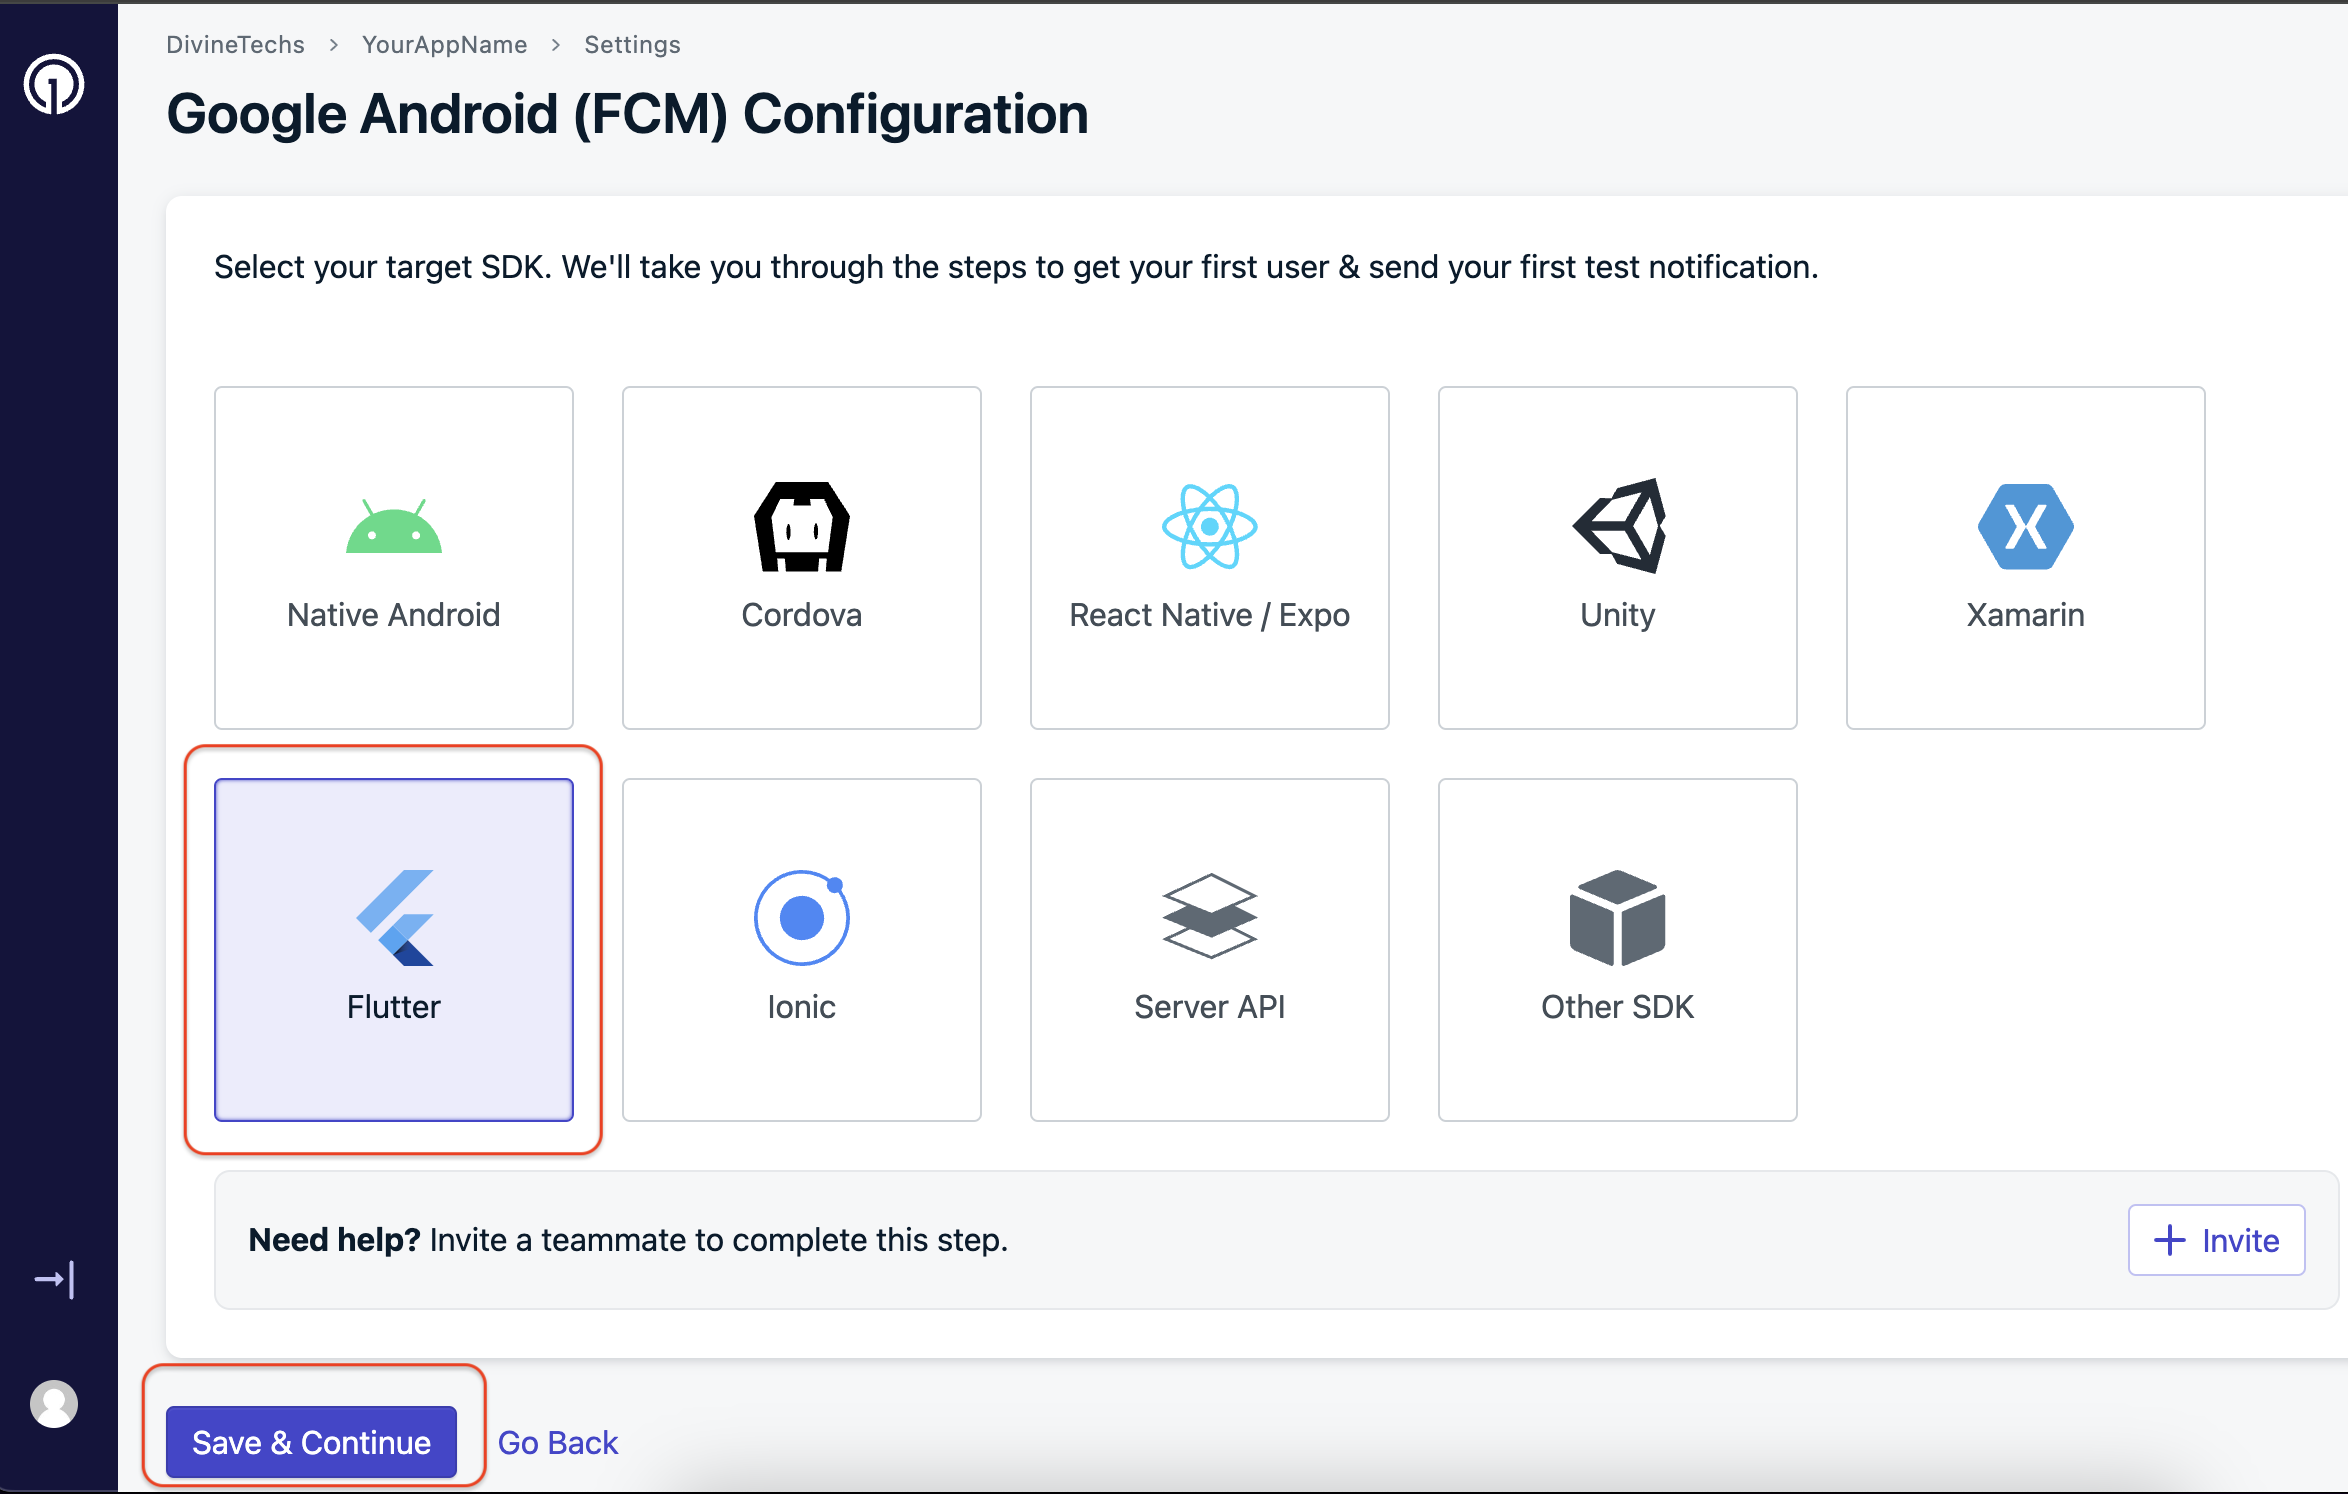
Choose Flutter as the platform and proceed to save the configuration.
Your OneSignal Android setup is now complete.
2) iOS Setup
Requirements:
An iOS mobile app
A paid Apple Developer Account with Admin Role
A OneSignal Account
Mac computer with Xcode 12+
Xcode project with Push Notification capability enabled
Step 1: Generate a .p8 Key for APNs Authentication
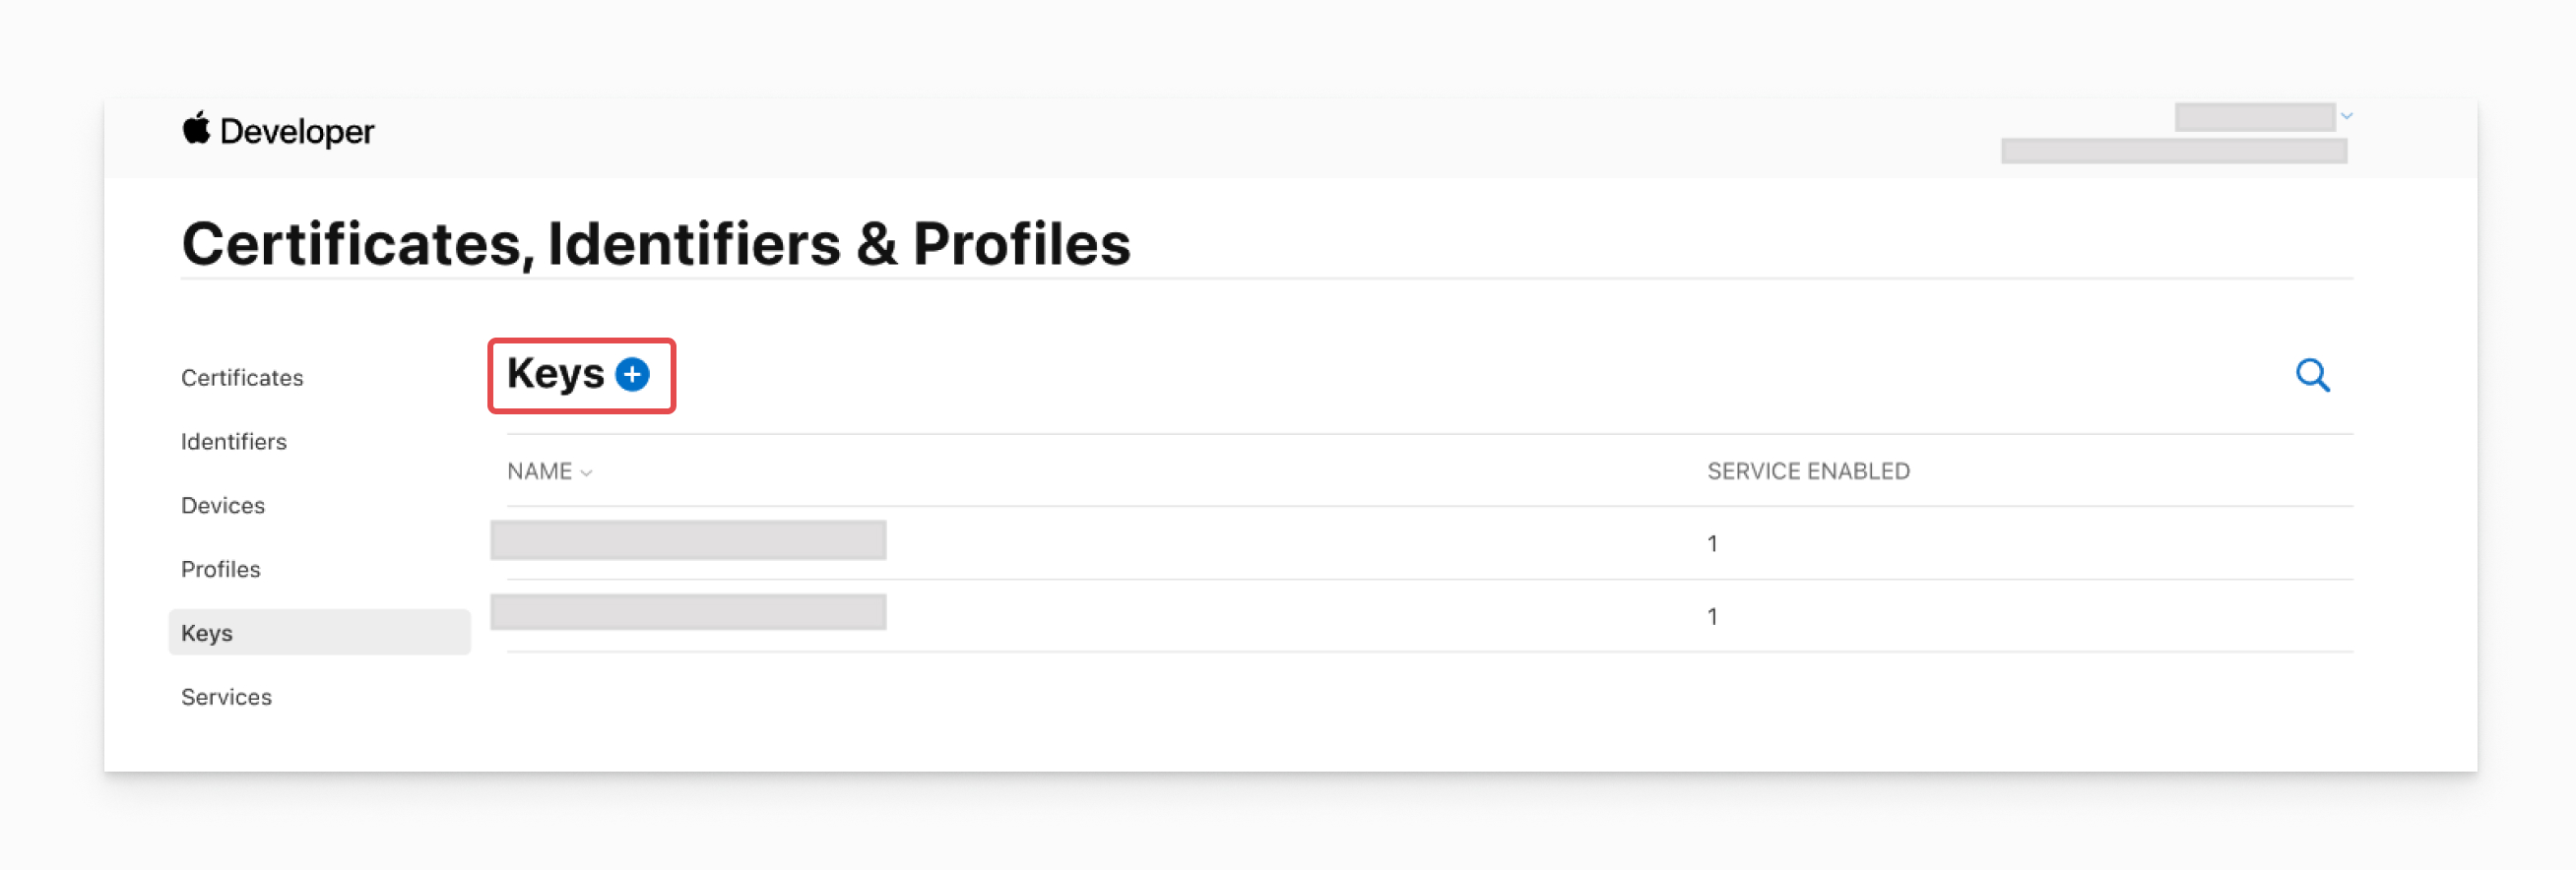
Navigate to Certificates, Identifiers & Profiles > Keys and click the Blue + button.
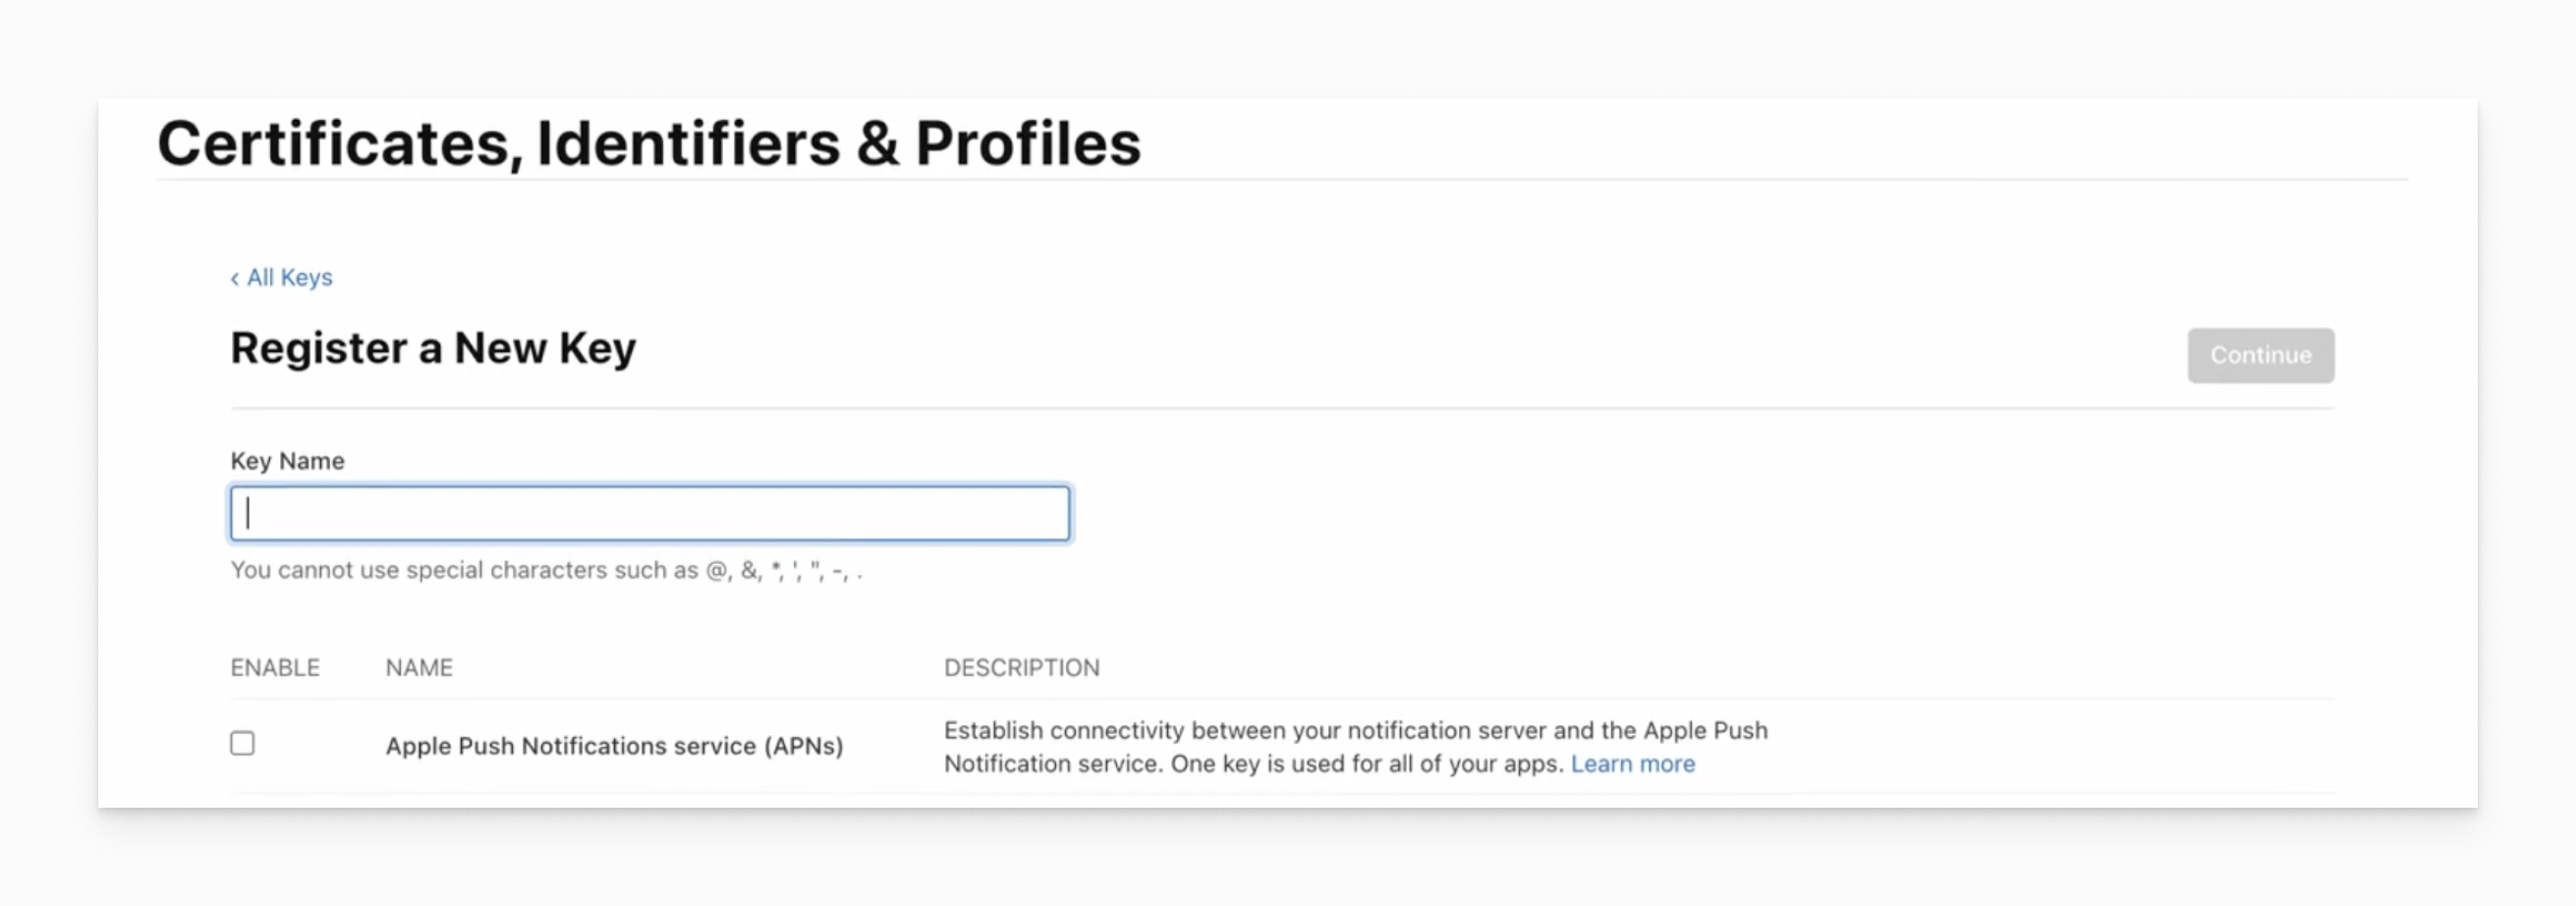
Select Apple Push Notifications service (APNs) and enter a name for the key.
Click Continue and then Register.
Download your new .p8 key and save it in a secure location.
Note:
You can only download the .p8 file once, so make sure to keep it in a safe place.
Step-by-Step Video Guide :
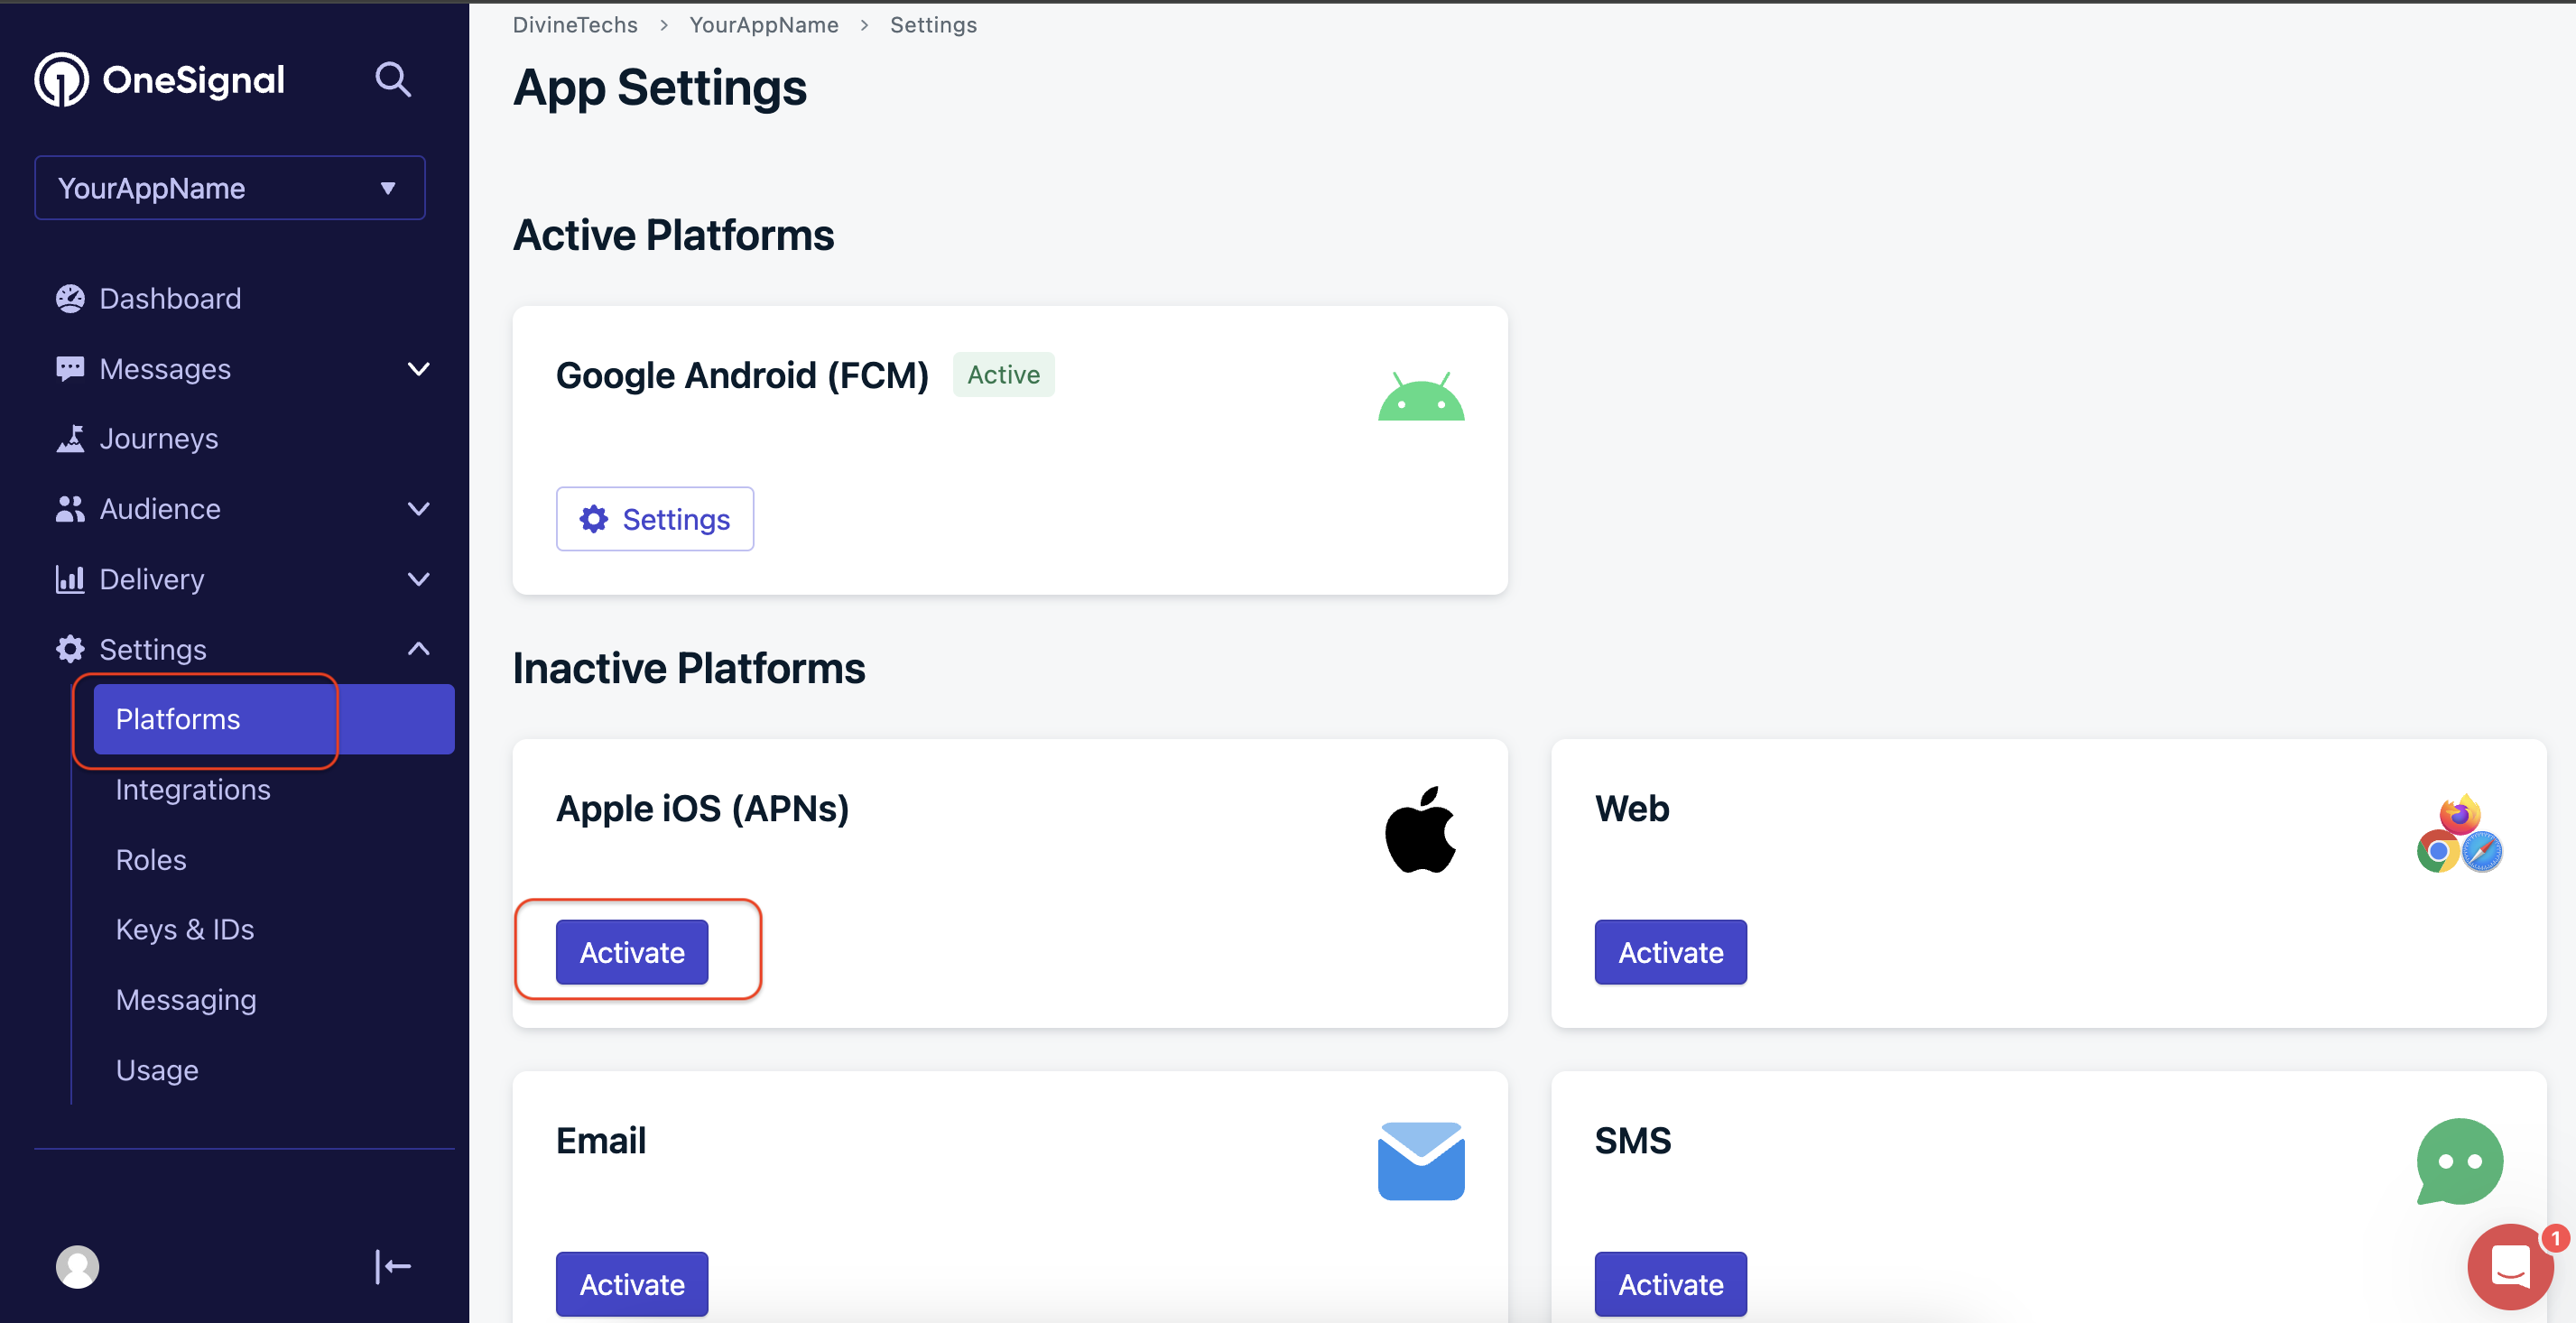
Step 2: Upload Your Push Key to OneSignal
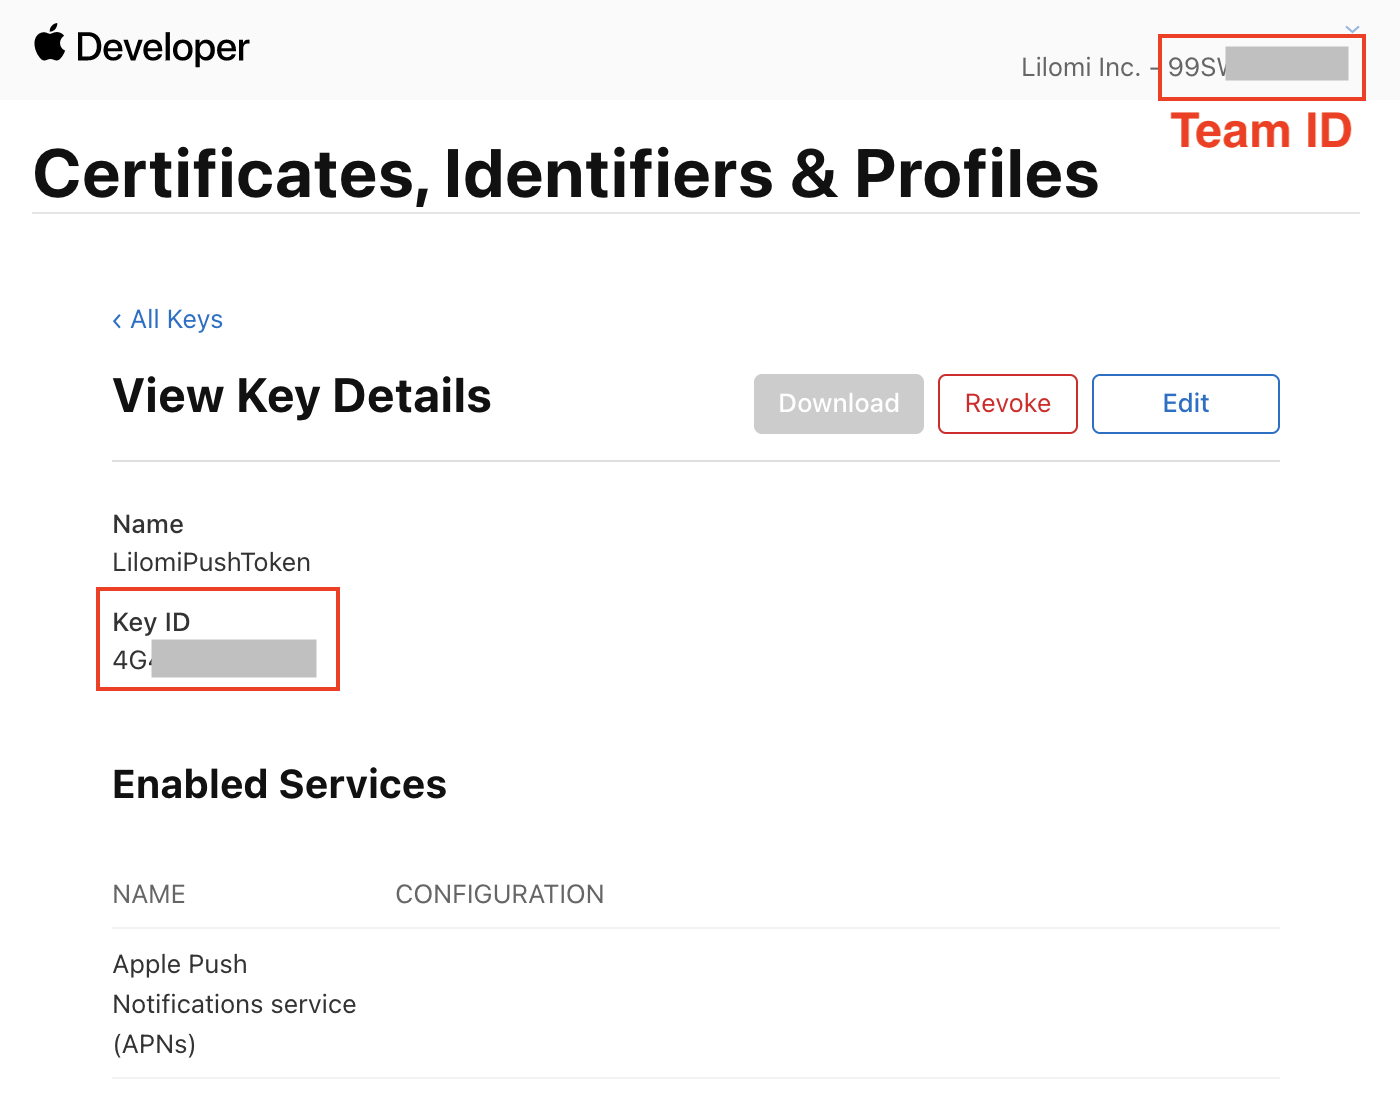
Team ID: Found in the top right of your Apple Developer account AND Key ID:
Found in the Keys section of your Apple Developer account.
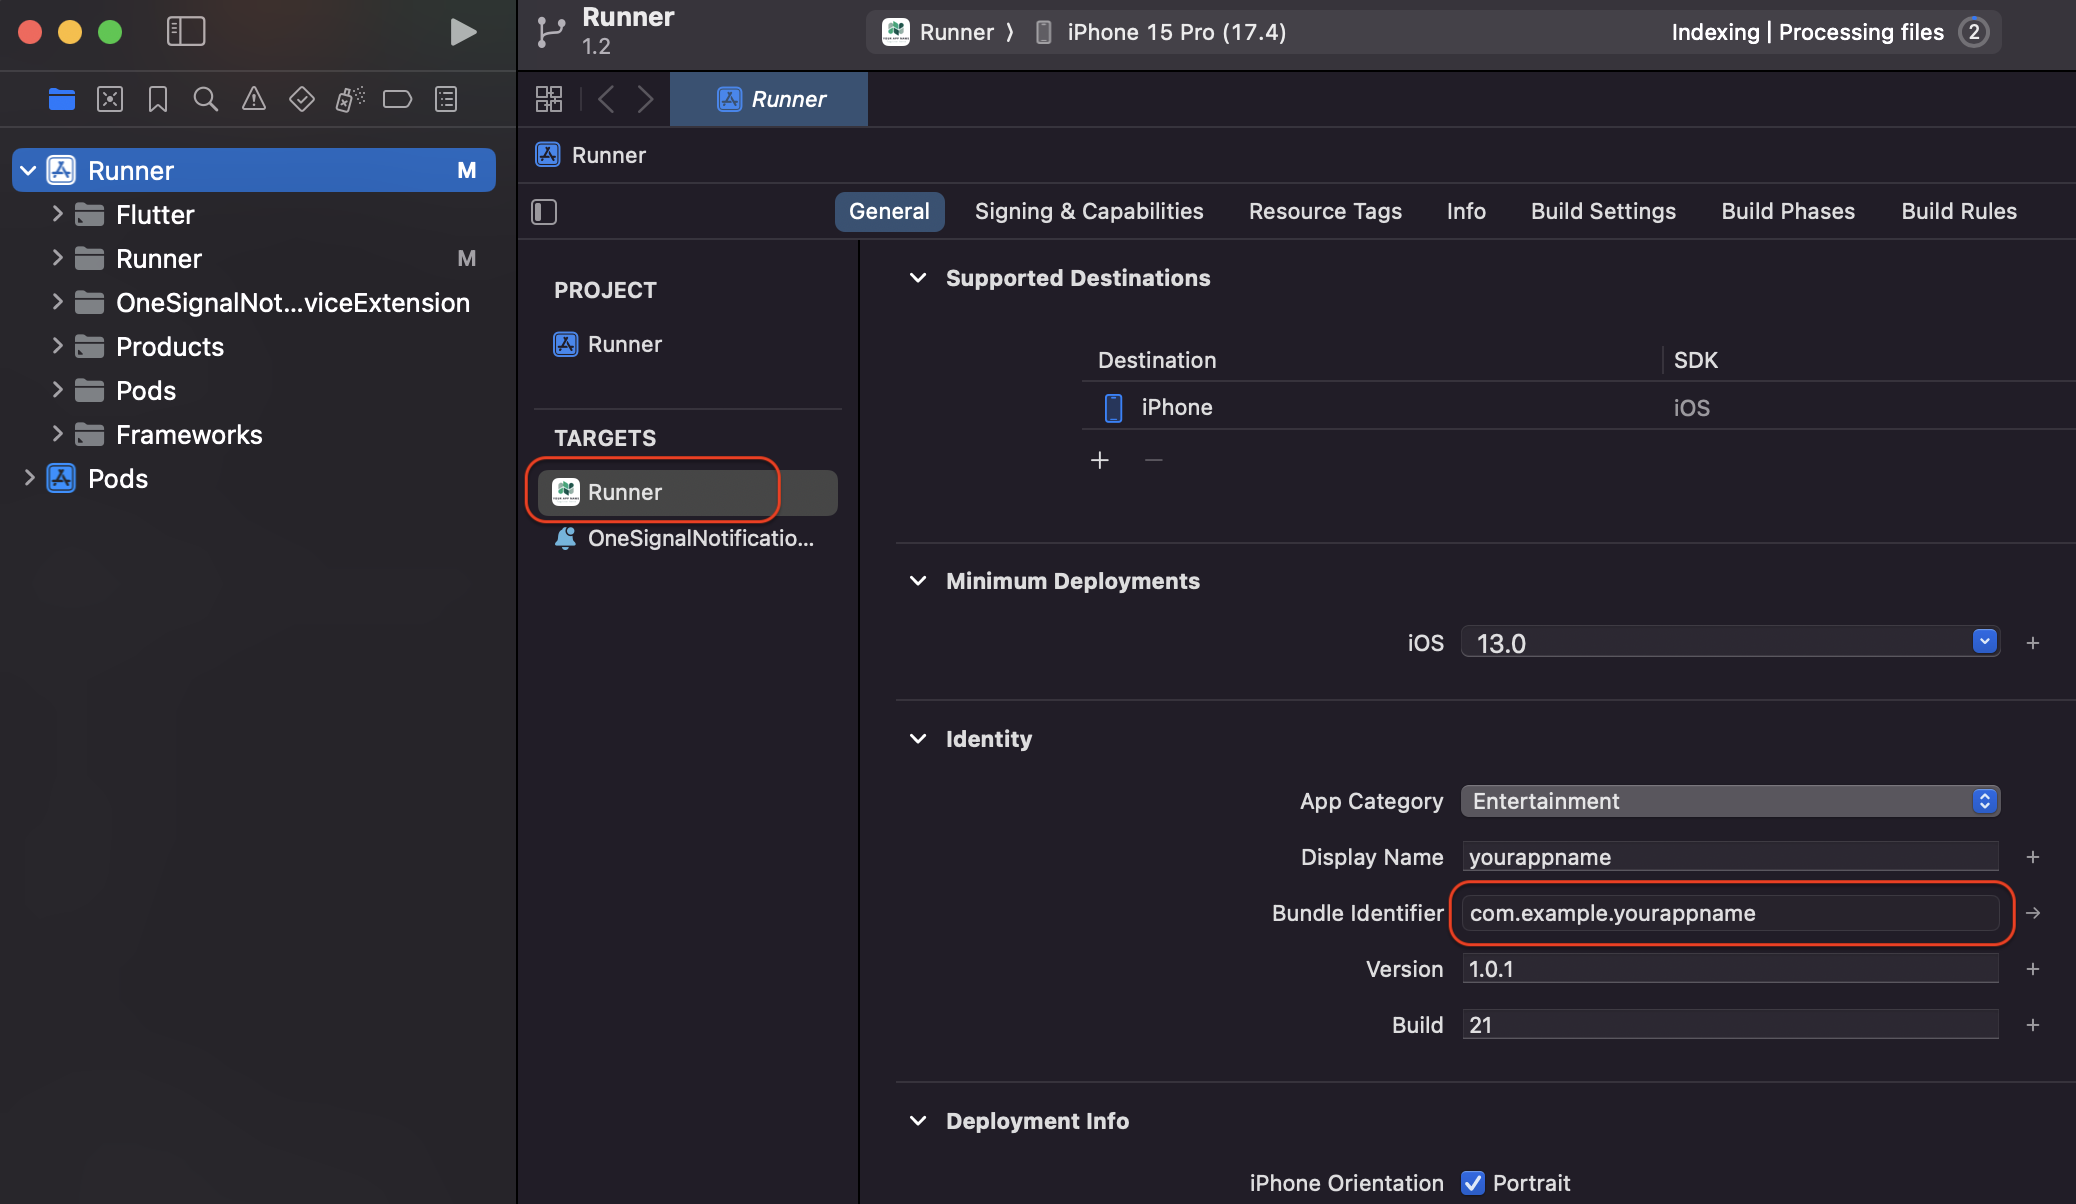
App Bundle ID: Found in the Identifiers section of your Apple Developer account or within Xcode > Main App Target > Signing & Capabilities.
In the OneSignal dashboard, navigate to Settings > Platforms > Apple iOS (APNs) Settings.
In the OneSignal dashboard, navigate to Settings > Platforms > Apple iOS (APNs) Settings & Choose .p8 Auth Key (Recommended) for the APNs Authentication Type.
Upload the .p8 file, fill in the Key ID, Team ID, and Bundle ID fields, and then click 'Save'.
Choose Flutter as the platform and proceed to save the configuration.
Your OneSignal iOS setup is now complete.
With these steps, you should have successfully configured push notifications for both Android and iOS using OneSignal.
If you encounter any issues, ensure all steps are followed accurately.
Step-by-Step Video Guide :
Introduction:
This section covers all the remaining adjustments and settings for your app.
Be sure to review these changes carefully to ensure everything is correctly configured.
1. Default Image Setup for Portrait and Landscape
Ensure that your app displays appropriate default images for both portrait and landscape orientations by following these steps:
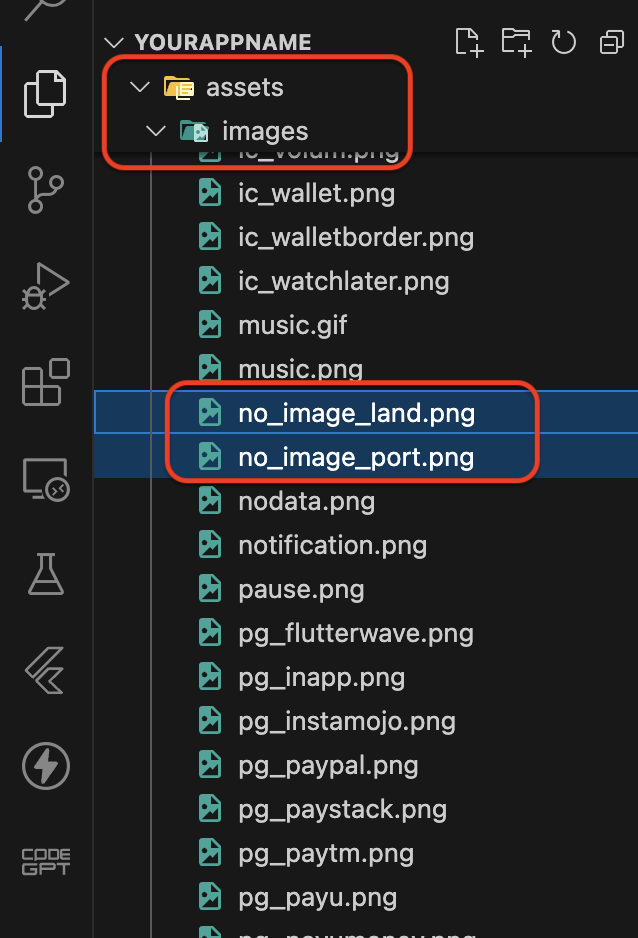
                                                    Place the images in the following directory:
                                                    Assets => images
Steps to Update:
                                                    •   Create or edit your default images according to the recommended ratios.
	                                                •	Save the portrait image as no_image_port.png.
	                                                •	Save the landscape image as no_image_land.png.
	                                                •	Place the images in the Assets => images directory in your project.
By following these guidelines, your app will display well-proportioned images for different orientations, enhancing the user experience.
2. Notification Icon Change
This section explains how to update the OneSignal push notification icons in your app.
Ensure that you create the icons with the correct sizes and use the specified names before replacing the existing files.
1. File Path
Navigate to the following directories in your project to locate the current notification icons:
                                                    Android > app > res > drawable-mdpi
                                                    Android > app > res > drawable-hdpi
                                                    Android > app > res > drawable-xhdpi
                                                    Android > app > res > drawable-xxhdpi
                                                    Android > app > res > drawable-xxxhdpi
2. Icon Sizes and Naming
Create new icons with the following sizes and replace the existing icons with the exact names as mentioned:
                                                    •   Create or resize your notification icons to match the sizes listed above.
	                                                •	Replace the existing icons in each directory with your newly created icons, ensuring the names remain exactly as specified.
Please refer to the provided screenshot for additional details on the icon replacement process.
Firebase Setup on App
This section will guide you through setting up the App for your Backand application.
Generate Release Build For Android
Step-by-Step Instructions to Generate the App
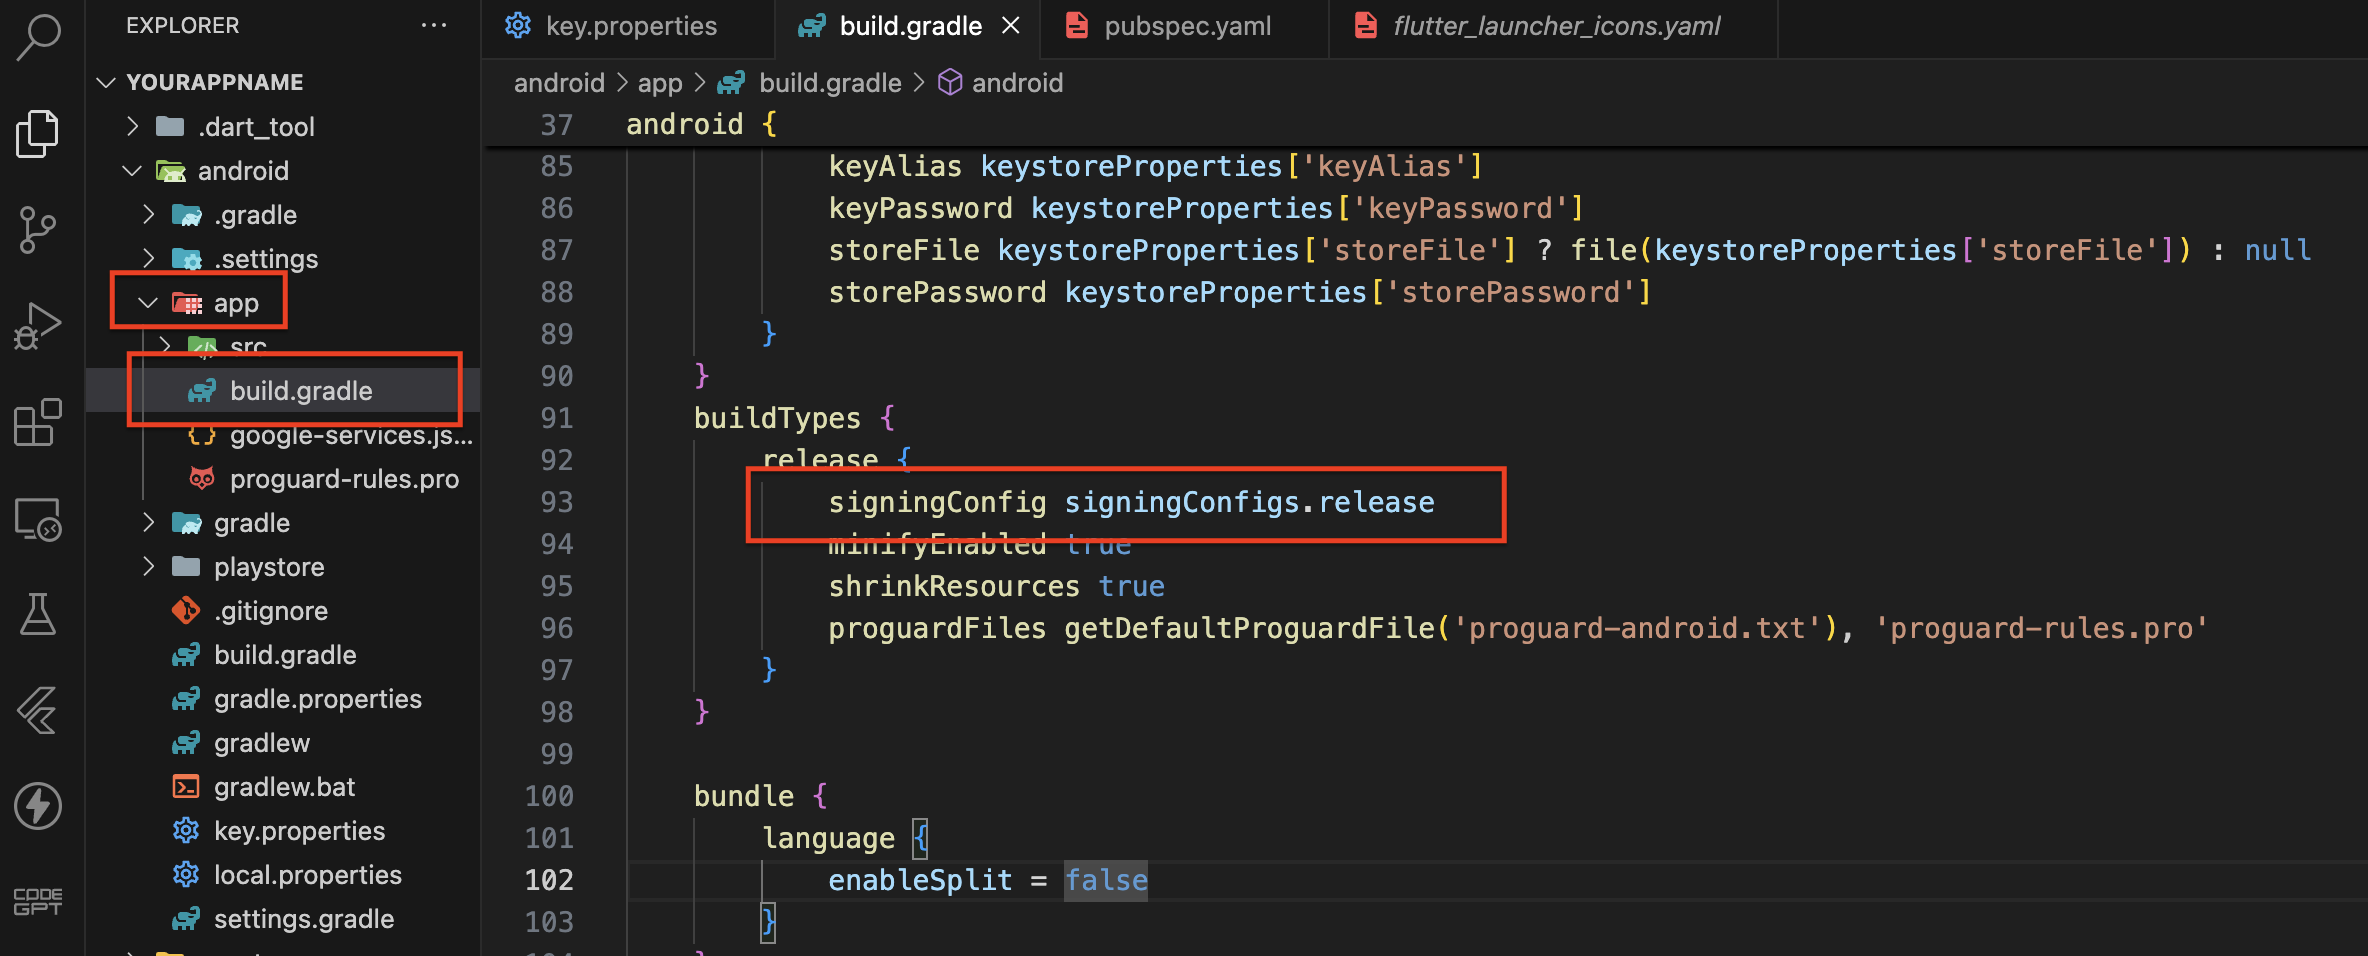
Create a keystore to securely sign your Android application.
1. Generate Keystore
Create a keystore to securely sign your Android application.
Follow the prompts to enter the required information, such as the keystore password, distinguished name fields, and alias password.
Upon completion, the keystore file (e.g., 'upload-keystore.jks') will be saved in the 'android/app' directory.
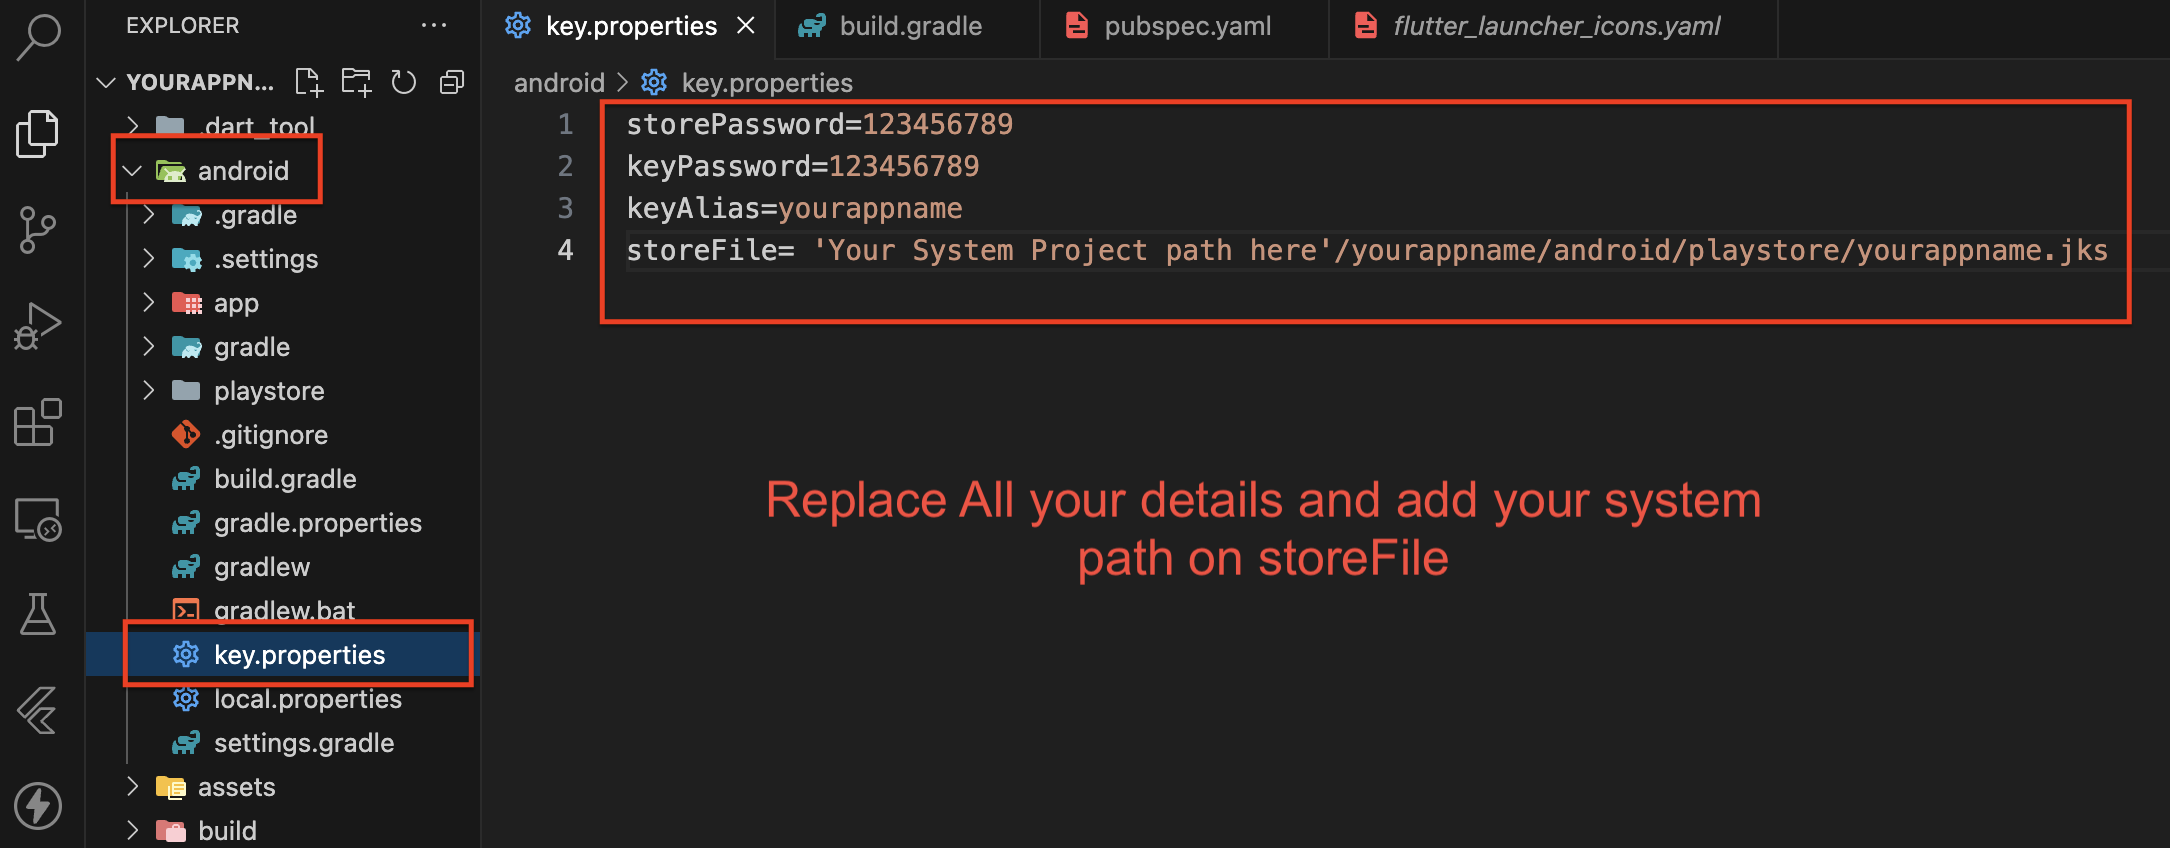
2. Configure key.properties
Update the key.properties file in the android directory to store keystore-related information.
Open the key.properties file in the android directory.
Create a final version of the APK suitable for distribution to end-users.
Open the terminal or command prompt & Navigate to your project directory. Run the following command to build the release APK:
flutter build apk --release
5.Generate App Bundle
Note:
Before generating the App Bundle, ensure you have completed the 'Update key.properties' step to configure your keystore information.
Refer to steps 1 and 2 for details. Package the app as an Android App Bundle for efficient delivery and optimization on the Play Store.
Open the terminal or command prompt & Navigate to your project directory. Run the following command to build the release APK:
flutter build appbundle
Step-by-Step Video Guide :
Generate Release Build For iOS
Step-by-Step Instructions to Generate the App
1. Finding the iOS Package Name (Bundle Identifier) in Flutter
2. Generating the Bundle ID and App Entry
3. Project Cleanup, Installation, and Archive
Step-by-Step Video Guide :
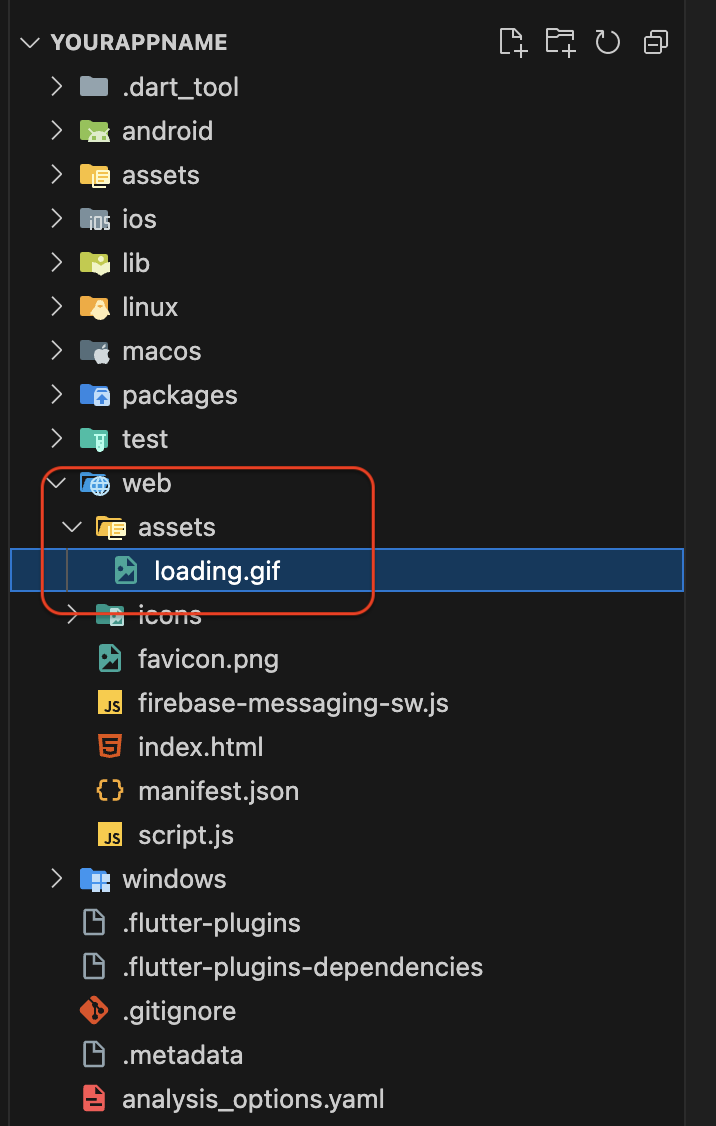
1. Web Version Splash Screen GIF Change
File Path
Navigate to the following directory in your project to locate the current splash screen GIF:
Web > Assets > loading.gif
Replace the GIF
                                                    Create or select your new GIF file for the splash screen.
                                                    Name the file loading.gif.
                                                    Replace the existing loading.gif file in the Web > Assets directory with your new GIF.
Rebuild the Web Version
After replacing the GIF, ensure to rebuild the web version to apply the changes:
Command: flutter build web --web-renderer auto --release
Step-by-Step Video Guide :
Setup VAP ID Key
Open App’s firebase project
Go to project settings >> Cloud Messaging Tab >> Web configuration(Scroll to bottom)
Click on “Generate Key Pair”
Copy this Key Pair and paste in your set-up Admin panel (App Settings >> Vapid Key(Scroll to bottom) and Save it)
Step-by-Step Video Guide :
Firebase Setup for Web Version
In this section, we will guide you through the process of setting up Firebase for the web version of your app. By following these steps,
you will configure Firebase to handle authentication, connect with your web app, and authorize your domain for a seamless integration.
This setup is crucial for ensuring that your app's web version is fully functional and secure.
Step-by-Step Instructions to Setup Firebase
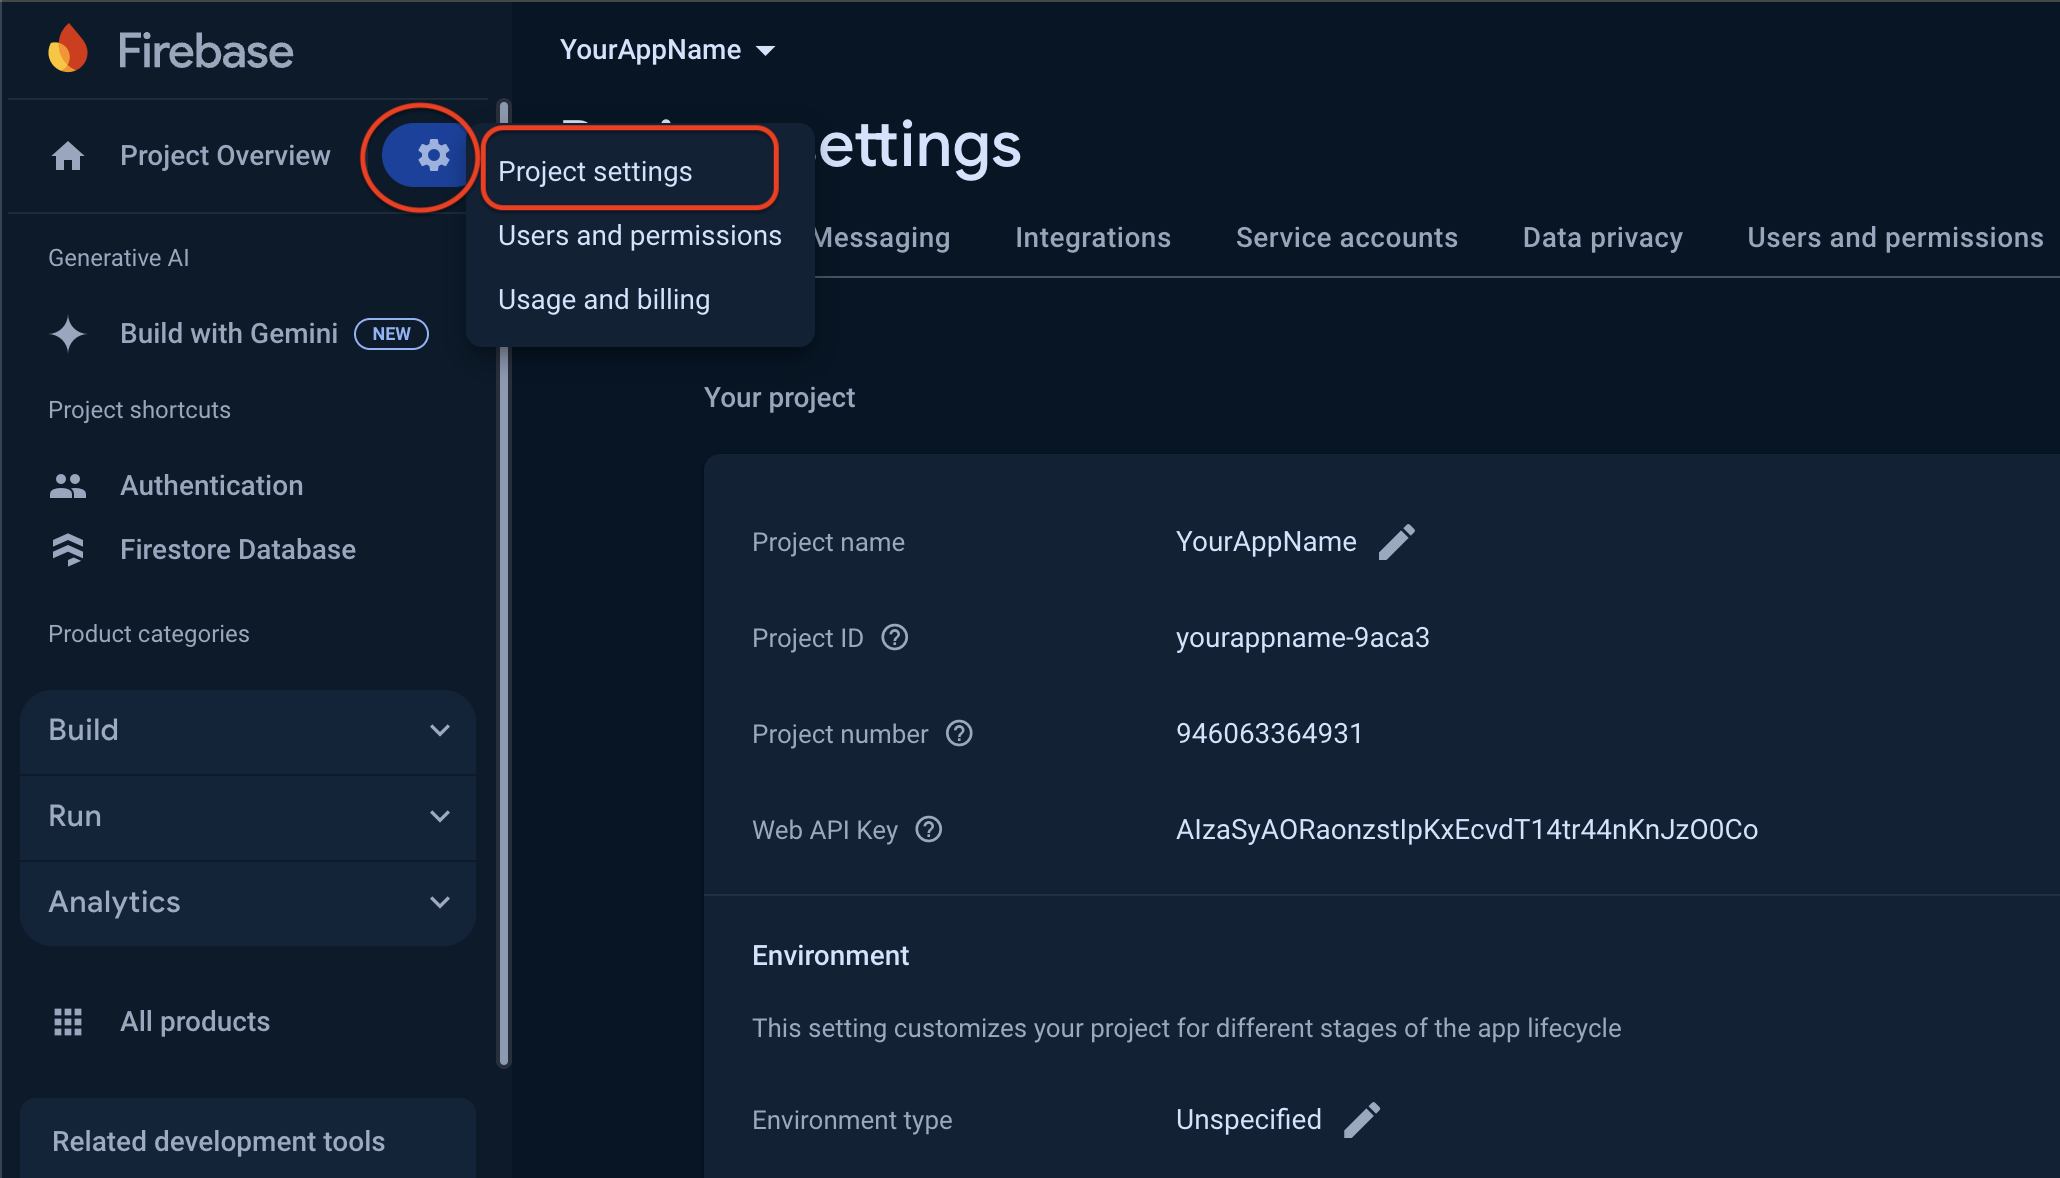
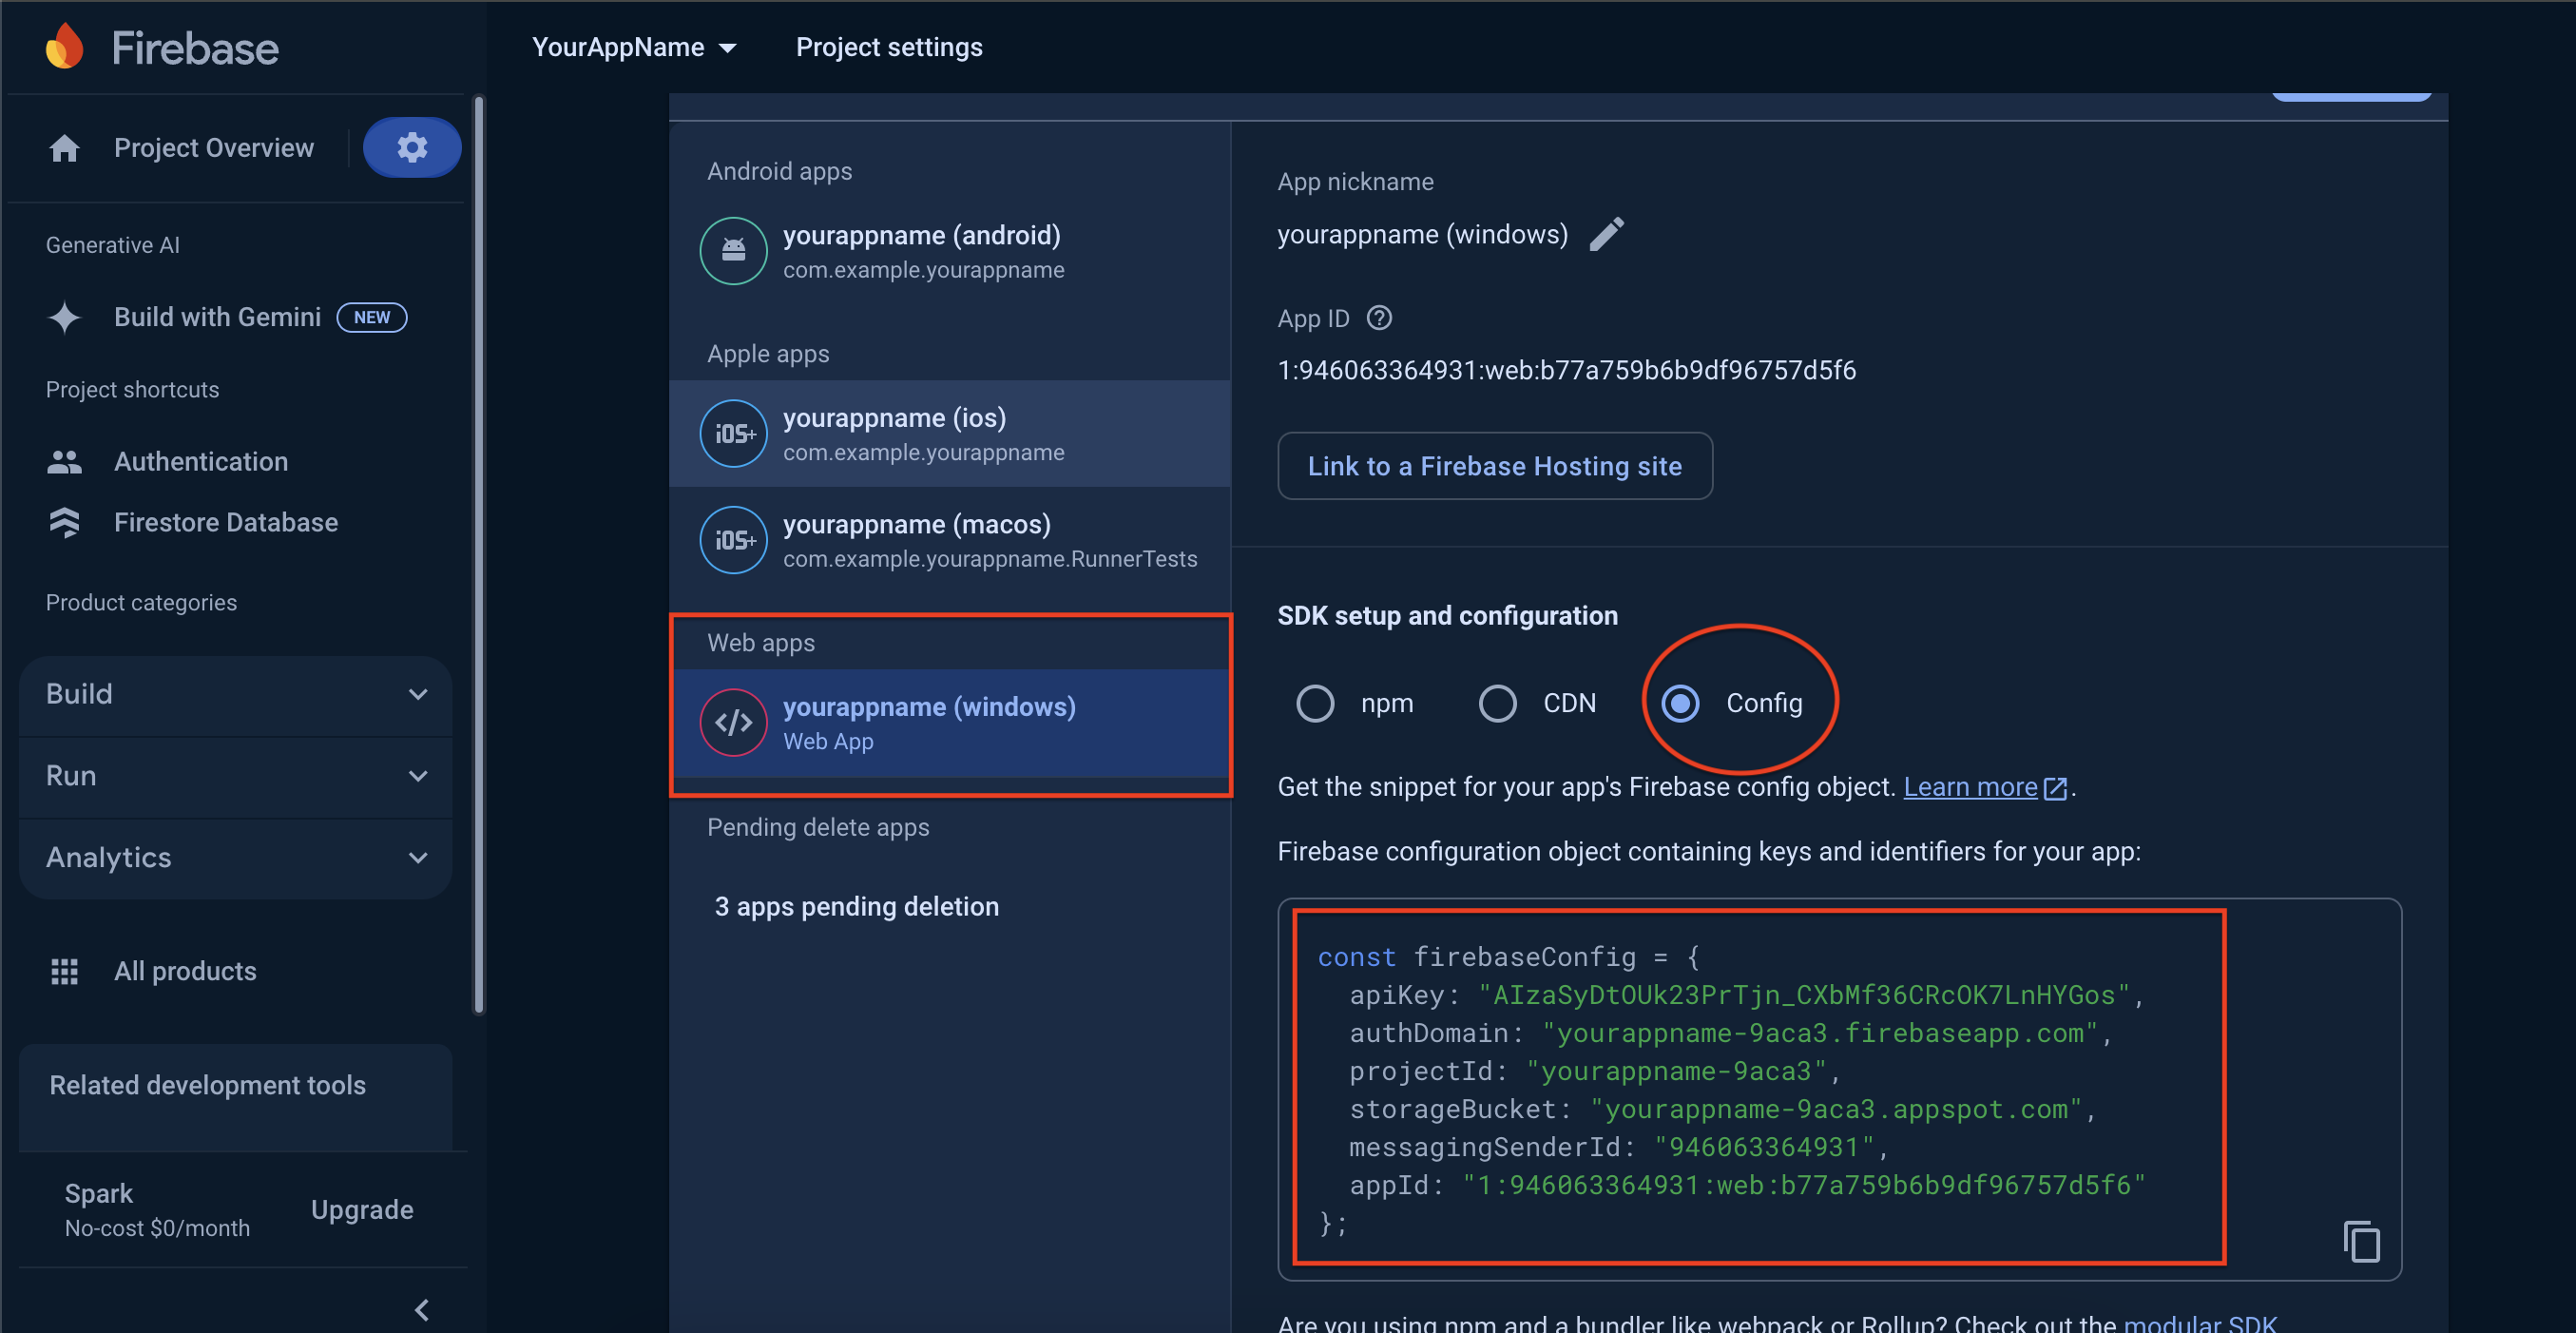
1. Open Firebase Account:
Log in to your Firebase account and navigate to the Project Settings. (See the screenshot below for reference.)
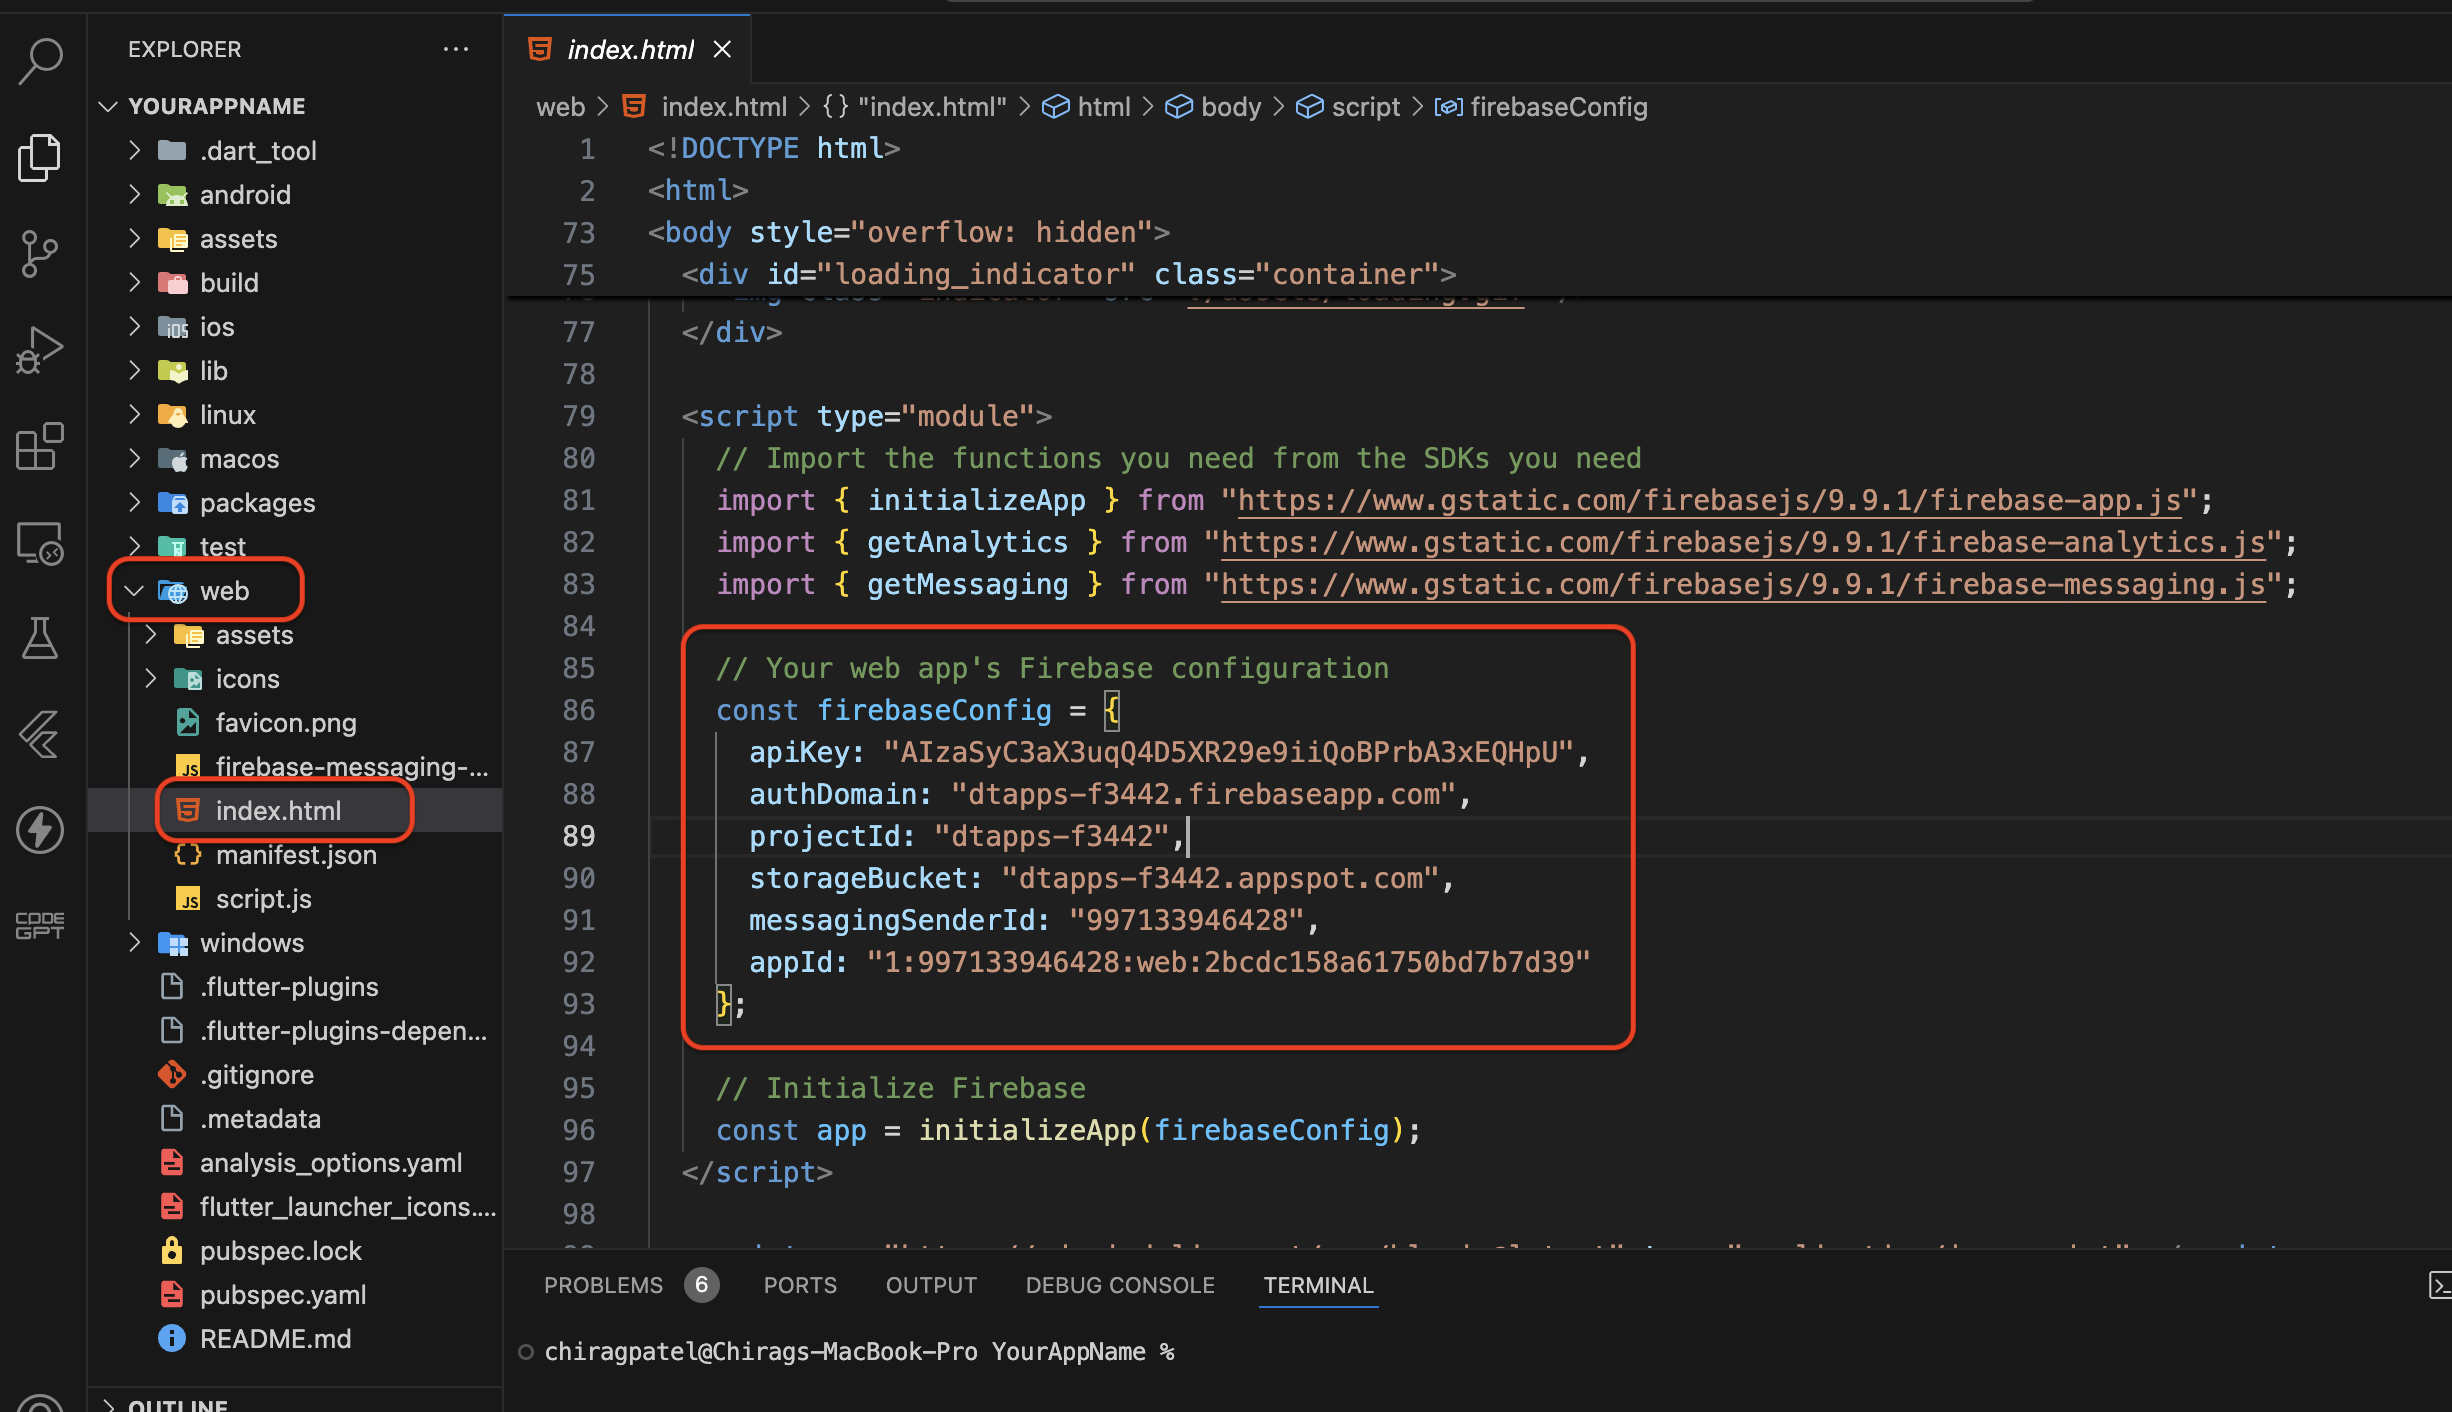
Copy the Firebase configuration code provided in the Project Settings. (See the screenshot below for reference.)
Paste it into the index.html file located in the web folder. (Refer to the screenshot below.)
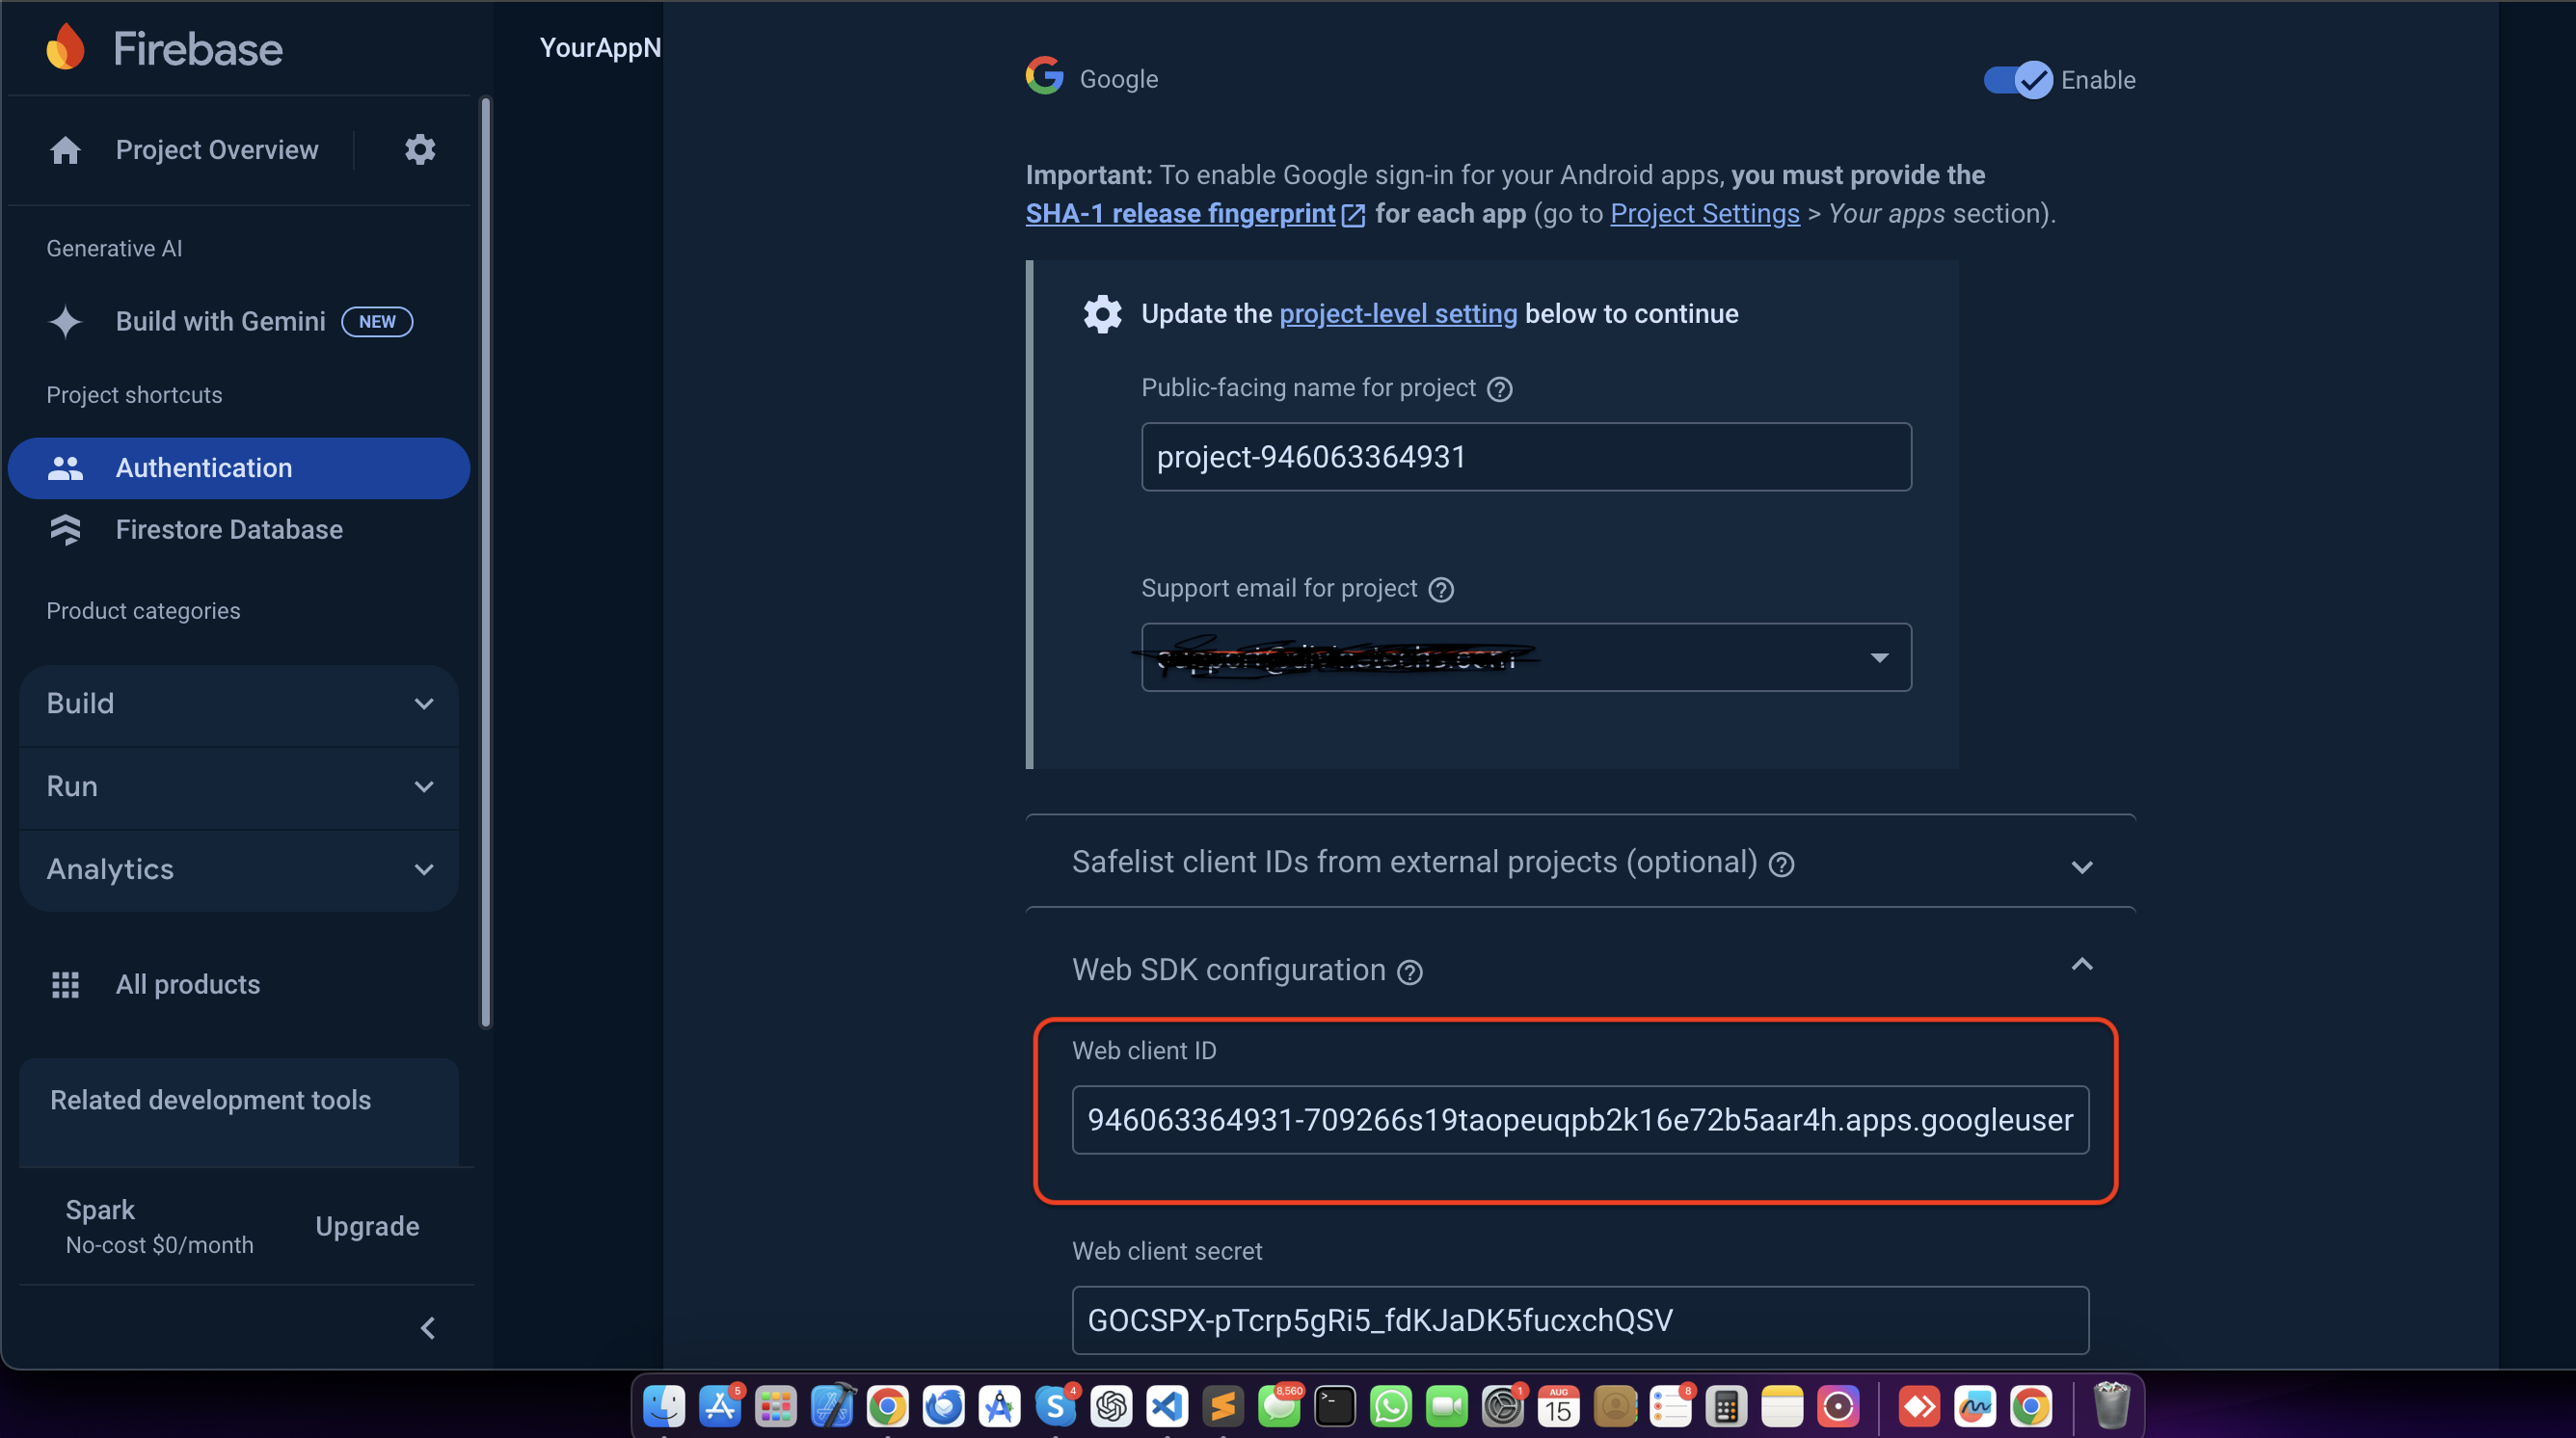
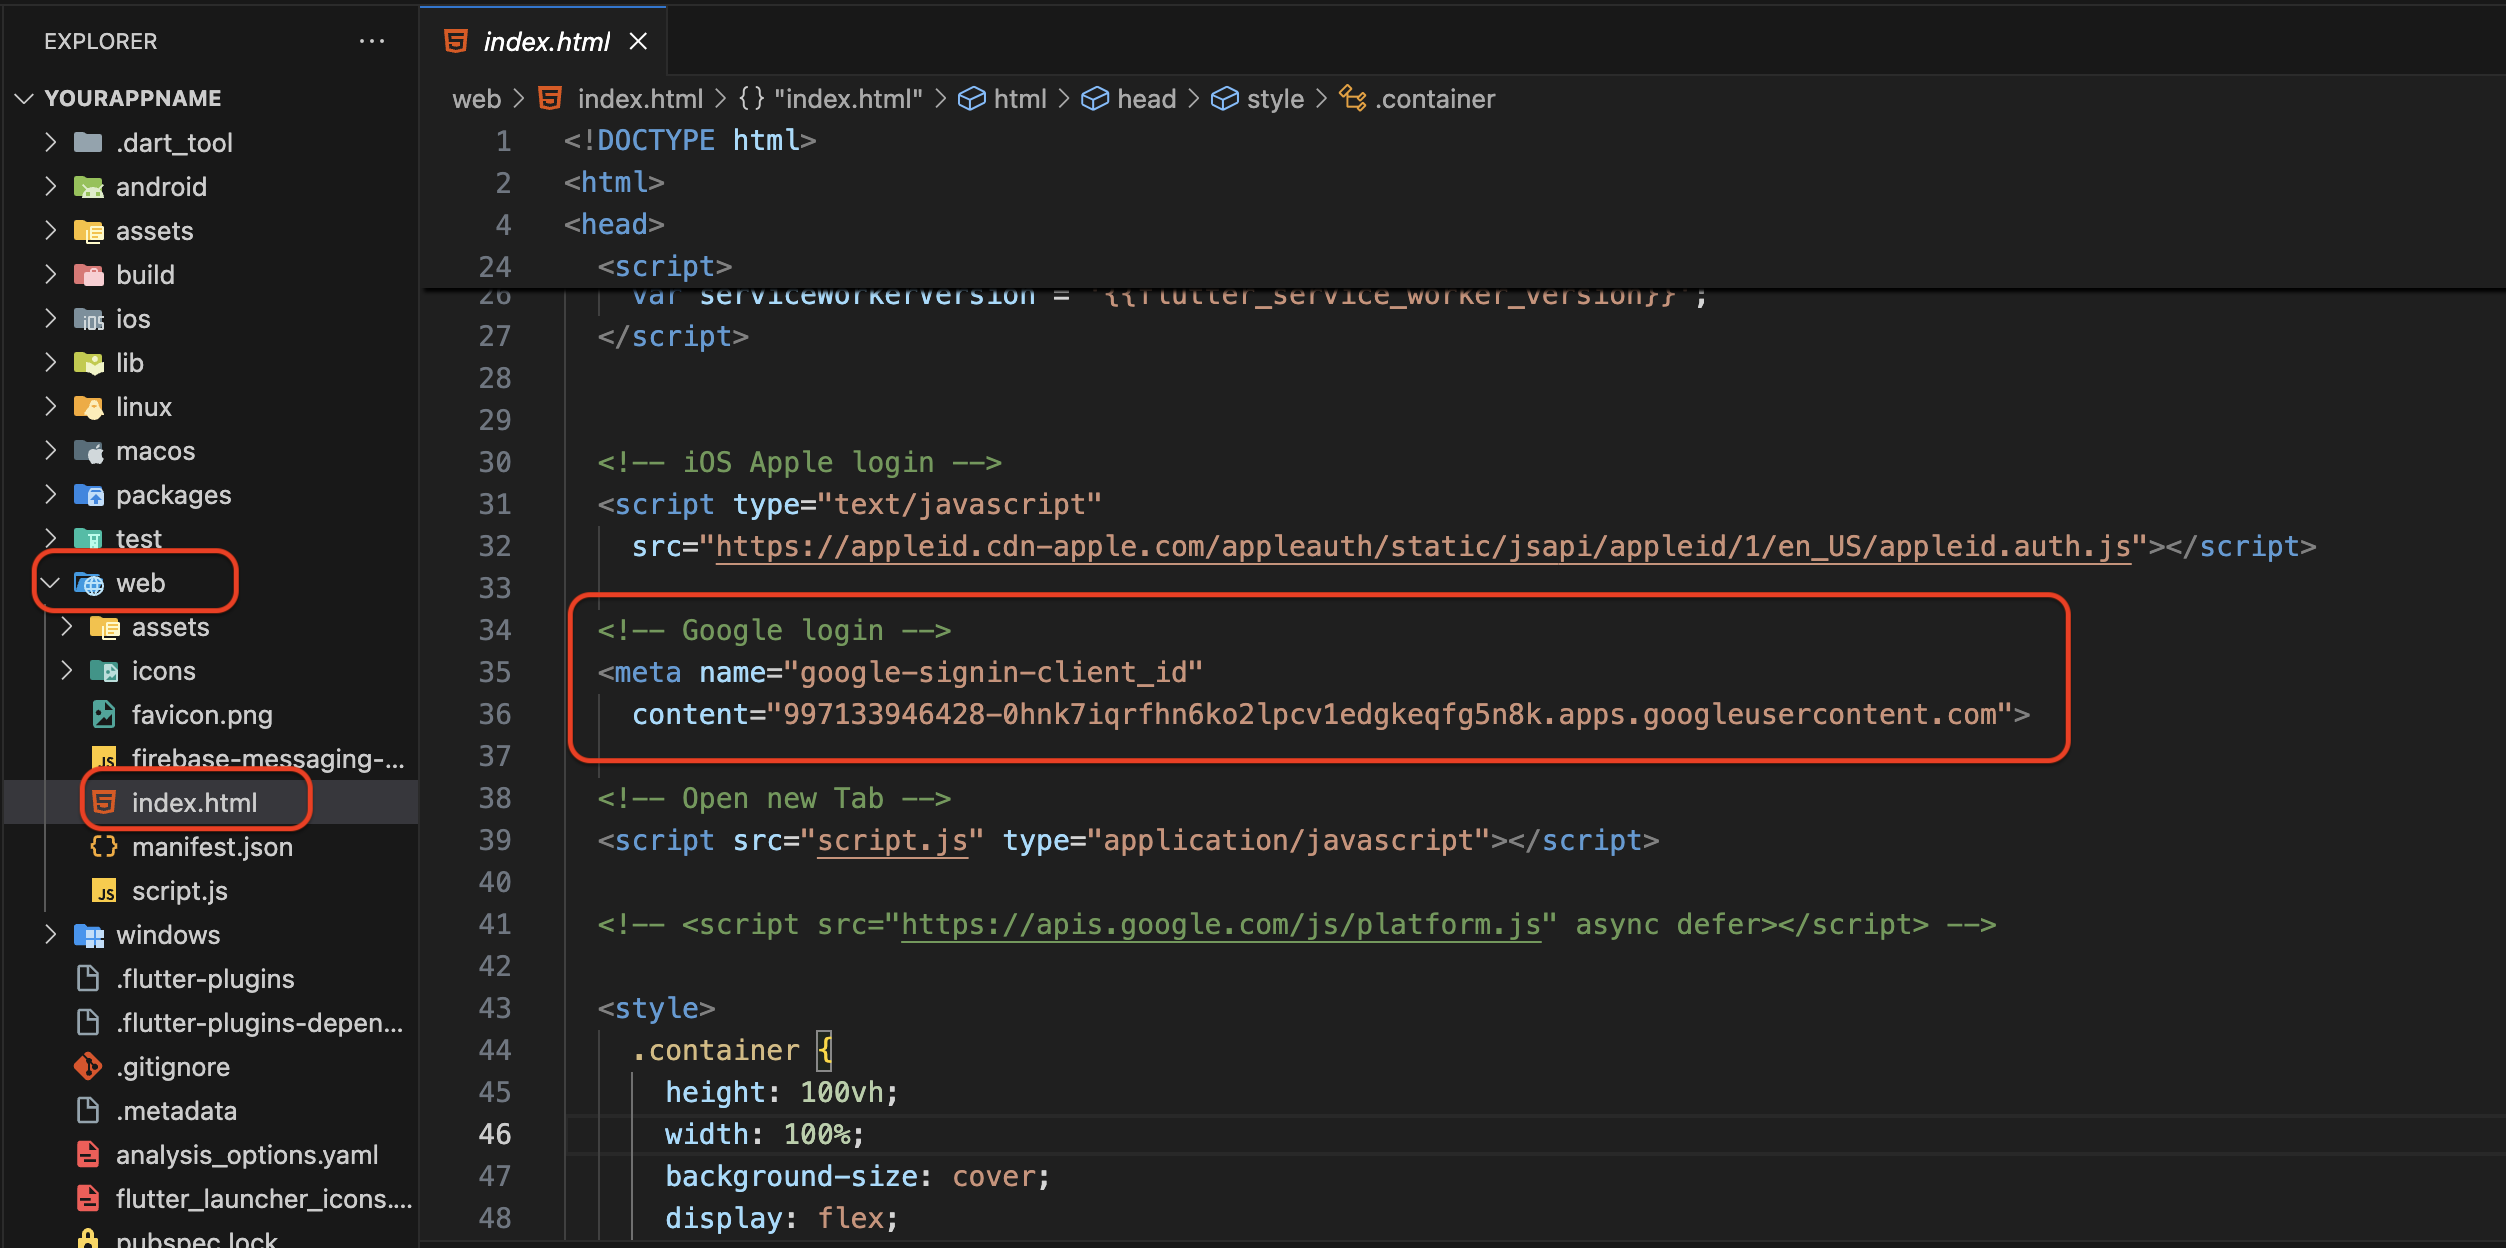
2. Set Up Google Authentication:
In Firebase, go to Authentication > Sign-in Method. Edit the Google sign-in method.
Copy the Web Client ID as shown in the screenshot below.
Paste the Web Client ID into the head section of the index.html file. (Refer to the screenshot below.)
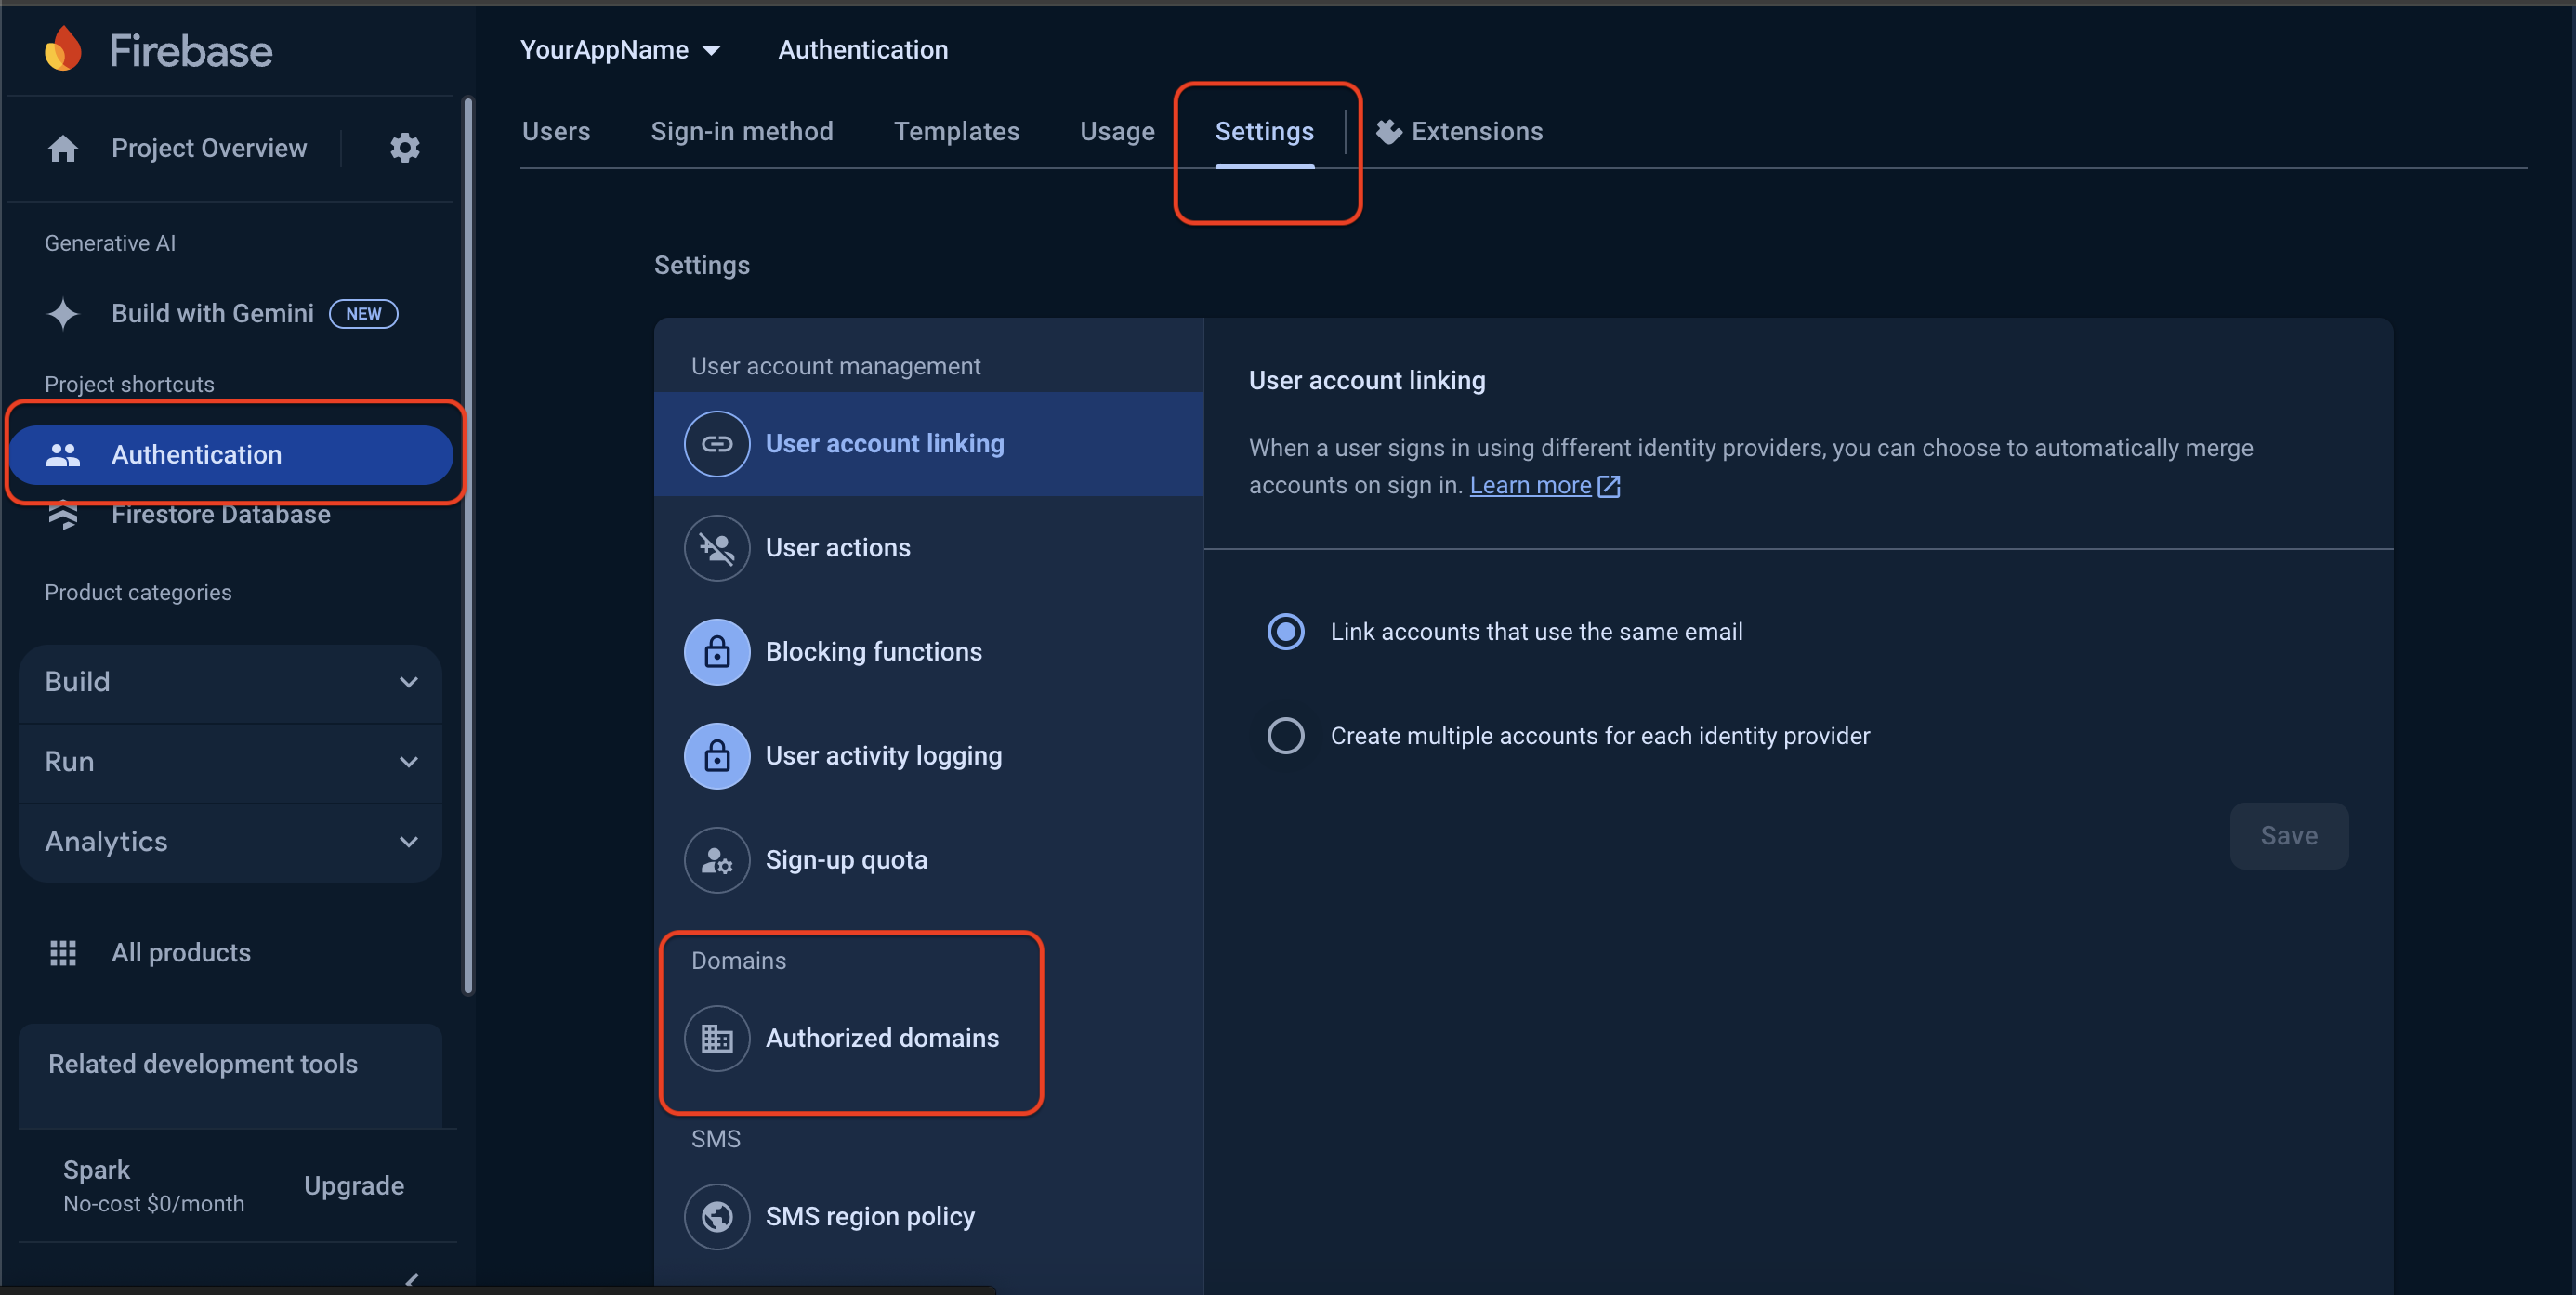
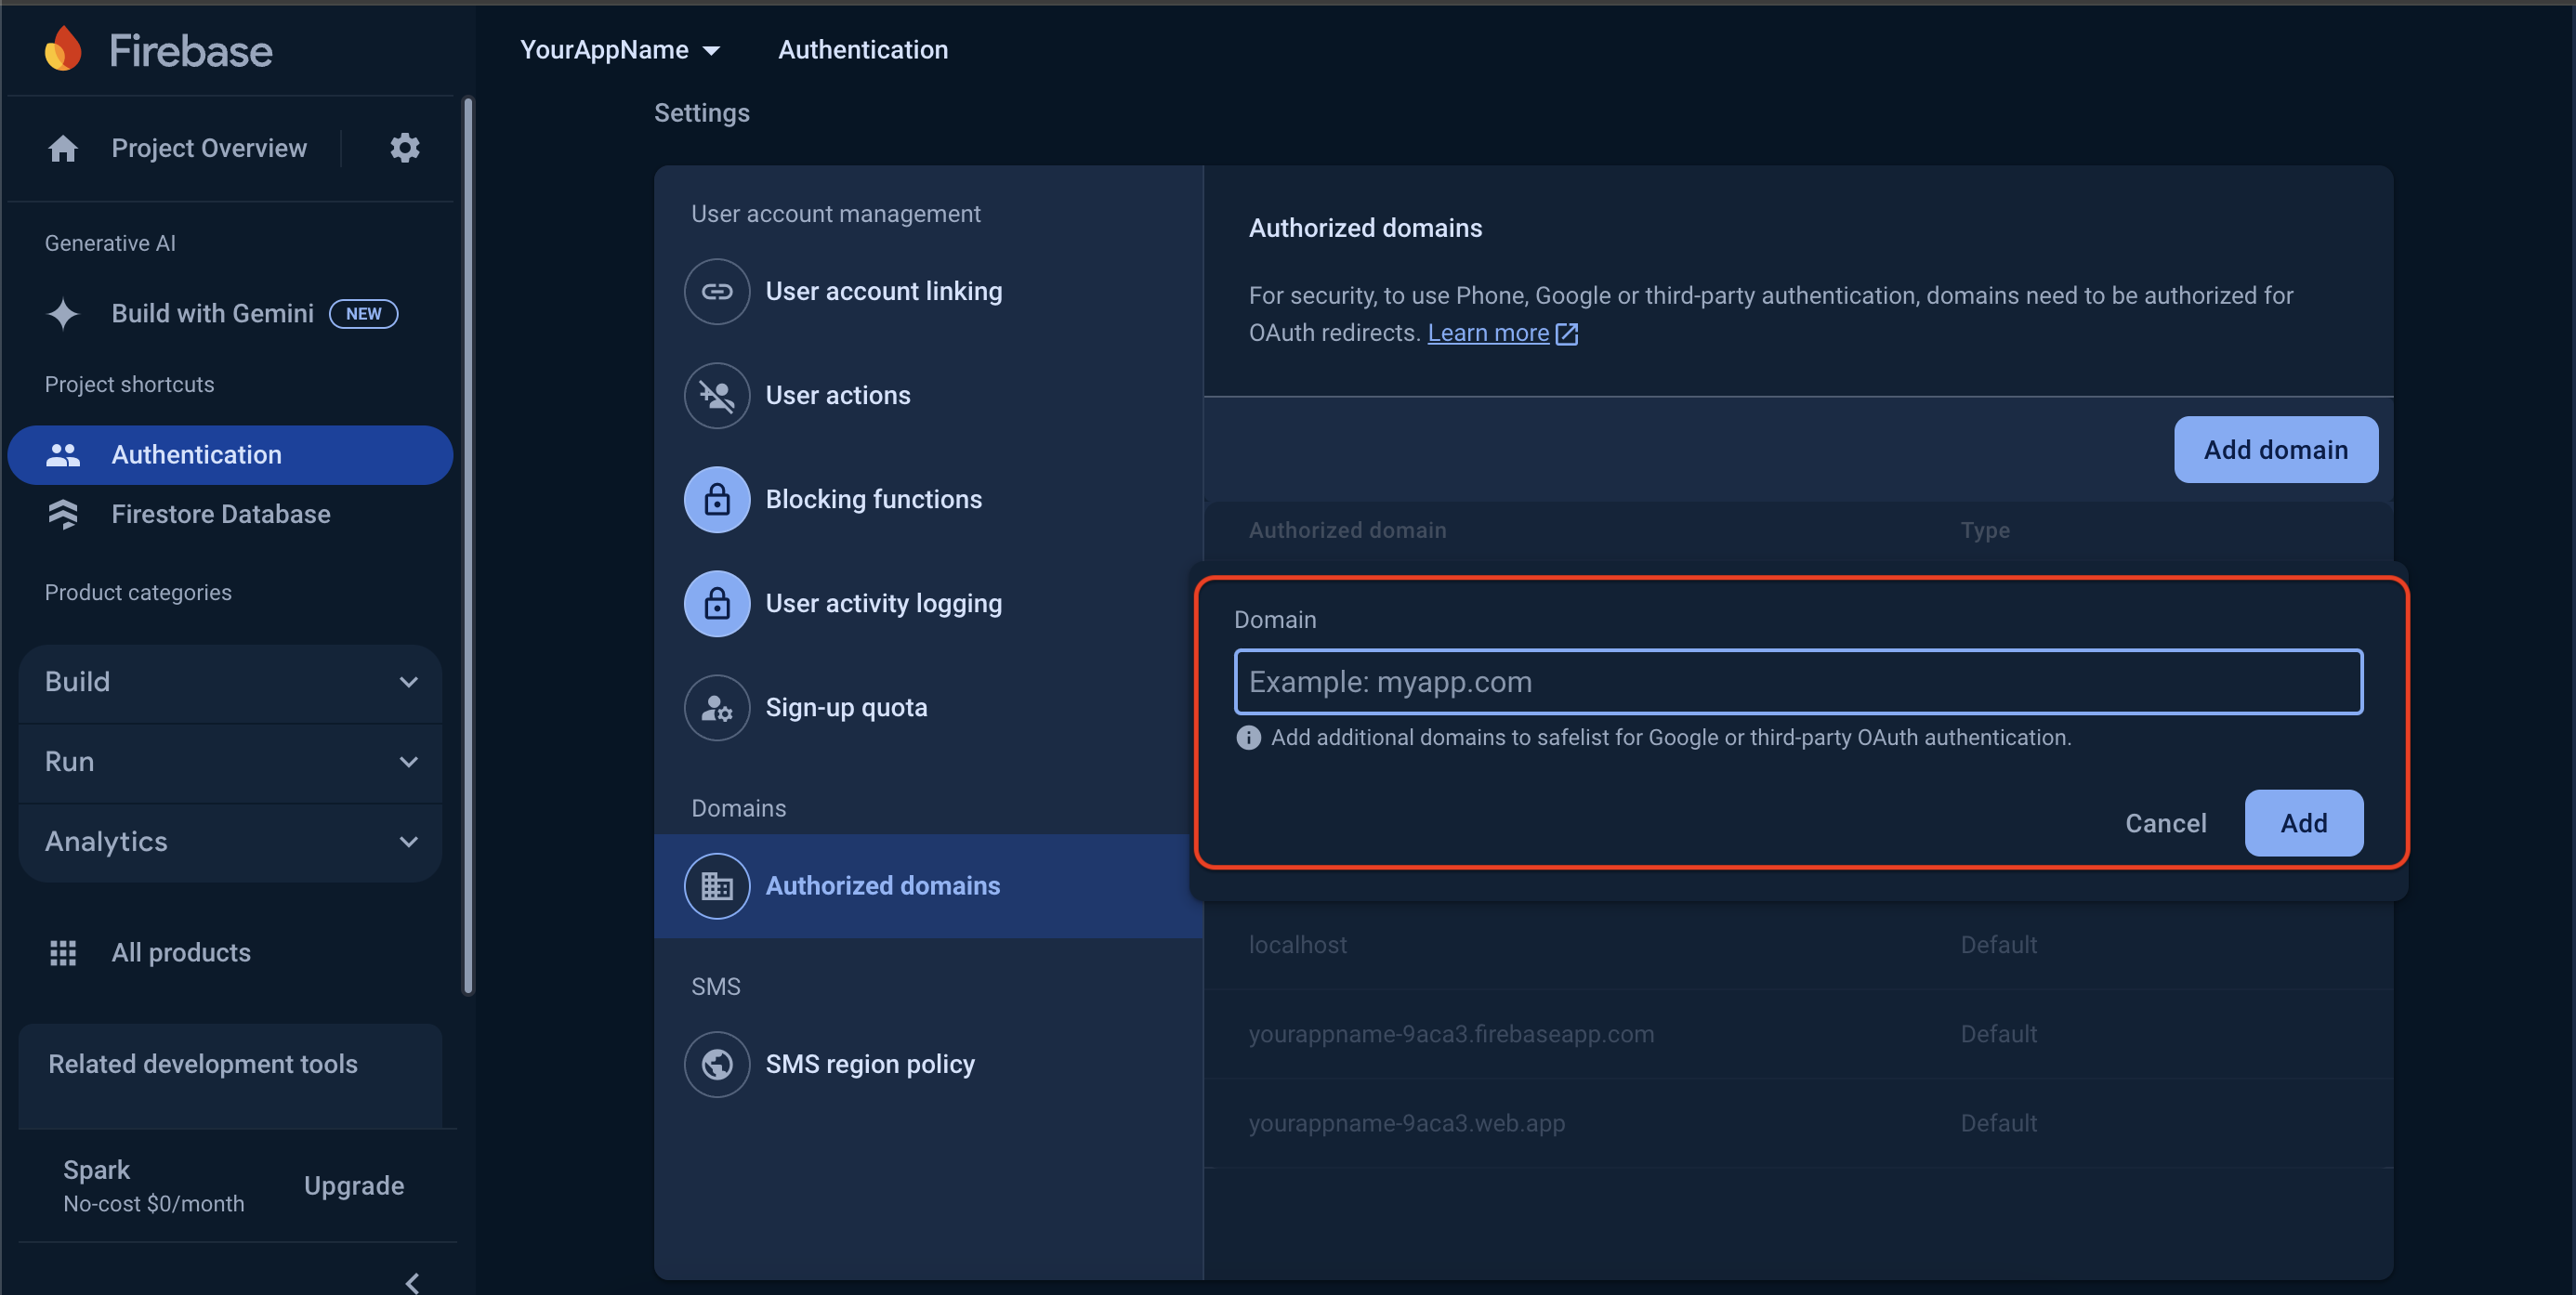
3. Authorize Domain:
In Firebase, navigate to Authentication > Settings > Authorized Domains.
Add the main domain where you plan to upload your website. (Check the screenshot below.)
Step-by-Step Video Guide :
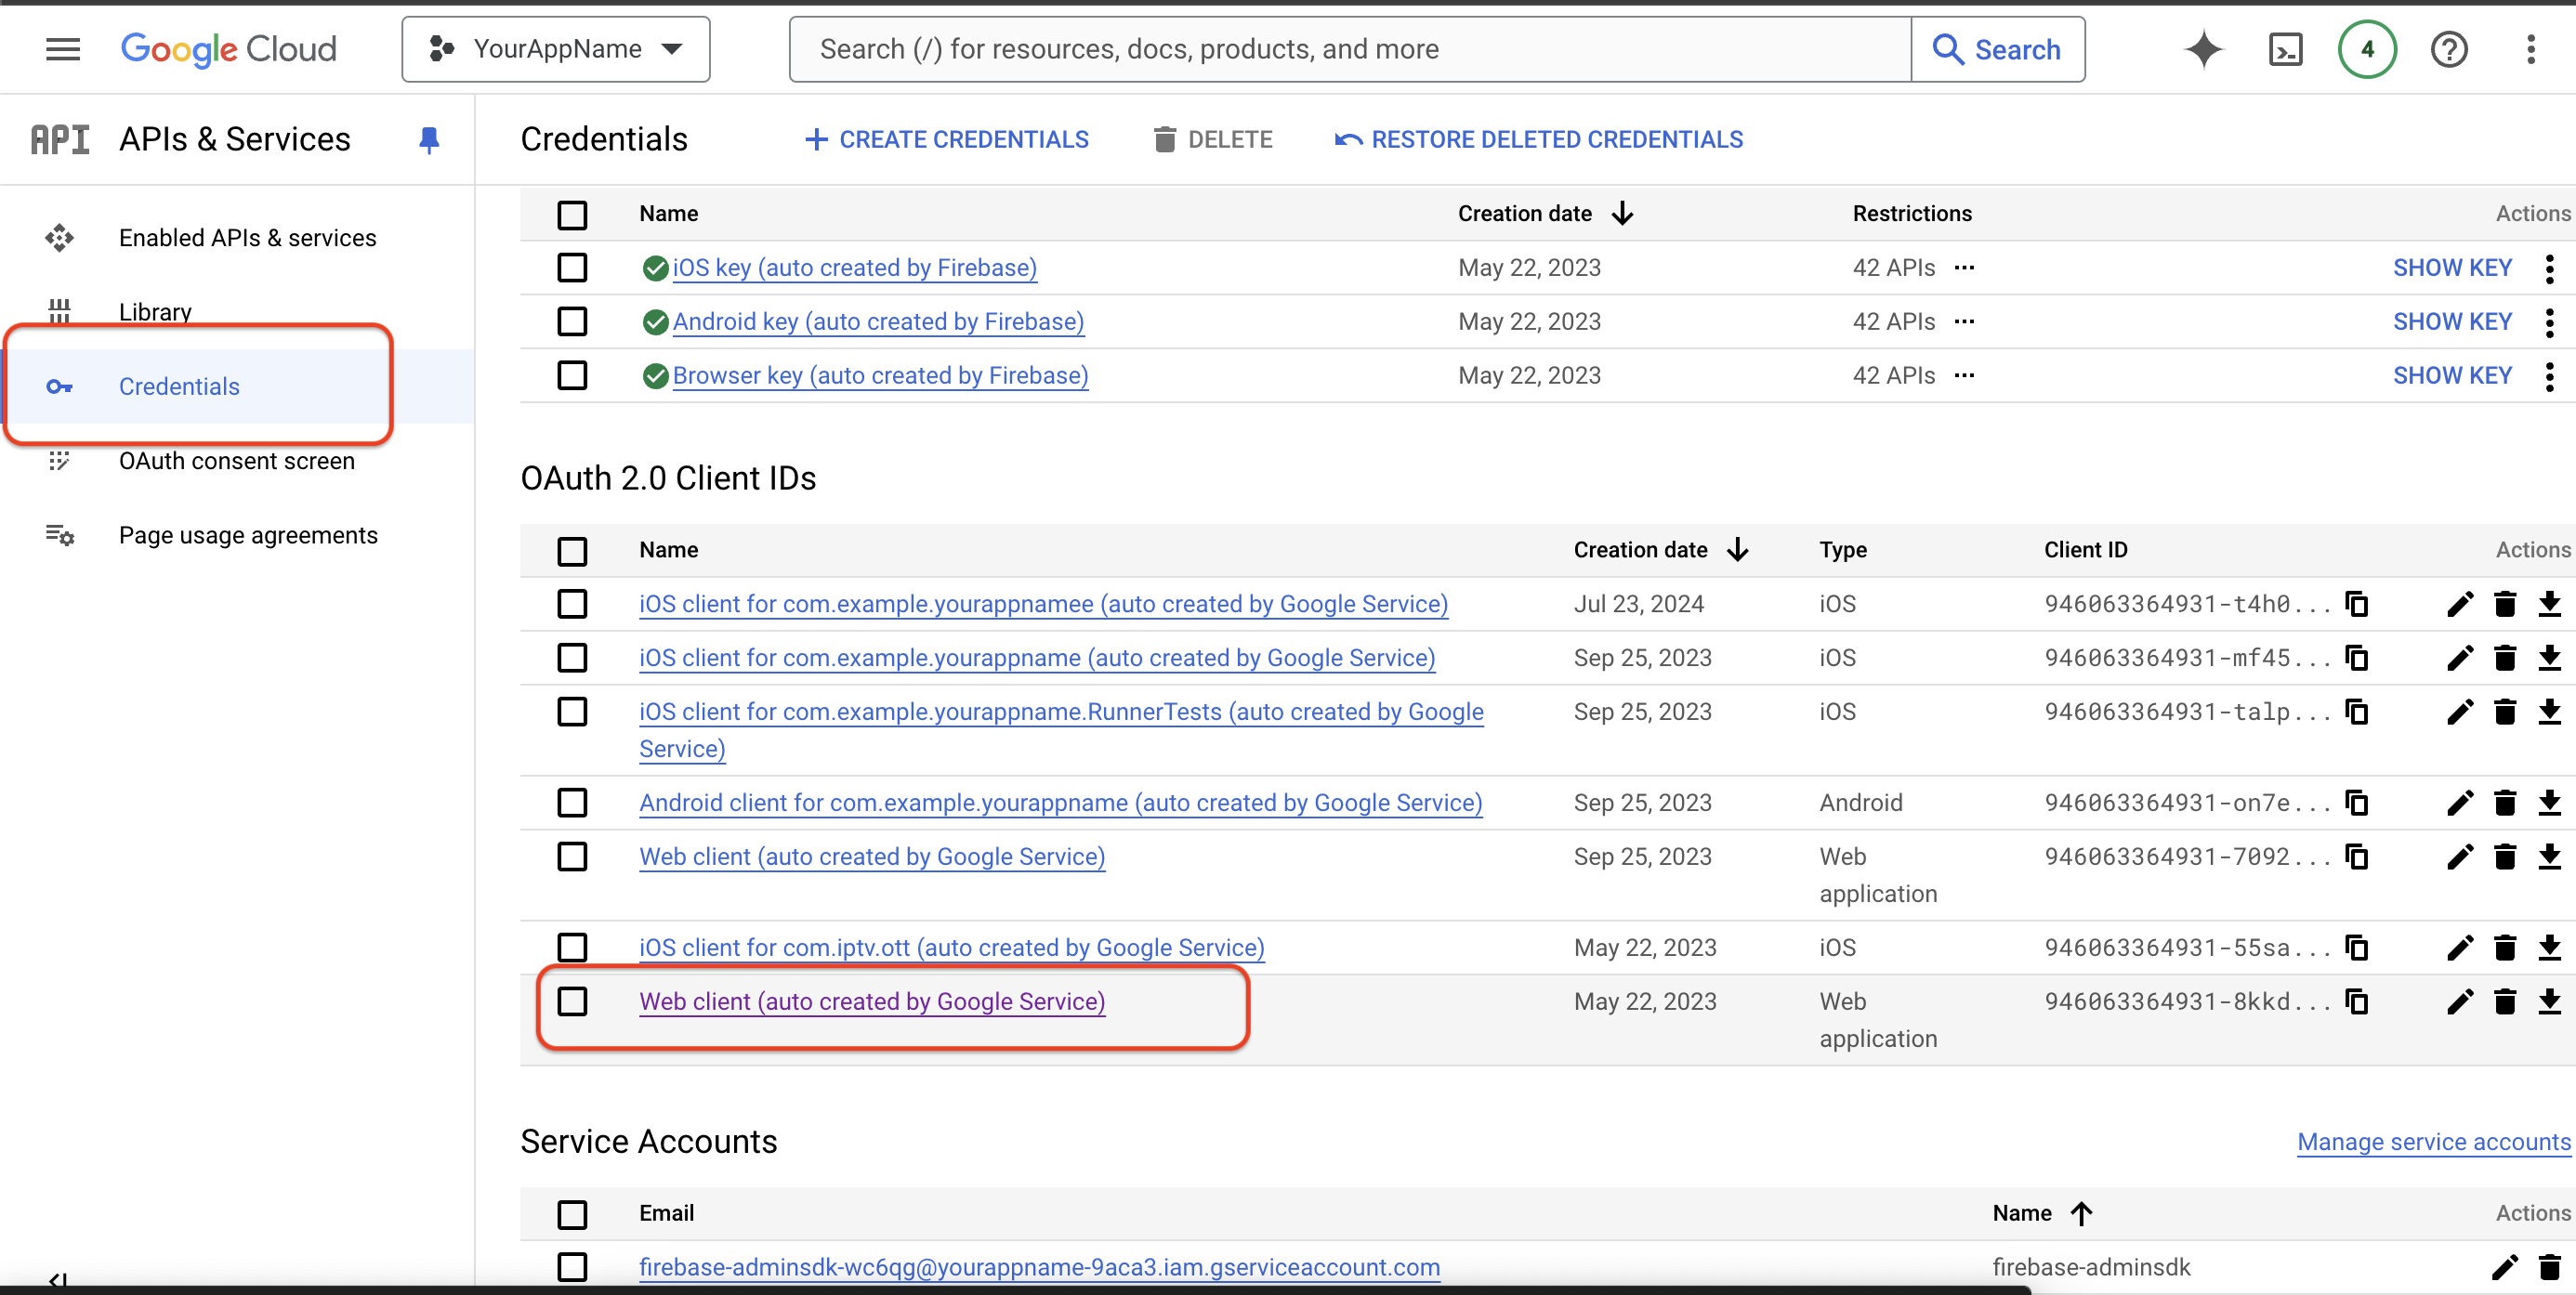
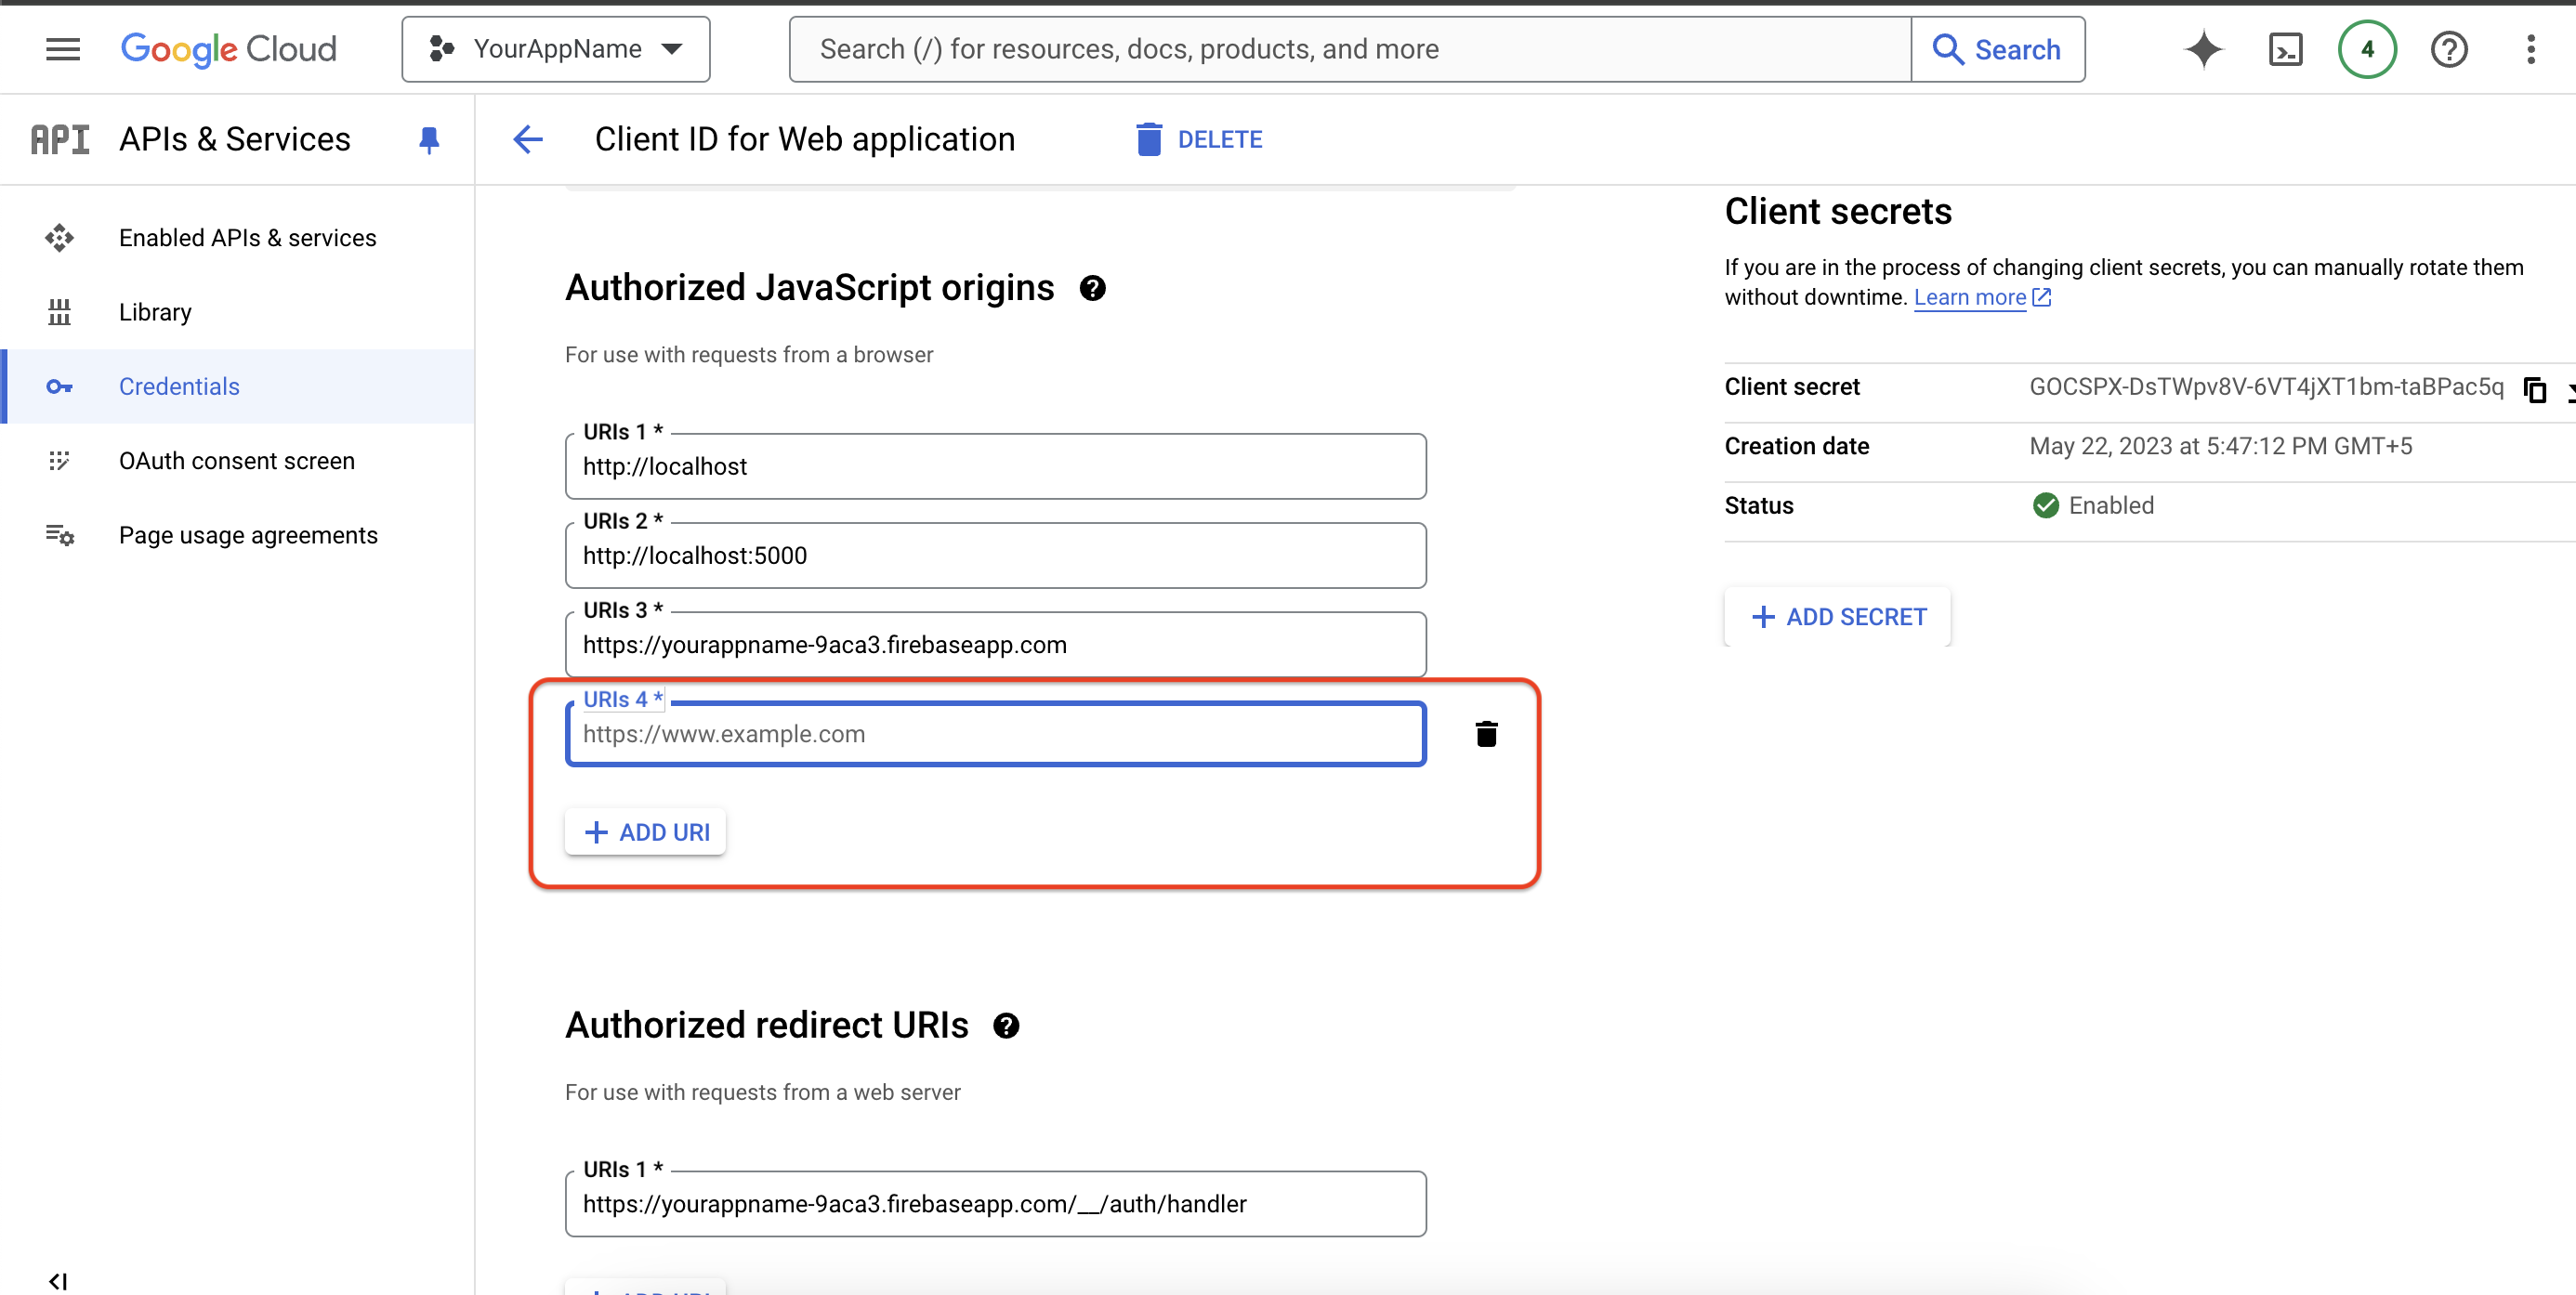
4. Update Google Cloud Console:
Open the Google Cloud Console & Go to APIs & Services > Credentials. Click here
Find the Web client (auto-created by Google Service) and add your full domain name. (See the screenshot below for guidance.)
You've successfully set up Firebase for the web version of your app.
After completing all the above steps, follow these commands to build and deploy your web version:
1. Run Web on Chrome:
If web support is not enabled, run the following command:
flutter config --enable-web
Use the following command to run your app on Chrome:
flutter run -d chrome --web-renderer html
2. Build Web Version:
Make a build of the web version using the command below:
flutter build web --web-renderer auto --release
3. Deploy the Web Version:
Upload the contents of the build / web directory to your web hosting service.
Test the deployed web version on multiple browsers and devices to ensure everything works as expected.
To assist our customers, we stay in constant touch to provide any needed assistance regarding our products.
Our support is available from Monday to Friday, 10:00 AM to 6:00 PM IST (GMT +5:30) – We are a team located in India – Asia.
Typically, we reply to all customer questions and queries within 24 hours via comments, our support forum, or emails.
Your Feedback
Dear valuable customer,
Thank you very much for choosing our product. It's our pleasure to provide top-notch service to you.
Please give us your honest feedback, which will help us make our product stronger and more reliable..
DivineTechs has a creative and dedicated group of developers who specialize in app development and web application development.
We excel in delivering quality solutions to customers across the globe. Contact us today to find out how we can help you or for freelance work.